
Blackthorn arena гайд
Обновлено: 08.07.2024
21 янв. 2020 в 2:36 Short Guide For Current Version
One-Hand Weapon: Bad
Two-Hand Weapon: Good at AoE damage. Minor CC. Can take out a squad of gladiators if that squad is positioned correctly. Good at removing stamina. The DPS comes from the interplay between Wild Sweep, Reaper's Cleave, and Trio Slash. These abilities combined together are incredibly powerful even against a single opponent.
-Race: Human
-Stats: Strength (no other stat is needed)
--Overwhelming: 3
--Spiral Slash: 3
--Wild Sweep: 3
--Mighty Guard: 3
--Reaper's Cleave: 3
--Hilt Strike: 3
--Trio Slash: 3
--Two-hand weapon master: 3
--Gladiator: 3
--Kick down: 1
--Medium armour expert: 3
--Battle furor: 3
--Distance attack: 1 (attack speed too slow to go any higher on this)
--Commander: 1
--First Aid: 3 (because why not)
--Stimulate: 3 (allows entire team to buff itself)
--Rescue: 3
--Condemn: 1
--Harasser: 3 (don't know if this works as I think it does) (idea is that everything that gets hit gets debuffed with this dodge penalty)
--Power in numbers: 1 (random extra point)
--Rogue: 1
--Cunning: 3
--Evasion: 1
Weapon & Shield: Probably the most broken class in the game. Can achieve 100% block rate. A great support class that is completely immortal.
-Race: Dwarf
-Equipment: Dueling sword + solidarity + champion's cloak + heavy armor for 100%+ block
-Stats: Endurance
--Expert blocker: 3
--Knock shield: 1
--Stone like: 1
--Sentry: 1
--Jump slash: 1
--Shield master: 1
--Commander: 3
--First aid: 3
--Stimulate: 3
--Rescue: 3
--Power in numbers: 3
--War roar: 3
--War banner: 3
--Defender: 3
--Impair attack: 1
--Heart of beast: 1
--Unyielding: 2 (should proc dwarven son of rock for heal to 30%)
--Deterrent: 1 (attacks so slowly with such low accuracy that this doesn't do much)
--Intercept: 1 (for when a target changes targets, though it has a minimum range, so limited use)
--Guardian: 3
--Focus block: 1 (no need to ever use this)
--Heavy armor expert: 3 (to get movement speed up)
--Fortress: 3
Ranged Weapon: Ok at taking out groups. Ok at taking out single targets. Very good at kiting due to high movement speed. Can kill anything expect Defenders and true Rogues.
-Race: Elf
-Stats: Agility and Precision (24/18) with remaining points into intelligence when approaching 25 so no points are wasted.
--Power shoot: 3 (good for team fights)
--Disabled shoot: 3 (good kiting ability)
--Falcon eye: 3
--Take the wind: 3
--Penetrating missile: 3 (good for team fights)
--Multi shoot: 3 (good for 1v1s and team fights, 300% damage if you aim it right)
--Execute shoot: 3? (not sure if this is actually good yet)
--Range weapon master: 1
--Rogue: 1
--Cunning: 3
--Evasion: 1
--Blinding dust: 1
--Light armour expert: 3
--Ranger: 3
--Strider: 3
--Dodge missile: 3
--Avenger: 3? (not sure how this actually procs)
--Close encounter: 1
--Slide strafe: 3 (not sure how good this actually is)
--Black flip shot: 1
Dual Weapon: Best used as assassin style class. Should not fight head on. Instead should skirt along the side and hit gladiators in the back. Can go around a fight and go after archers very effectively as well. While 2-handed's can do a lot of damage, a 2-handed's damage is not sustained. It is burst. This class is the clean-up crew and can do pretty decent sustained DPS, more-so than a ranger can. They move extremely fast and nothing can escape them. They are just harder to use than rangers as they have very low health. They can easily get out of danger though due to their incredibly high movement speed.
-Race: Elf
-Stats: Agility, Precision, Intelligence, Strength (not sure if agility actually increases attack speed, so agility may be best dropped for precision and intelligence with a little strength) (I ran 24 agility, 19 precision, 12 intelligence, 13 strength)
--Cross cut: 3
--Quick withdraw: 3
--Harmonious wield: 3
--Speed burst: 3
--Serial ♥♥♥♥♥♥: 3
--Dual weapon master: 1
--Gladiator: 3
--Distance attack: 3
--Rogue: 3
--Cunning: 3
--Evasion: 1
--Lurk: 3? (not sure how well this works)
--Blinding Dust: 1
--Light armour expert: 1
--Surprise attack: 3? (not sure on the conditions for a surprise attack)
--Envenomed weapon: 3
--Low profile: 3 (important to keep enemy from turning around to face you)
--Ranger: 1
--Strider: 3
--Dodge missile: 1
I went with light armor, short cloak, and double Tai Chi.
Polearm: Doesn't do quite as much damage as a greatsword. Actually does a LOT less. However, where it lacks in damage it makes up for in cc. It has a few great aoe cc abilities and is the only class that actually has aoe cc. Can be useful to keep a group of gladiators stuck so that your great sword can mow them down.
-Race: Human
-Stats: Strength
--Precision attack: 3
--Upstroke: 3 (useful on single large targets)
--Armor penetration: 3
--Perforate stab: 3
--Round sweep: 3 (not great, but it's a follow up for the aoe cc)
--Stumble sweep: 3 (best ability on polearm)
--Polearms weapon master: 1
--Gladiator: 3
--Kick down: 1
--Medium armour expert: 3
--Battle furor: 3
--Distance attack : 1
--Power strike: 3 (polearm does do higher damage than great sword after all)
--Commander: 1
--First aid: 3
--Stimulate: 3
--Rescue: 3
--Condemn: 1
--Harasser: 3? (mainly off of abilities) (not sure if this would work)
--Power in numbers: 1 (random extra point)
--Rogue: 1
--Cunning: 3
--Evasion: 1
Team compositions:
I usually run one of the following teams
2-hander, 2-hander, defender, ranger
2-hander, polearm, defender, ranger
2-hander, defender, ranger, dual-wielder
For solo I typically go 2-hander. Ranger is REALLY good but it has a few very hard counters, making it dangerous to run. Don't want to be using a ranger when the opponent's a defender. That'll be a tie as the defender can't hit the ranger and the ranger can't hit the defender : P.
My opening move in 4-man is I jump with defender and then run forward to get close to enemy gladiators. I then taunt them. Meanwhile I flank on either side with the 2-hander/polearm or 2-hander/assassin. I move the ranger up a bit and then target a non-armored enemy. If the enemies are lined up I do a power shot. I execute battle furor + guard stance and roar. When I get close enough I use stumble sweep on polearm and trio slash on 2-hander or double trio slash. As I'm starting this I put down a banner. After stumble sweep/trio slash I then run round sweep and spiral slash. I move the ranger up with slide strafe and unload a multi shot. If anything's left alive I just let my gladiators chase it. If I'm running an assassin I run the assassin along the side and target any squishy's like dual wielders/rangers. I always run the assassin behind the squishy target, pop speed burst + envenomed blades, and then open up with serial pricks followed by cross cut. If I'm only running one aoe, like a single 2-hander, to bring in the assassin, the enemy gladiators are usually at very low health after the aoe combo. I just run the assassin from target to target to finish each one off. The extremely fast movement speed and attack speed doesn't give the enemy gladiators any chance to recover. I usually take 0 damage.
Изменить язык
Полная версия


Арена Блэкторн
Арена Блэкторн
Статистика:
Читайте и оценивайте руководства пользователей по этой игре — либо напишите собственное и поделитесь советами с сообществом.
Популярные категории


Characters
Руководств: 6


Руководств: 6


Walkthroughs
Руководств: 5


Gameplay Basics
Руководств: 4


Руководств: 2


Maps Or Levels
1 руководство


1 руководство


1 руководство


1 руководство


1 руководство


Achievements
1 руководство
Популярные руководства Steam Пользовательские руководства, советы и прохождения
With such a wide array of different styles & genres, I thought I'd share some tips I've learned.
Guide to Gladiator Selection and Training
Starting Out
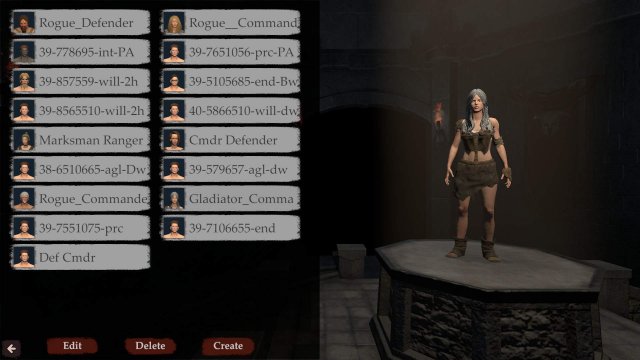
The very first thing you should do is go back to the main menu and open the Role Library. From here you can create any number of starting slaves. While it seems strange to start there, this feature was added during beta at the request of players. Your first 2 slaves form the core of your team, and players would restart repeatedly to get a decent pair.
Open the attributes section and Roll up your slave stats. They start at a flat 30 pts, and you role from 5-10 more. Spam that button if you want, because the most important attribute for your gladiator slave isnt here. While it can be useful to have 10 strength and 10 willpower this is not the game maker, same with the weapon preference which is randomly rolled at this time too.
Your slave will have a pair of " Genre ". This is their natural talents that will determine the skill trees available and subsequent fighting styles. Some pairs work very well together, while others do not .
I should emphasize that this is the only point you can assign Genre. You can also set the race and sex at this point. The appearance is less important since you can change it later.
Incidently, all the slaves that you create in this library become available as seed characters for the slave market. They will appear with the name & attributes you've assigned, with a random race/sex and appearance. I have been naming my role library slaves after their genre-pair for easy identification.
What the Heck Are Genre?

Most of the classes do get clear bonuses from attributes not focused upon, Berserker for example gets bonuses for all six. I have listed those that clearly give the most bonus to that genre.
Gladiator focus: Strength, Agility, Willpower
- Melee damage experts, with a weight reduction bonus to Medium armor, they can self buff, kick enemies down and spin for area damage.
- Usually the squad leader, he buffs his allies & debuffs the enemy. This commander can also heal with first aid, and even revive fallen comrades.
- Combat, accuracy and dodge focused, can force enemies to fight him and even disarm them.
- The heavy armor expert, with damage resistances and a weight reduction buff, that specializes in drawing aggro, can guard allies, intercept and impair enemies.
- With the abilities to lurk, reduce their threat and backstab, they can surprise attack enemies. They also use dirty tricks like blinding dust and envenomed blades, and get a reduction for light armor.
- Highly agile & mobile on the field of battle, getting bonuses at short range. They melee and even knock enemies down with their bow. They specialise in multiple & trick shots.
- He is all about chasing down the enemy, and flailing at them as rapidly as possible. They also get even faster as their health gets lower.
- The snipers of this world, they can slow down & concentrate for better accuracy. Allowing them to curve arrows, jump them to multiple targets, knock enemies down and even set them on fire.
Now You Can Start the Game. Almost
So now you can start your game. I have tried different modes & find that Senior (the default) is nicely balanced. I am old and gave up keyboard bashing a decade or so back so I play in no manual combat mode and concentrate on building my team & let them fight themselves.
Ironman Mode will prevent you from save-scumming to win all your fights, however since there are traps all over the field in many of the arenas, and bad RNG can get a highly trained valuable slave killed for standing in the wrong place too long. I wont use it. Your choice, but not recommended.
In the character creation screen you can use the same appearance selection system to create your arena master and then name him/her. Now finally, you can hit Start.

Eventually after the monologue videos, background and presentation are done your slaves will come out & fight their first battle. The AI will provide them with suitable starting gear, that is based upon their initial stats as well as your difficulty choice.
Creating an Effective Team

Hurray you won your first battle!
Unless you didn't.
You can now go through your menu & look at your characters abilities & items. At least one of the two slaves will have levelled up, so you can start building. Your first points will probably go to the weapon type you want to specialise in. That is, if it didnt already start with it.
It is generally better to specialise in only one weapon as it takes a lot of time & effort to master even that one. Any points spent in the skill tree of a weapon you dont swing are producing no benefit.
You should go to your treatment center, and assign your injured slaves to heal. You are going to go to market while they do so. This next bit is truly important, and essential to your success. When you travel to market one day will pass and you will be unable to battle with your gladiators on this day.
Each of the three different markets sells slaves, weapons, armor & other items .. with a slightly different flavor to them. When you are done with one market, do not click the Back Arrow at the bottom of the screen, instead go to the menu & select a different market .. you can travel between markets multiple times before returning home .. and only one day will pass.
Use this ability to jump back and forth between markets, take your time now because it will pay off later. The slave markets will have some pre-levelled slaves available for up to 5x the cost of a normal slave (1 gold vs 20 silver) and can be used to help you start to great effect. This can be a gamble, as he could have 10 pts into a skill tree you want, but in the wrong skills.
First Things First
Your slaves left back at the treatment center will heal..slowly, You want to increase that. Gladiators will get injured and gain no experience while recovering, so first thing to do it hire a slave with the Medic ability. You will also want to hire one with the Coach abilty at this time, and this is where jumping from market to market really helps.
You will want a Cook, but you dont need one yet as the only food available is bread & water. Better food & drink will help with health and morale, very helpful once you get established.
You should already have someone willing to Torture his fellow slaves, as that is the easiest way to raise obedience. and not a job you need to assign someone to permanently.
Fnally you can start looking for & buying new slaves to be turned into gladiators.
Once you own them, you may change their names and appearance as much and as often as you wish. Race and sex are fixed.

- Humans are the baseline character, and recieve a racial trait of fast learner, giving them one extra skill point every 5 levels (+10%).
- Elves are Lithe, letting them move 15% faster.
- Dwarves are Son's of a Rock, and have 25% reduced weight penalty and have increased health regen below 30% HP.
- Beastmen are Unchained Beasts and gain 20% Melee damage below 30% HP.
Speaking of funds, try and keep 20 - 30 days worth of cash available, since if you run out of money you lose. You will spend less than 10 silver per day at the start, so 1 or 2 gold coins is usually enough to start.
Can I Start Fighting Now?
The short answer is Yes!
I fumbled with the map to try & locate places to battle, don't do that. Use the Arena menu on the drop down list on the right. This gives a list of all arenas, and their scheduled events. There are five basic types of event.
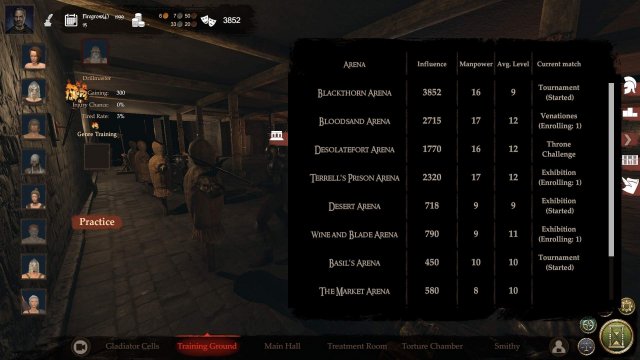
- Exhibition is a team vs team event with 1-4 members all entering and doing battle at once.
- Tag Match has one member from each team battling at a time, with the loser being replaced with a fresh face until one team or another is completely eliminated.
- Tournaments have 4, 8 or 16 teams pairing off & eliminating each others as they advance rounds to the final match. This is the spring games format.
- A Throne match pits two teams randomly, and the winner then has to battle each of the other teams entered sequentially until you have defeated them all. or are defeated.
- Venatoiones, or beast fights pit from 1-4 gladiators against some random group of monsters. You cannot bet on these fights, but you do get the animal parts when you defeat them.
Choose your fights carefully, and take the time to heal up fully between matches. You have 90 - 95 turns until the spring games, so there is no rush. When you have learned the secret of patience, you will succeed.
You will need to keep winning contests to keep that purse full. Make certain to bet on ALL your own fights (unless you plan on losing?) You can only bet 1000 coins (10 silver) on any one fight, with 2:1 the average payout.(less if you are dominating) Early wins will payout from 10 - 20 silver on a win (plus your gambling winnings) so you can literally win only one fight every 3-4 days and not run out of coin. Later fights start paying out more but normally no more than 40-50 silver.
Once you win the Spring Tournament, hosting your own games at Blackthorn is like having a licence to print money. You do not even have to fight in them.
Tips, Tricks & Strategy
Like many fantasy element games the trifecta of tank-heals-dps works well. Defender genre has tank abilities, including some aggro management. Commanders heal & buff and for dps.
My own team also looks historically accurate, as I use a sword & board tank, a DPS with a Lance and a marksman. You will need 4 character to fight the tournament, but you should fill all 6 slots. At least one of those spares must be a tank to backup your main.
Battle damage to real damage conversion was recently reduced, making tournament more survivable. After each round the damage is applied to your actual health, so you can be disabled in one round but still fight the next at full health. The lower your true health is, the greater the chance for lethal damage to occur. I swapped my champion out for the spare on the last fight of the tourney even though she was not disabled, because I wanted to complete the final challenge.
No spoilers, but you do want to complete the final challenge, or you lose access to 1 of the 4 major arenas. These give the best competitions & rewards.

This is a Simple, but detailed guide on the Role Library for new players.
Role Library Introduction
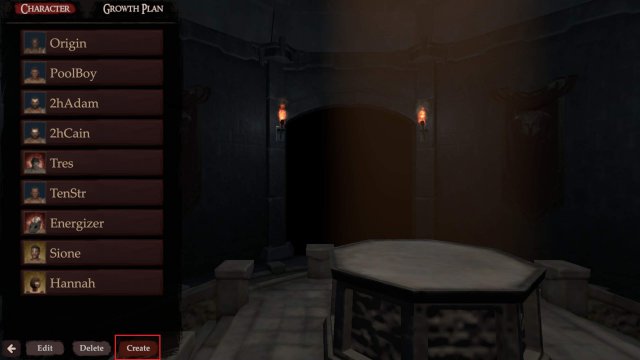
A note to begin with for this guide is that I will be boxing important details in pictures with a Red Rectangle, and giving Bold texts to important terms within the guide. I want to mention that so that no one gets confused at how this guide teaches the Role Library functions. With that out of the way lets begin. The Role Library is a function in the game that allows the creation of starting slaves/gladiators. This function is located on the starting menu under the load button, as seen on the picture bellow.
It is a very useful function in creating starting slaves/gladiators that serve as the back bone of your team. Here you can create, and alter slaves/gladiators to meet your own desired look, starting classes, and stats. Also within the Role Library you can create Growth Plans which can be applied to slaves/gladiators, and will apply Attribute points and Skill Points according to your designation within the Growth Plan. That will be explained in greater detail further into the guide. Below is what you should see when you click the Role Library button in the main menu. When you click it the first time, or haven't yet created a slave, then it will be empty unlike the picture.
Creating Your First Slave / Gladiator
In this section I will be going over even the most obvious detail, so as many people as possible can utilize this important feature, so I hope those that already know whats going on can be patient as you look for something specific. You begin the creation process of your first slave/gladiator by clicking the create button on the bottom left of the screen.
When you click on the create button the game should take you to the beginning of the creation process, which is shown in the picture below.
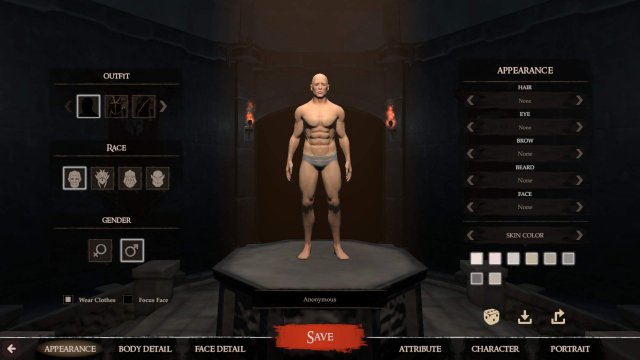
Here you will take notice of a few important things such as Outfit, Race, Gender, and Appearance. We will first start with the Outfit section of the above picture. Here you will be able to see your slave/gladiator in a few different outfits. Putting on a certain outfit does not apply that class of armor on your slave when you start the game. The game will randomly choose what armor you get depending on difficulty and settings you make.
Next is Race. Race is the first important decision you make in regard to your slave's/gladiator's build because each Race has its own starting Trait that affects gameplay. I won't go into detail about how each trait can affect your build because there are guides dedicated to that specific thing, instead I'll just give a rundown on what each trait does for each race. Listing first the race name, then the trait they have, and ending with the description of the trait, or what it does.
- 1) Humans - Trait: Quick Learner - Description: Gain 1 extra skill point every 5 levels
- 2) Bruteman - Trait: Unchained Beast - Description: Melee Damage increased by 20% while health is under 30% of its total value
- 3) Elf - Trait: Lithe - Description: Movement Speed increased by 15%
- 4) Dwarf - Trait: Son of Stone - Description: Health Restoration increased by 1 when health under 30%. Reduce all load bearing penalty by 25%.
After you are finished with the initial creation of your character you may notice that there is an option for Body Details, as shown by the picture below. These are body sliders. The body sliders allow for different body proportions and allow you to create even more unique slaves/gladiators. The Face Detail section has sliders as well, but specifically for facial attributes. Such as ears size, mouth size, and so on.
When finished with detailing and creating the look of your slave/gladiator we can move on to the combat attributes you want to prioritize for your slaves/gladiators. We can begin that by clicking on the Attribute button to the right of the big red save button. The picture bellow will box it, along with the attribute section itself.
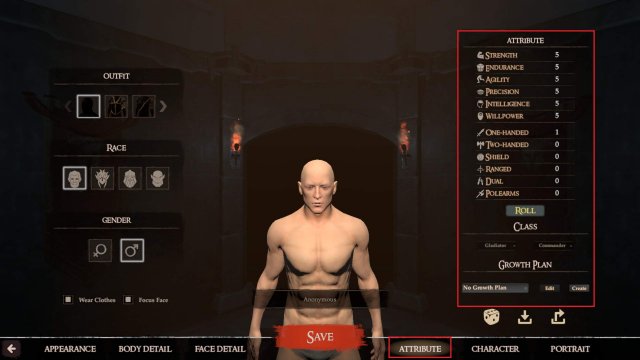
Here we will be able to adjust our slaves/gladiators combat focus. If you mouse over the attributes a little description box will appear that will tell you what each attribute does. Use that to begin to visualize what you want your slaves/gladiators to be good at. After you've figured what you want to do with each gladiator use the Roll button to randomize the attributes until they fall close to what you want. In Blackthorn Arena you can't place attribute points where you want like a regular Rpg, but instead as mentioned above you Roll for the stats you want, and keep Rolling until you get it, or something close.
Another important decision to be made about your slaves/gladiators in this Attribute section is the Classes you want them to have. Each slave/gladiator in the game is entitled to 2 begging classes. These Classes are Gladiator, Commander, Marksman, Ranger, Duelist, Rouge, Defender, and Berserker. The selection is also shown in the below picture. What you choose is up to you and the build you are working with.

Right beneath the Class section of the Attributes section is Growth plan. In this section you will be able to apply growth plans that you have made. Further details about Growth Plans will be in the Growth Plan section of the Guide.
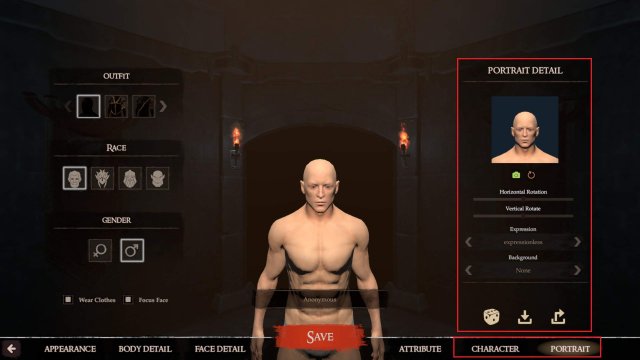
The Last two section of the character creation is Character, which includes customization for voice pose and face paint, and Portrait, which includes customization for the portrait you see in game for your slave/gladiator. Both are represented visually below.

That concludes each of the aspects of the character creation portion of the Role Library. If you have more questions on the subject you can leave a comment and I will do my best to answer. Don't be shy to ask a dumb question, I wrote this guide because the Role Library kinda stumped me when I first started playing the game, and I have no idea why. I would use the random npc's that they gave me in the beginning of the game and kept restarting until I got the right ones. I finally went back and just figured it out so I get not understanding something that seems simple. I hope this guide helped with any question in regards to Character Creation within the Role Library.
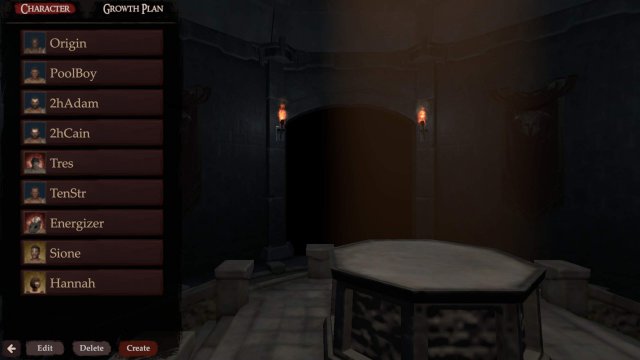
Growth Plan Basics
Note, this Guide is not an in-depth guide on the Growth plan, but instead an introduction and overview of the system.
Growth Plans are a system given to the player that allows us to apply automatic progression to slaves/gladiators which frees us from allocating skill points and attribute points ourselves. Simply it is a plan we create that puts attribute points and skill points where we want them to go automatically according to what we put in the plan. We start this process off by clicking the Growth Plan button in the top left within the Role Library. As shown in the picture below.

After we have entered the growth plan section of the role library we click the create button to start the creation of your new growth plan. When doing so a prompt will pop up which will give you a spot to name your new growth plan. You can name this whatever you want, it doesn't have an affect on the growth plan.
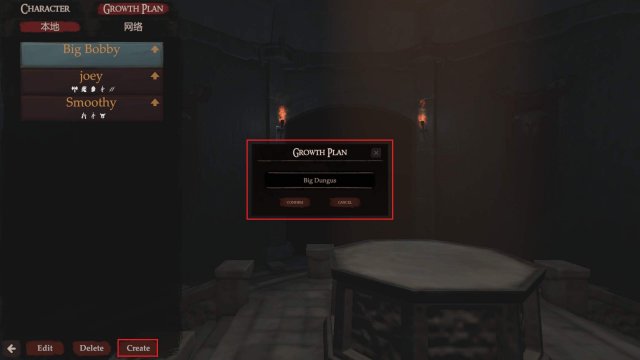
After you confirm the name the Growth Plan window will appear looking like the bellow picture.
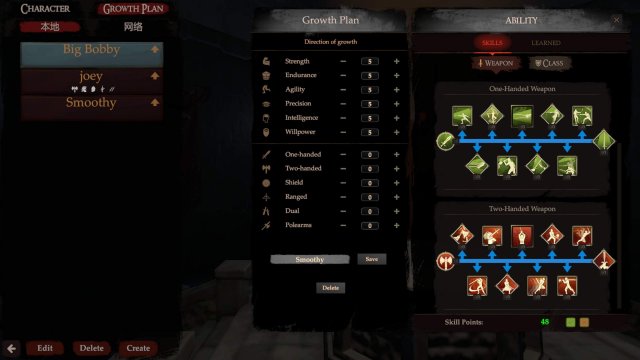
When you get to this point some general important things to note are the skill points in the bottom right, the classes that you can put those points into, and the attributes on the left of the classes. The skill points on the bottom right indicate the amount you can spend on the skills you want the Growth Plan to cover, whether weapon skills, or class skills. The attribute tree on the left of the class/weapon skills lets you set the level you want a specific attribute to eventually reach. Thats pretty much it for the introduction to the growth plan. I might improve upon this section later, but for now it'll do for the purpose of introduction. Hope it helps!!
Читайте также: