
Single number reach что это
Обновлено: 17.05.2024
This document describes the inputs and modifications commonly used when configuring Cisco Unified Mobility Application known as Mobile Connect, it is also commonly called as Single Number Reach (SNR) with the Cisco Unified Communication Manager Administrator (CUCM) application.
Configure
When you work with CUCM, the performed tasks are related to these activities:
- User Configuration
- Remote Destination Profile Configuration
- Remote Destination Configuration
User Configuration

You are directed to a User Device Association page, from where you can select the device which needs to be associated as the deskphone of the user and then click Save Selected/Changes, as shown in the image:

Once done, as shown in the image you must see the device name in the section controlled devices.

As shown in the image select the Primary extension for the device.

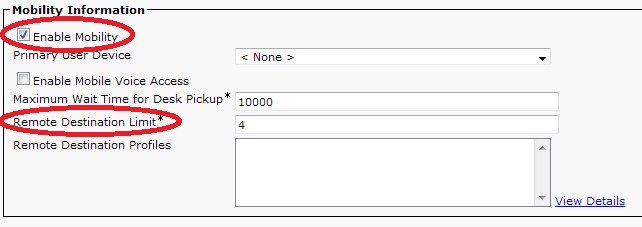
Check the Enable Mobility check box. You can also, modify the Maximum Wait Time for Desk Pickup and Remote Destination Limit if required. Moreover, the default values can be seen in the image.

Remote Destination Profile Configuration
Create a Remote Destination Profile (RDP) for the end user .
In order to create a new RDP profile, navigate to Device > Device Settings > Remote Destination Profile > Add new.

Click Save, now you can see an option to add a new Directory number (DN) .
Click Add a new DN to navigate to directory number configuration, where you need to specify the directory number of the desk phone with which you need to associate the RDP and then click Save.

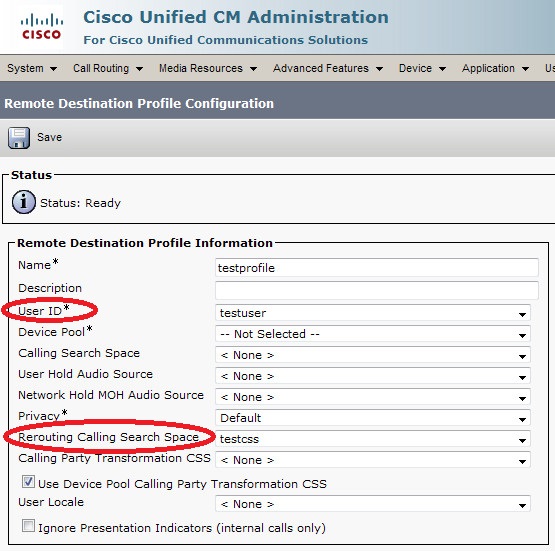
It is also important to note that the CUCM attempts to reach the remote destination through the Rerouting calling search Space.

After you save the directory number, specify the correct CSS against Rerouting calling search space, click Add a New Remote Destination, as shown in the image:

Remote Destination Configuration
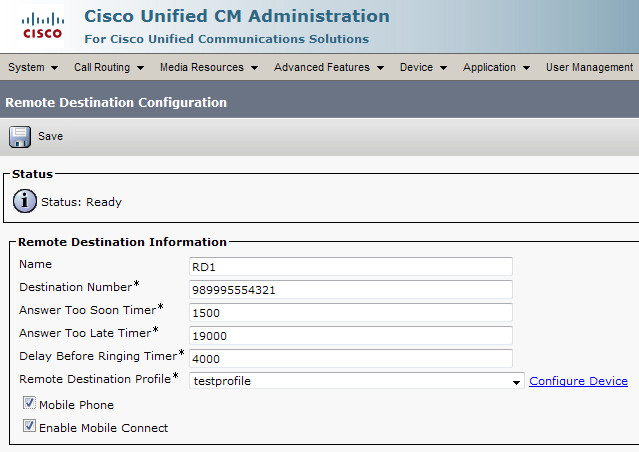
Specify the Destination number, as this is the number for your Remote detination .
Ensure that the check box, Enable UNified Mobility features, Enable Single Number Reach, Enable Move to Mobile is checked.
Single Number Reach Voicemail Policy provides two options Timer control and User Control, of which the former one is default.
Under the section Timer information, you can specify the amount of delay before which the Remote Destination should ring.
In case if the Remote Destination is required to ring immediately, you should set the Wait* as zero.
It is also important to calibrate the time in which the service provider of the remote destination sends the call to the voice-mail of the remote destination. The Stop ringing this phone after value should be set lesser then that to ensure that
call does not go to the voicemail of the cell phone. This time value is specified against Stop ringing this phone after.
In previous call manager version, these parameters were there with different names:
- Delay before ringing timer
- Answer too soon timer
- Answer too late timer

If the SNR voicemail policy is confgured for User Control, timer information changes as shown in the image:

In case the SNR configuration needs to be restriceted based on time and day then these options are modified as required. If no restriction is needed to be applied then Ring Schedule should be set to All the time and When receiving a call
during the above ring schedule should be set to Always ring this destination.
After you complete the configuration of remote destination, click Save.

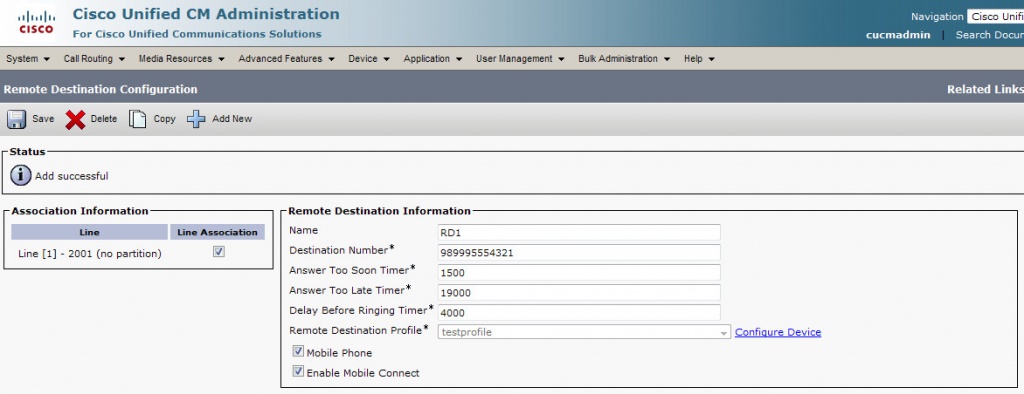
Check the checkbox, which is next to the line and click Save.

Настройка Mobile Connect в CUCM

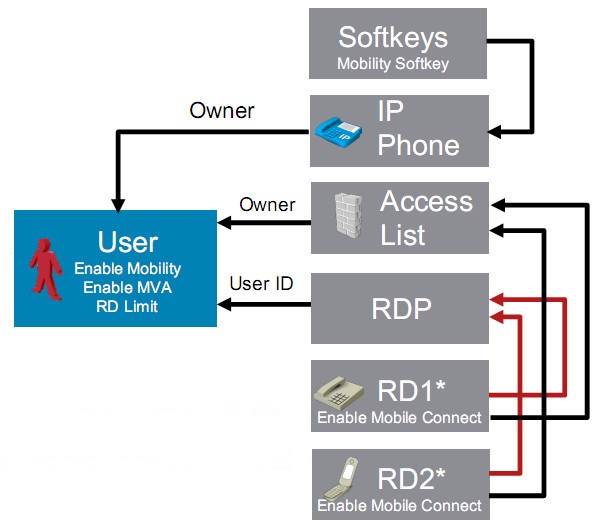
User - это End User, известный CUCM, для которого включен функционал Mobile Connect. Фактически, когда речь заходит о какой-то мобильности в CUCM, во главу угла всегда ставится пользователь, а не устройство, поскольку речь идет о предоставлении collaboration сервисов какому-то человеку, а не конкретному устройству. С пользователем у нас будут ассоциированы офисный телефон и RDP.
IP phone и Softkeys. С телефоном в целом несложно: как уже было сказано, с ним надо ассоциировать конкретного пользователя. Но возможно, на телефоне в режиме on-hook нам понадобится софтовая кнопка Mobile. С ее помощью наш пользователь сможет перебросить уже активный вызов на офисный телефон, если вызов уже организован на мобильный телефон. В этом случае кнопку Mobile придется добавить на телефон через Softkey Template.
Access list. Это необязательный элемент, однако его использование позволяет фильтровать входящие вызовы на мобильный телефон на основании номера вызывающего абонента. Достаточно удобно, если требуется, чтобы до Remote Destination добирались не все вызовы, а только определенные. Access List формируется в конфигурации отдельно, а затем привязывается к RDP.
Конфигурация Mobile Connect является достаточно несложной. Начать стоит с создания End User, поскольку, как было показано выше, он является центральным элементом всей логики Mobile Connect. Пользователь может быть создан любым возможным способом, важно лишь включить для него фичу Mobile Connect, поставив в настройках галочку Enable Mobility:

Здесь же, кстати, можно обозначить максимальное количество Remote Destination (то есть внешних номеров), которыми этот End User сможет пользоваться.
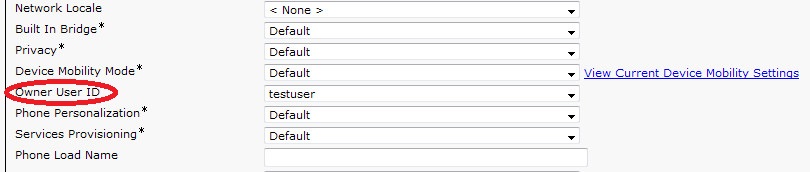
После этого необходимо привязать данного пользователя к офисному телефону, которым он пользуется. Делается это с помощью стандатной опции Owner User ID в настройках самого телефона:

После этого можно переходить к настройке сущностей, специфичных именно для функционала Mobile Connect. Начнем мы с создания Remote Destination Profile. Создаются и настраиваются они в меню Device > Device Settings > Remote Destination Profile. В настройках нового RDP в обязательном порядке нужно указать того же самого End User, о котором мы говорили ранее. Делается это в поле User ID. Стоит обратить внимание также на поле Rerouting Calling Search Space. Это CSS, который CUCM будет использовать для исходящего вызова в сторону Remote Destination номеров, когда будет обрабатывать входящий вызов на офисный телефон. Этот CSS должен обеспечить доступность Route Pattern, который используется для маршрутизации исходящего вызова на Remote Destination:

После сохранения конфигурации RDP у нас появится возможность задать для него какие-то линии. На одну из линий назначаем тот же DN, который используется на офисном телефоне сотрудника, и для которого необходимо поведение, к которому приводит Mobile Connect, тем самым формируя shared line.

Далее переходим по ссылке Add a New Remote Destination, и попадаем в меню задания внешних номеров:
Помимо достаточно очевидного задания внешнего номера тут можно обратить внимание на следующие параметры:
Answer Too Soon Timer - регламентирует минимальный период времени, в течение которого вызов должен посылаться на Remote Destination перед ответом абонента. Если Remote Destination отвечает на вызов до истечения этого таймера, то вызов сбрасывается с Remote Destination и направляется на корпоративный VoiceMail (если таковой имеется). Этот таймер позволяет быть уверенным в том, что если мобильный телефон у сотрудника выключен или находится вне зоны действия сети, то вызов не попадет на мобильный VoiceMail.
Answer Too Late Timer - определяет, максимальную продолжительность посылки вызова на Remote Destination. Здесь нужно указать время, которого будет достаточно для того, чтобы абонент успел ответить.
Delay Before Ringing Timer - определяет задержку, с которой CUCM направит вызов на Remote Destination после получения входящего вызова на офисный телефон сотрудника.
Значения всех параметров задаются в милисекундах.
При настройке Remote Destination необходимо не забыть поставить галочку Line Association рядом с тем DN, с которым мы хотим ассоциировать внешний номер. Также обязательно ставим галочку Enable Mobile Connect. Опция Mobile Phone позволит перебросить активный вызов с мобильного телефона на офисный по нажатию на кнопку Mobility на офисном телефоне.

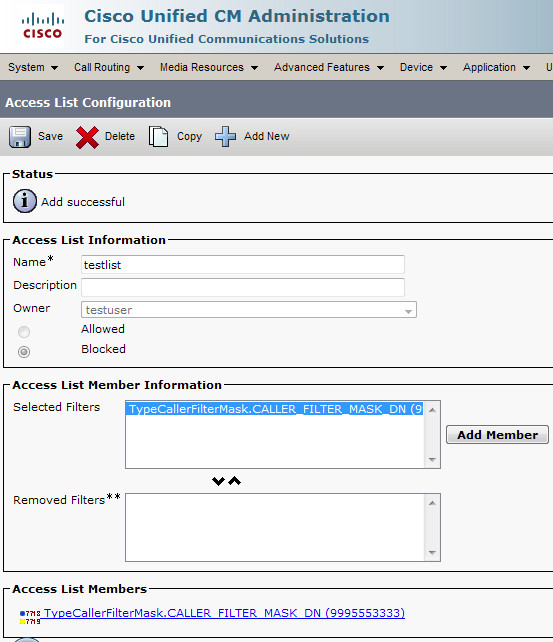
Если необходима какая-то фильтрация вызовов на Remote Destination, то далее можно перейти к настройке Access List. Настраиваются они в меню Call Routing > Class of Control > Access List. При настройке необходимо выбрать, какой именно лист мы формируем: Black List или White List, выбрав опцию Blocked или Allowed соответственно. Далее с помощью кнопки Add Member можно заполнить лист соответствующими номерами или их диапазонами:


Привязка созданного листа производится на странице настройки Remote Destination. Можно выбрать два варианта: направлять вызов на внешний номер, если вызывающий абонент присутствует в листе, или наоборот - не направлять, если присутствует. Обратите внимание, что помимо этого в настройках Remote Destination можно задать Ring Schedule. Это позволяет указать расписание, по которому вообще разрешено направлять вызовы на внешний номер. Здесь можно указать, например, только рабочие часы нашего сотрудника. Или наоборот: только нерабочие часы, чтобы после окончания рабочего дня наш сотрудник мог отвечать на входящие вызовы, но не по офисному телефону, а по мобильному:
При этом есть такая особенность: если одновременно настроено и расписание и Access List, то расписание проверяется первым. То есть, если вызов приходит в неразрешенное время, то Access List даже не проверяется, и вызов на внешний номер, конечно же, не направляется.
Эта несложная процедура позволит настроить функционал Single Number Reach, позволяющей сотрудникам отвечать на входящие вызовы на свой офисный номер с личных мобильных или домашних телефонов вне зависимости от того, откуда эти вызовы совершаются.
Troubleshoot
There is currently no specific troubleshooting information available for this configuration.
Background Information
Cisco Unified Mobility application known as Mobile Connect, commonly called Single Number Reach (SNR), provides Cisco Unified Communications users with the ability to be reached via a single enterprise phone number that rings on both their IP desk phone and their cellular phone (Remote Destination), simultaneously. Mobile Connect users can pick up an incoming call on either of their desk or cellular phones and at any point and can move the in-progress call from one of these phones to the other without interruption.
Verify
Use this section in order to confirm that your configuration works properly.
Verify that the name of the Remote Destination Profile, which is reflected on the End user page.

On the directory number page, you now must see the name of th Remote Destination Profile in the section Associated devices.

Perform a test through Dialed number analysis to check whether the call manager directs the call to the remote destination based on configuration or not.
In order to perform a dialed number analysis, navigate to Cisco Unified Serviceability > Tools > Dialed Number Analyzer > Analysis > Phones > Find > Choose the calling phone
Specify the Directory number of the desk phone and click Do Analysis.

On the Analysis output, the call is extended to the RDP along with the desk phone, which confirms the eventual effects of SNR configuration.


Prerequisites
Requirements
Cisco recommends that you have knowledge of these topics:
- Remote destination Phone cannot be a phone registered to the same cluster,It could be a phone in a different cluster or a PSTN phone across the trunk/gateway .
- Remote destination phone should be reachable from the cluster of the desk phone .
Components Used
The information in this document is based on these software versions:
The information in this document was created from the devices in a specific lab environment. All of the devices used in this document started with a cleared (default) configuration. If your network is live, make sure that you understand the potential impact of any command.
Single Number Reach
The Single Number Reach (SNR) feature allows users to answer incoming calls to their extension on either their desktop IP phone or at a remote destination, such as a mobile phone. Users can pick up active calls on the desktop phone or the remote phone without losing the connection. This enables callers to dial a single number to reach the phone user. Calls that are not answered can be forwarded to voice mail.
Remote destinations may include the following devices:
Mobile (cellular) phones.
IP phones not belonging to the same Cisco Unified CME router as the desktop phone.
Home phone numbers in the PSTN. Supported PSTN interfaces include PRI, BRI, SIP, and FXO.
For incoming calls to the SNR extension, Cisco Unified CME rings the desktop IP phone first. If the IP phone does not answer within the configured amount of time, it rings the configured remote number while continuing to ring the IP phone. Unanswered calls are sent to a configured voice-mail number.
The IP phone user has these options for handling calls to the SNR extension:
Pull back the call from the remote phone—Phone user can manually pull back the call to the SNR extension by pressing the Resume softkey, which disconnects the call from the remote phone.
Send the call to remote phone—Phone user can send the call to the remote phone by using the Mobility softkey. While connected to the call, the phone user can press the Mobility softkey and select Send call to mobile . The call is forwarded to the remote phone.
Enable or disable Single Number Reach—While the IP phone is in the idle state, the user can toggle the SNR feature on and off by using the Mobility softkey. If the user disables SNR, Cisco Unified CME does not ring the remote number.
IP phone users can modify their own SNR settings directly from the phone by using the menu available with the Services feature button. You must enable the feature on the phone to allow a phone user to access the user interface.
This feature is supported in Cisco Unified CME 7.1 and later versions on SCCP IP phones that support softkeys.
SNR Enhancements
Hardware Conference
In Cisco Unified CME 8.5, you can send a call to a mobile phone after joining a hardware conference. After joining the hardware conference, all conference callers are blind-transferred to hardware DN. The call character of the ephone changes from incoming call to outgoing call and you are able to send a call to the mobile.
Call Park, Call Pickup, and Call Retrieval
In earlier versions of Cisco Unified CME, Call Park, Call Pickup, and Call Retrieval features were not supported for SNR. Cisco Unified CME 8.5 and later versions allows you to park, pickup, or retrieve an SNR call,
Cisco Unified CME 8.5 enhances the SNR feature to allow you to see the local number on your cell phone instead of the calling party number. You can configure the snr calling number local command under ephone-dn configuration mode to view the caller ID of the SNR phone. For information on configuring SNR calling number local, see Configure Single Number Reach Enhancements on SCCP Phones.
Answer Too Soon Timer
On non-FXO ports, you can set an snr answer too soon timer to prevent the calls from rolling to the voice mailbox of your cell phone. When the cell phone rolls to the voice mail within the answer too soon timer range (1 to 5 seconds), the mobile phone call leg is immediately disconnected. You can configure the snr answer too soon command under ephone-dn mode. For more information, see Configure Single Number Reach Enhancements on SCCP Phones. The answer-too soon timer is not applicable when sending the call to a mobile.
SNR Phone Stops Ringing After Mobile Phone Answers
When SNR is deployed on non-FXO ports, if cell phone picks up an SNR call, you are connected to the call. The ephone stops ringing further and is placed on hold. You can configure the snr ring-stop command under ephone-dn configuration mode to stop the ephone from ringing and to place the phone on hold. For more information, see Configure Single Number Reach Enhancements on SCCP Phones.
Single Number Reach for Cisco Unified SIP IP Phones
Before Cisco Unified CME 9.0, the Single Number Reach (SNR) feature enabled the user to be reached on two numbers: a regular directory number (DN) on the ephone and a public switched telephone network (PSTN) connection (either a PRI/BRI/FXO port or a SIP interface). For incoming calls to the ephone, the Cisco Unified CME called the ephone DN first. When the ephone DN did not answer within a configured time, the Cisco Unified CME called a preconfigured PSTN number while continually calling the ephone DN.
In Cisco Unified CME 9.0 and later versions, the following SNR features are supported for Cisco Unified SIP IP phones:
Enable and disable the Extension Mobility (EM) feature on a Cisco Unified SIP IP phone—Use the Mobility softkey or PLK as a toggle or use the mobility and no mobility commands to enable or disable the Mobility feature on a Cisco Unified SIP IP phone.
Manual pull back of a call on a mobile phone—Use the Resume softkey to manually bring a call back to the SNR DN.
Send a call to a mobile PSTN phone—Send a call to the mobile PSTN phone using the Mobility softkey while the Cisco Unified SIP IP phone is on a call. Select “ Send call to mobile ” and the call is handed off to the mobile phone.
Send a call to a mobile phone regardless of whether the SNR phone is the originating or the terminating side—Ensure that the SNR feature is configured in voice register dn or ephone-dn configuration mode to send a call to a mobile phone regardless of whether the SNR phone is the originating or terminating side. Use the Mobility softkey, select “ Send call to mobile ,” and the call is handed off to the mobile phone.
For calls from a PSTN, local, or VoIP phone to a Cisco Unified SIP IP phone configured as an SNR phone, the Cisco Unified CME calls the SIP SNR or the mobile phone DN.
When you answer the call on the SIP SNR phone, you can send the call to the PSTN/BRI/PRI/SIP phone.
When you answer the call on the mobile phone, the Resume softkey is displayed on the SIP SNR phone and allows the call to be pulled back to the SIP SNR phone. You can repeatedly pull the call back from the PSTN phone to the SIP SNR phone or from the SIP SNR phone to the PSTN phone.
If the cfwd-noan keyword is configured and both the mobile and SIP SNR phones do not answer, the call is redirected to a preconfigured extension number when the end of a preconfigured time delay is reached.
The following shows how SNR phones configured with Cisco Unified SIP IP phones behave differently from those configured with Cisco Unified SCCP IP phones when sending a call to a mobile:
For Cisco Unified SCCP IP phones, the Resume softkey is displayed on the SCCP SNR phone as soon as the call is sent to the mobile phone.
For Cisco Unified SIP IP phones, the Resume softkey is displayed on the SIP SNR phone as soon as the mobile phone answers the call.
Cisco Unified CME 9.0 and later supports the SNR feature in Cisco Unified SIP 7906, 7911, 7941, 7942, 7945, 7961, 7962, 7965, 7970, 7971, 7975, 8961, 9951, and 9971 IP Phones.
Single Number Reach (SNR) support through MyPhoneApps on Unified CME is available for SIP Phones on the Cisco IP Phones 7800 and 8800 Series.
Virtual SNR DN for Cisco Unified SCCP IP Phones
A virtual SNR DN is a DN not associated with any registered phone. It can be called, forwarded to a preconfigured mobile phone, or put on an Auto Hold state when the mobile phone answers the call or the time delay is reached. In the Auto Hold state, the DN can either be floating or unregistered. A floating DN is a DN not configured for any phone while an unregistered DN is one associated with phones not registered to a Cisco Unified CME system.
Before Cisco Unified CME 9.0, an SNR DN feature did not launch when the SNR DN was not associated with any registered phone. Although a call could be forwarded to the mobile phone using the call-forward busy command, the SNR DN had to be configured under a phone. Users who were assigned floating DNs could not forward calls unless they had a phone assigned to them.
In Cisco Unified CME 9.0 and later versions, an SNR DN is not required to be associated with a registered phone to have the SNR DN feature launched. A call can be made to a virtual SNR DN and the SNR feature can be launched even when the SNR DN is not associated with any phone. A call to a virtual SNR DN can be forwarded to an auto-attendant service when the preconfigured mobile phone is out of service and the voice mail can be retrieved using the telephone or extension number assigned to the voice mailbox.
Although the virtual SNR DN feature is designed for SNR DNs that are not associated with registered phones, this feature also supports virtual SNR DNs that complete phone registration or login and registered DNs that become virtual when all associated registered phones become unregistered.
Configuring CUCM Single Number Reach feature

This article is about configuring Single Number Reach (aka Mobile Connect) feature in Cisco Unified Communications Manager (CUCM).
When you receive an incoming call on an extension number in a cluster, the Single Number Reach (SNR) enables rerouting the call not only to a DN, but also to a remote number. For example, that can be an employee's cell phone. If needed, you can configure rerouting to a group of remote numbers that belong to an employee.
Let's have a look at how SNR (Mobile Connect) actually works.
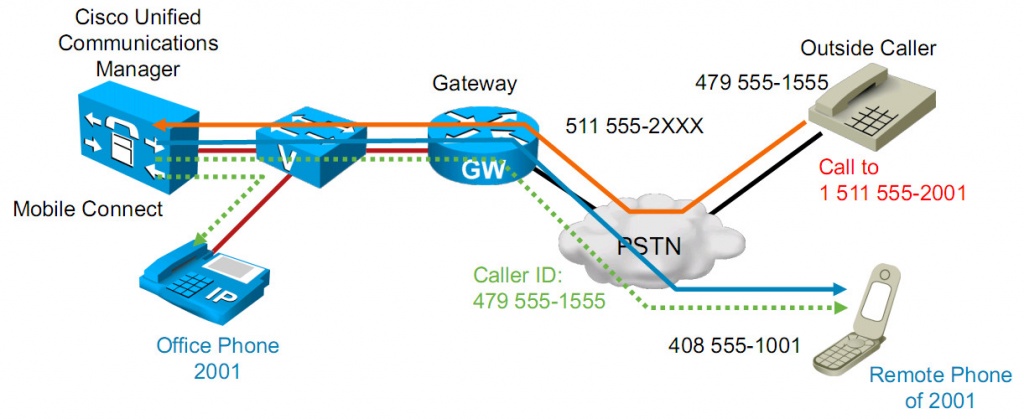
Basically, Mobile Connect provides functionality similar to Shared Line. The difference is that in this case a shared line is organized between an office phone and some remote device that isn't necessary in a cluster, not between the phones within a cluster.
The figure below illustrates this configuration:
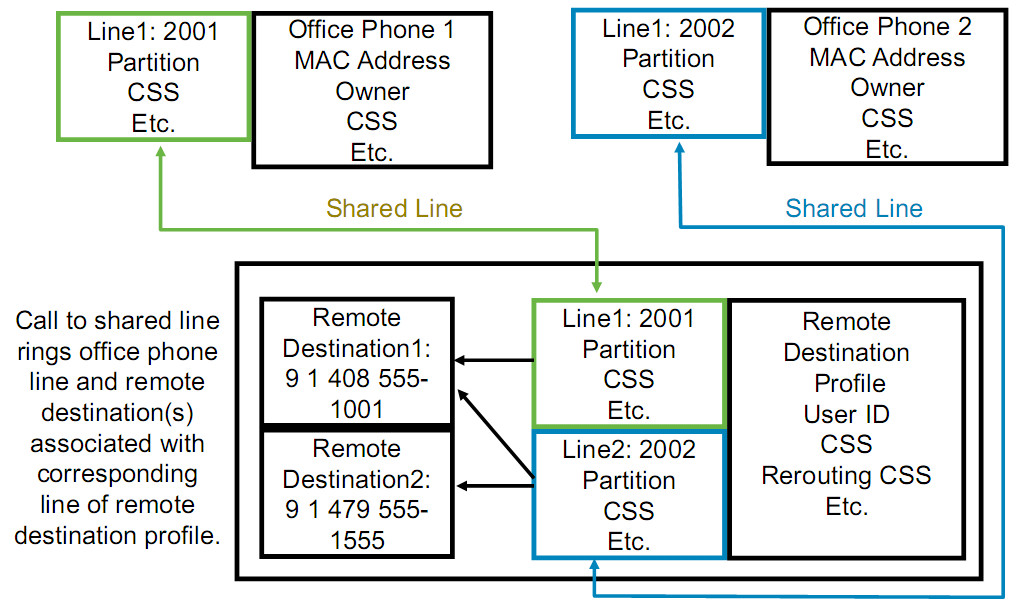
On this figure you can see that Mobile Connect creates a shared line between an office phone and a Remote Destination Profile (RDP). RDP reflects remote numbers in CUCM configuration. You can bind several Remote Destination numbers to a single DN using RDP. Note that Remote Destination Profile and Remote Destination are essential parts of Mobile Connect. Apart from them we'll also use the following entities: User, IP phone, Softkeys, Access list.
The User entity defines an end user registered in CUCM with Mobile Connect features enabled. Generally, the most important thing in CUCM is a user, not a device, because the services are provided to people, not to devices. That's why in the system a user is associated with an office phone and RDP.
Next, IP phone and Softkeys. A phone has to be associated with a certain user. The Mobile softkey provides an employee with an opportunity to redirect an active call to an office phone, if this call is coming to a cell phone. To add the Mobile button to the phone interface in on-hook mode, you'll need a Softkey Template.
Access list enables filtering incoming calls by the caller's phone number. This feature isn't necessary, but it can be handy. At first an Access list is created in the configuration parameters and then it is bound to a certain RDP.
Configuring Mobile Connect is relatively easy. First of all, you should create an End User that will be the center of all the system logic. There are several ways to create a user, but in any case the Enable Mobility option should be checked, as the figures show.
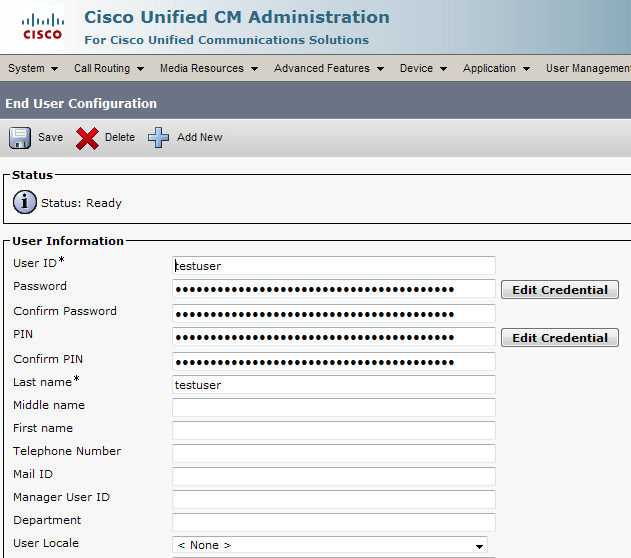
Here you can also define a limit for the quantity of remote phone numbers associated with this user. After that you should associate the user with the office phone number that he or she uses. For that purpose you can use Owner User ID in the phone parameters.
Now you can configure the entities that are essential for Mobile Connect. At first, you should create a Remote Destination Profile. To do this, proceed to Device -> Device Settings -> Remote Destination Profile.
You must specify the same End User (User ID field). Note the Rerouting Calling Search Space field. Here you can specify CSS that will be used for outgoing calls to Remote Destination numbers while processing an incoming call to an office phone. This CSS will ensure Route Pattern availability while routing an outgoing call to a Remote Destination.
Please save the RDP information. After that you'll be able to create lines. Specify the number used on the office phone that should have the calls redirected via Mobile Connect as one of the lines.
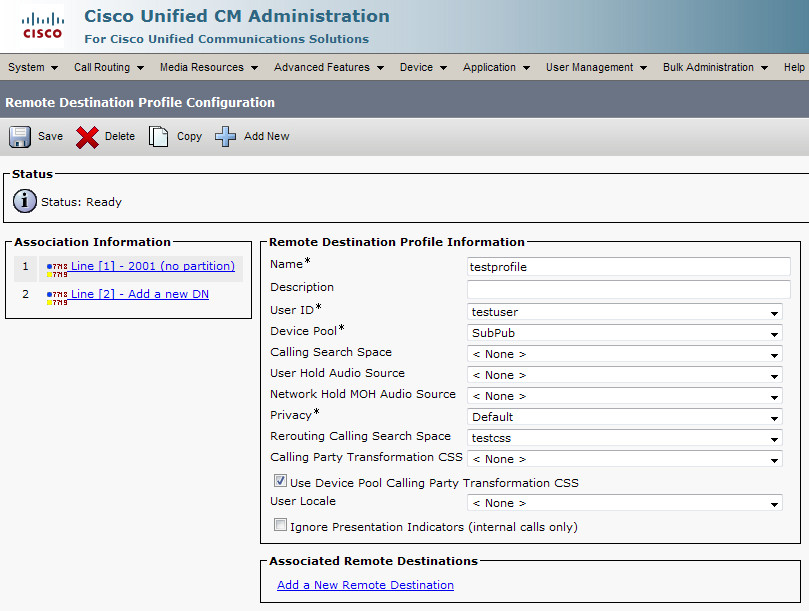
Follow the "Add a New Remote Destination" link. The Remote Destination Configuration form will appear.
Let's have a look at the parameters we can specify. "Answer Too Soon Timer" defines the minimal time for a call to be transmitted to a Remote Destination before the user answers. This parameter helps to prevent the call from being sent to voice mail when the user's cell phone is switched off or out of coverage area. "Answer Too Late Timer" defines the maximum response timeout for a call to a Remote Destination. "Delay Before Ringing Timer" defines the delay before the CUCM redirects an incoming call to a Remote Destination. All these parameters are specified in milliseconds. It is necessary to set the Line Association mark for the number that will be associated with a remote number. It is also necessary to switch the Enable Mobile Connect option on. The Mobile Connect option enables redirecting an active incoming call from a mobile phone to a landline office phone by clicking the Mobility button on the office phone.
If needed, use the Access List Configuration to configure the filtering for the calls to a Remote Destination. To do this, proceed to the menu: Call Routing -> Class of Control -> Access List. Select the access list type: blacklist or whitelist (Blocked or Allowed). Then use the Add Member button to fill the list with the corresponding numbers.
Now you should bind the Access List on the Remote Destination Configuration page. You can select one of the following options: transmit the call to a remote device if the subscriber is on the list, or the opposite. You can also specify the Ring Schedule, which can permit redirecting calls to a remote number during the working hours only, for example.
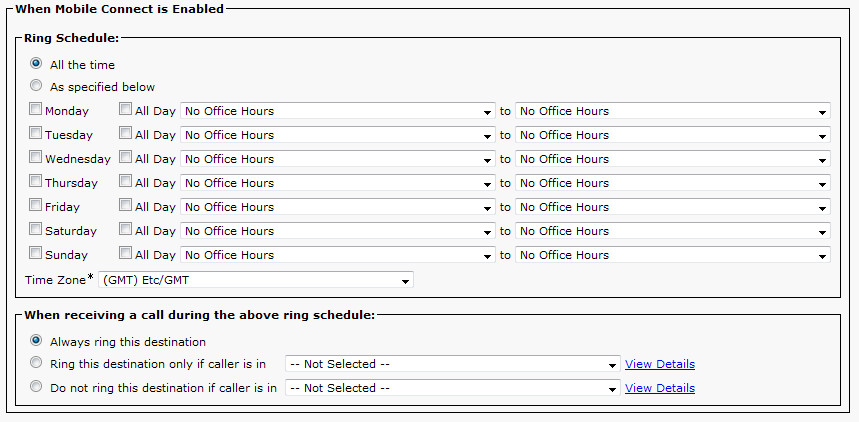
You should remember that if you configure both the schedule and call filtering, then the schedule will be checked first. So if the time is inappropriate, the access list won't be even checked.
As you can see, configuring Single Number Reach presents no great difficulty. After you configure this feature, your employees will be able to accept incoming calls on the office phone numbers not only in the office, but on their mobile and home phones as well, no matter where the call is coming from.
Читайте также: