
Mods can not be deployed как исправить vortex скайрим
Обновлено: 18.05.2024
Modding is a great way to breathe new life into games that allow it. Through the use of all manner of different creations that generous authors all over the world have shared, you can create a vastly different and highly personalized experience than what the original game offers.
So you want to add mods to Skyrim Special Edition / Fallout 4?
Contrary to what some may say, though modding can become a complex hobby over time, installing your first mod is rather simple. This guide is intended to help you get started by guiding you through the process of installing and configuring Vortex and then installing your first mod.
This document is intended for those who are new to modding. For more detailed information about Vortex usage, see our general Vortex FAQ and Importing FAQ.
Contents
Installing our Mod Manager Vortex from the website

- In the file section, download the file at the top described as “One-click installer” for Vortex (Manual Download). This is the preferred and recommended way of installing Vortex.
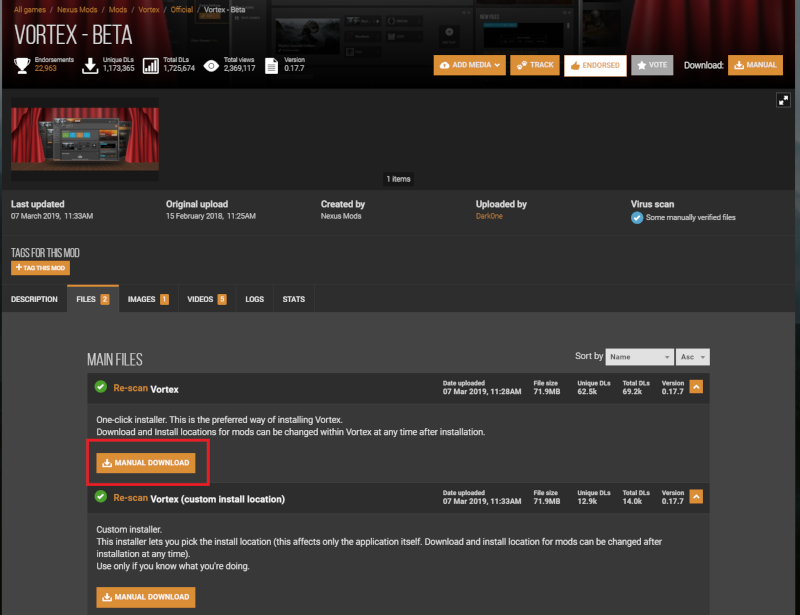
- Once the download is finished, open the *.exe file to run the installation. Note: some misconfigured anti virus programs might rename the *.exe to something else, in that case, rename the downloaded file to *.exe and open it to run the installation.
- Vortex will install on C: (note that this is just Vortex and the files it requires to function which amount to around 70 MB). You may choose within Vortex later on where you want to download your mods to.
Before we start:
This tutorial is intended for those looking to install mods for Fallout 4 or Skyrim Special Edition.
Ensure that the game your want to mod has been downloaded and installed and has successfully been run at least once as this may be important for proper installation of game files.
Contents
Vortex Initial Setup
Once Vortex is installed, there are a few steps to be taken in order to set it up to manage and download mods for Skyrim Special Edition. There are also some things that you might (optionally) want to customise to your liking.
Starting up Vortex
Once installed, start up Vortex via the shortcut on your Desktop. Upon initialising, Vortex will automatically associate itself with Nexus Mods download links and inform you of that via a notification in the top right corner:
This is necessary so Vortex can be used to download mods straight from Nexus Mods via the corresponding “Download: Vortex” button on a given mod page.
As Vortex does this automatically upon startup, no action on your end is required.
Link your Nexus Mods account to Vortex (required)
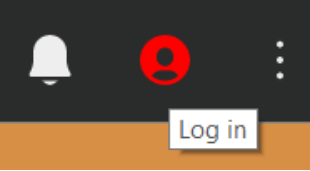
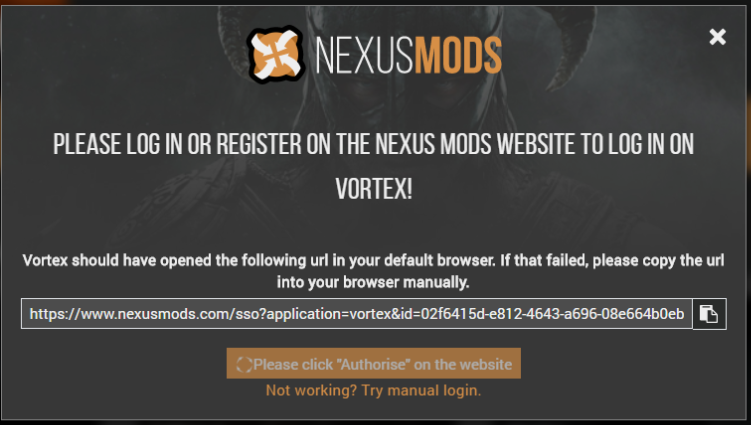
Open Vortex and click the red icon in the top right corner.
In the next dialogue window that comes up, click “Log In On Website” to open a new page in your browser:
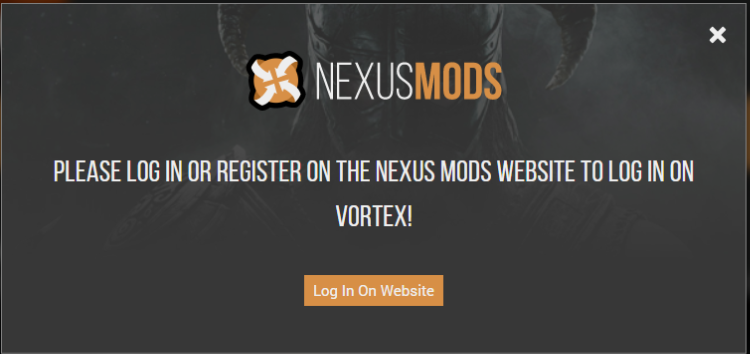
If no new page is loaded in your browser, copy and paste the link displayed by Vortex into your browser’s address bar:
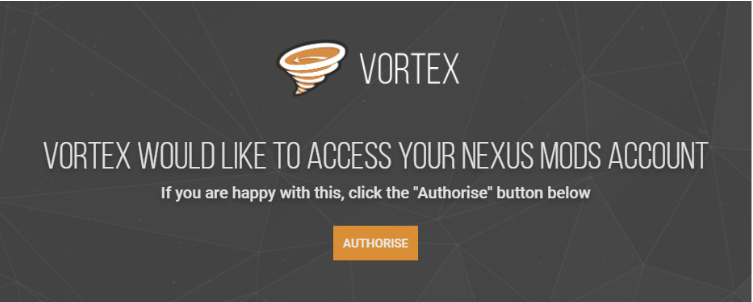
Click the "Authorise" button to allow Vortex to sign in.
Congratulations! You have now successfully linked your Nexus Mods account to Vortex.
Note: if authorising via the website fails, you can try to log in manually. To do so, click on the hyperlink that reads “Not working? Try manual login.”

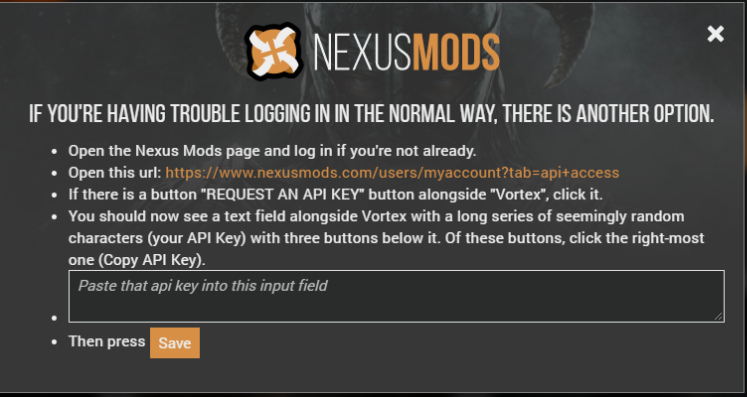
Once you hit “Save” you should have successfully linked your account with Vortex and your Nexus Mods profile should display your avatar.
Search for, discover, and manage a game (required)
Vortex is capable of managing mods for dozens of different games. That being said, Vortex does not just automatically take over mod management for a particular game - in case you would rather manage it yourself or with another tool. Therefore, in order to use Vortex the first thing we want to do after installation is to tell it to actively manage Skyrim Special Edition.
To do that, navigate to the “Games” section from the side menu.There you will see three different tabs:
- Managed - Games currently handled by Vortex.
- Discovered - Games Vortex has found on your hard drive.
- Supported - All games Vortex supports that are neither discovered nor managed (yet).
If your installed game does not appear in the “Discovered” tab, you can have Vortex attempt to find it by running either a quick scan (from the toolbar) or a detailed scan (from the button at the bottom right of the Vortex window). A detailed scan may take several minutes to complete, so, please, be patient while Vortex is searching for the game.
Change your Download Folder and/or Mod Staging Folder (optional)
Download Folder
While Vortex will always install the files it needs in order to work to your C drive, you are free to choose the location where you want your downloaded mods (i.e. the file archives) to be stored.
To change the default download location which is “C:\Users\YourUsername\AppData\Roaming\Vortex\downloads” go to your Settings > Download:
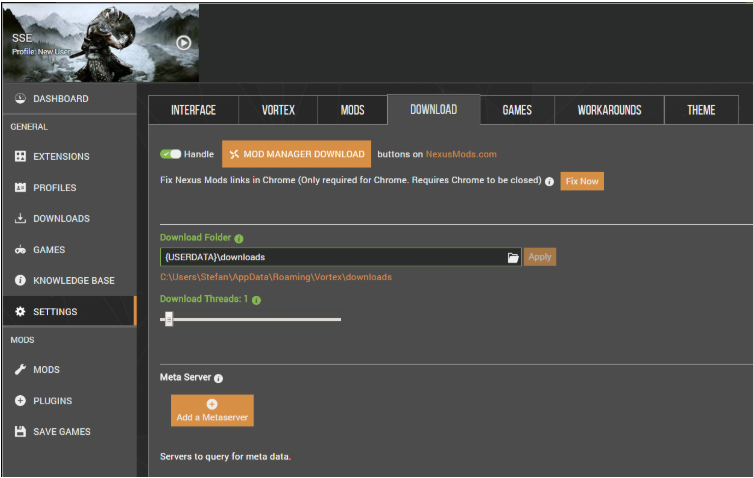
You can specify any folder on your drive. Make sure to confirm your selection by clicking “Apply”.
Mod Staging folder
This is the folder where Vortex stages your mods i.e. unpacks them to. Due to how the Bethesda games work (including Skyrim and Skyrim Special Edition), the Mod Staging Folder must be on the same partition as the game.
The default location for the Mod Staging Folder is “C:\Users\YourUsername\AppData\Roaming\Vortex\skyrimse\mods”. To change it, go to Settings > Mods and change the folder to an (empty) folder of your choice that is located on the same partition as the game.
Downloading and installing mods via Vortex
In the following, we will go over the necessary steps involved in order to get mods from the website downloaded, installed, and enabled via Vortex.
Unofficial Skyrim Special Edition Patch
Navigate to the Skyrim Special Edition section on the website. If your search is sorted by endorsements (default), the “Unofficial Skyrim Special Edition Patch” should appear as the first mod in the list for results.
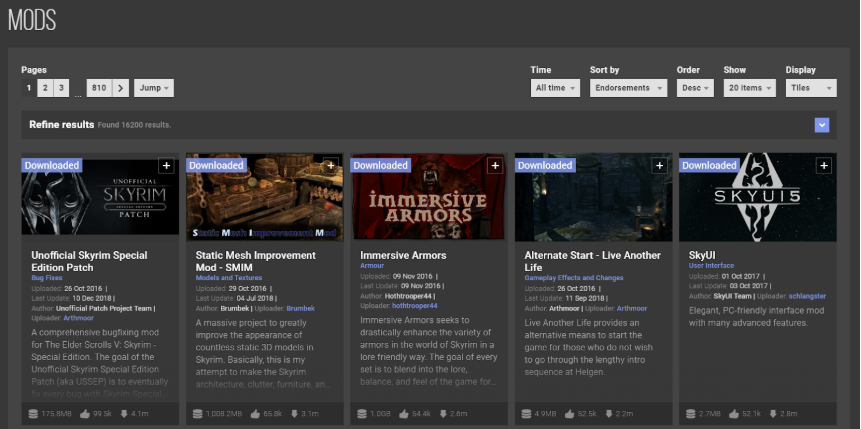
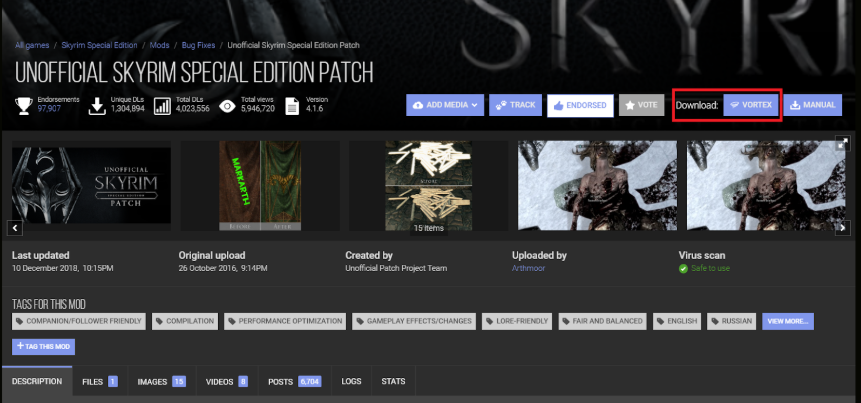
Open up the mod page by clicking the mod tile. In the top right, you will see a download button labelled “Download: Vortex”. Clicking this button will trigger a download of the mod’s main file via Vortex, provided that Vortex is set up to handle download links (see above).
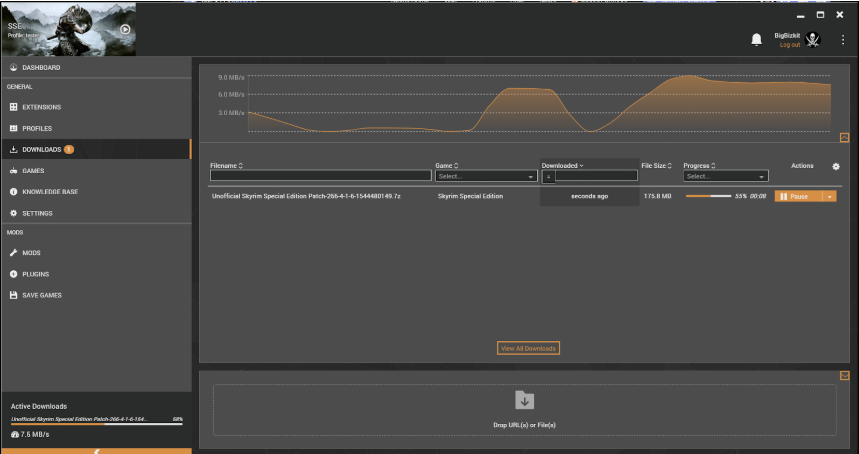
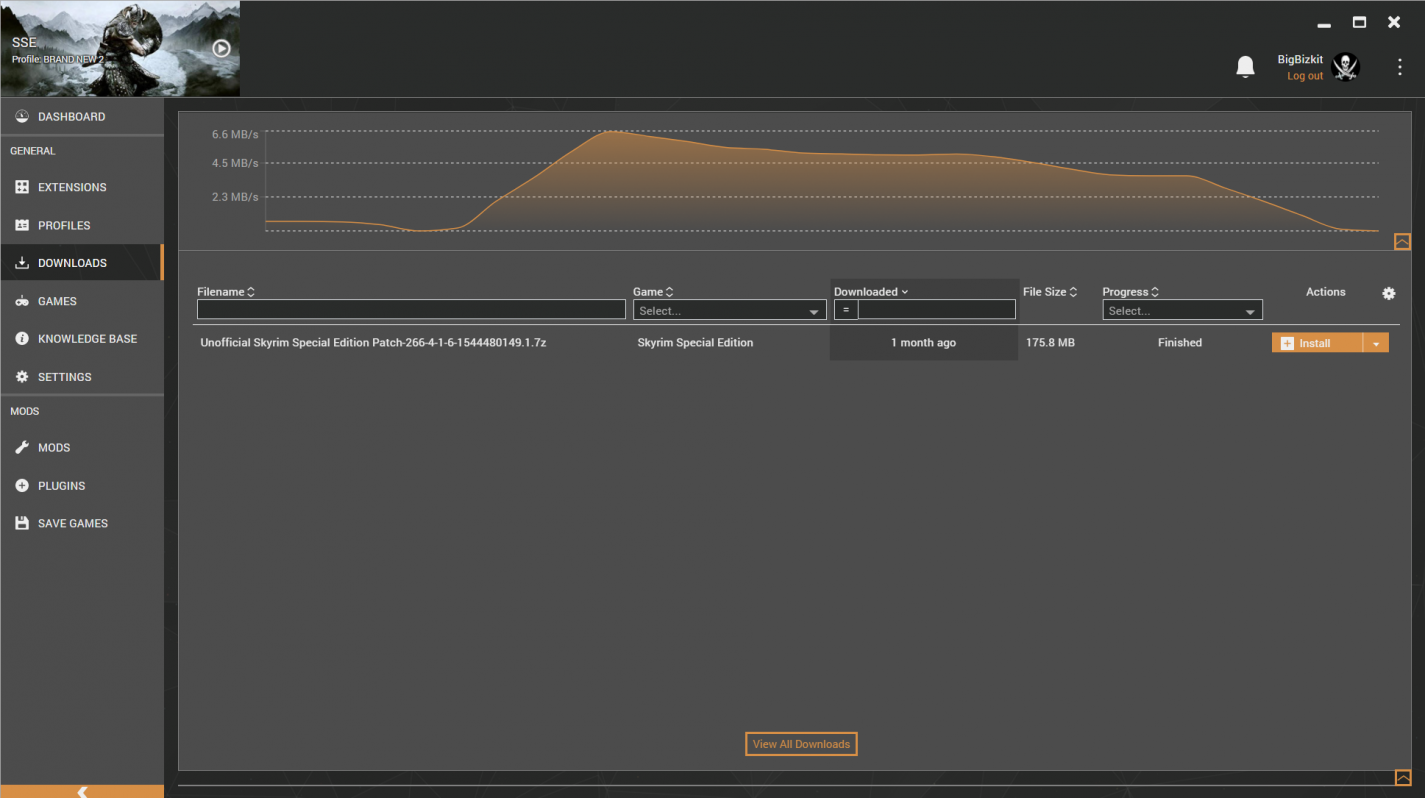
Once the download has been started, it will appear in your download list for Skyrim Special Edition inside Vortex (side bar / navigation area > DOWNLOADS).
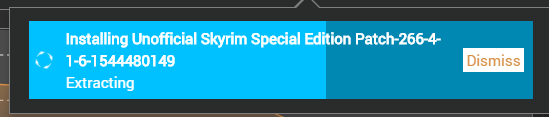
As soon as the download is finished, Vortex will display a notification in the top right corner informing you of the download finishing and giving you the option to install the mod right away (clicking “Dismiss” will only dismiss the notification, the mod has still been downloaded successfully and you can still install it at a later point in time if you want to).
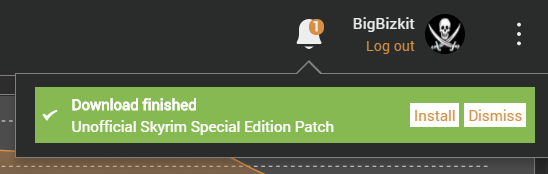
Click on the button labelled “Install” to start the installation process for the Unofficial Skyrim Special Edition Patch, which should only take a couple of seconds (this varies depending on how many files a mod installs, how big those files are etc.).
Once the installation is complete, the mod is ready to be enabled. Vortex will now display another notification where you can choose to enable the installed mod by clicking the “Enable” button:

Clicking the “Enable” button will do the following:
- It will set the mod’s status to “Enabled”
- If the setting “Deploy Mods when Enabled” is active (which is the case by default when Vortex is first installed) it will deploy the mod’s files to your game’s data folder (where the mod files loaded by the game need to be).
- If the enabled mod comes with a plugin (usually an esp file) it will enable the plugin from that mod as well.
Note: While many mods for Skyrim Special Edition (as well as other Bethesda games) come with a plugin, not every mod does. When we say “mod” it refers to the entirety of the modification including all the files it provides to achieve a game-altering effect. A “plugin” on the other hand is a particular file (esp, esm, or esl) that contains information and edits that the game can load (e.g. the position of a mod-added rock in the world). Oftentimes, mods such as retextures only come with texture files that replace existing textures in the game and do not require a plugin to function.
On the other hand, some mods consist of just a plugin file (simple patches or bugfixes that require no additional files), and no other files.
Considerations:
If you have accidentally dismissed the notification that asks whether you want to install the just downloaded mod, you can still do so via the “Downloads” section: side menu / navigation area > Downloads > Install
If you want to disable the mod, you need to navigate to your mod list (not plugin list) and disable the mod from there. This will “undeploy” (purge) all the mod’s files and remove them from your game’s mod folder. Note that you will not have to reinstall the mod if you decide later on that you still want to use it (you would simply have to reenable it).
Simply disabling the plugin rather than the mod, will only disable the esp, but the other files (if there are any, some mods consist of only a plugin file) will remain in your game’s mod folder potentially still affecting your game. Disabling plugins can be a quick way to troubleshoot issues in your load order, but it is not the advised way of uninstalling mods.
Sky UI (and SKSE64)
Sky UI is a mod that primarily overhauls the interface for Skyrim Special Edition, but more than that it is required for many other mods and adds a user-friendly mod menu (MCM - Mod Configuration Menu) to the game. It is, therefore, highly recommended. In order to install Sky UI, you will have to download and install SKSE64 (Skyrim Script Extender 64) the script extender for Skyrim Special Edition. These steps will walk you through downloading, installing, and setting up both Sky UI and SKSE64.
We have now successfully installed and enabled Sky UI. However, as we have not yet installed its requirement (SKSE64) yet, it will not function properly in the game.
Downloading and installing SKSE64
The only thing left to do now is to set Vortex to run Skyrim Special Edition via the SKSE64 launcher, which is also required in order to use the features SKSE64 introduces (and which many mods, including Sky UI, rely on).
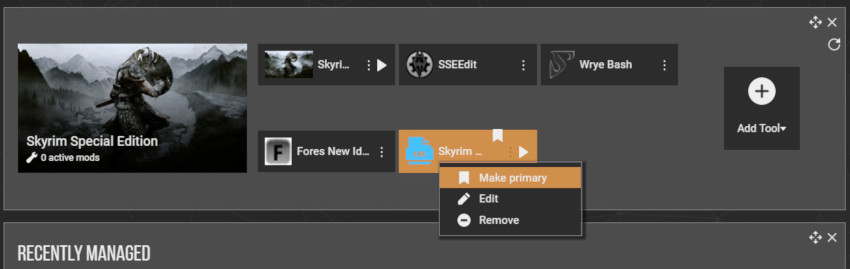
Vortex will indicate a tool that has been set as primary by adding a little banner next to its icon on the starter dashlet.
Setting SKSE64 as primary will instruct Vortex to always run SKSE64 whenever you launch the game via Vortex from the play button in the top left corner:
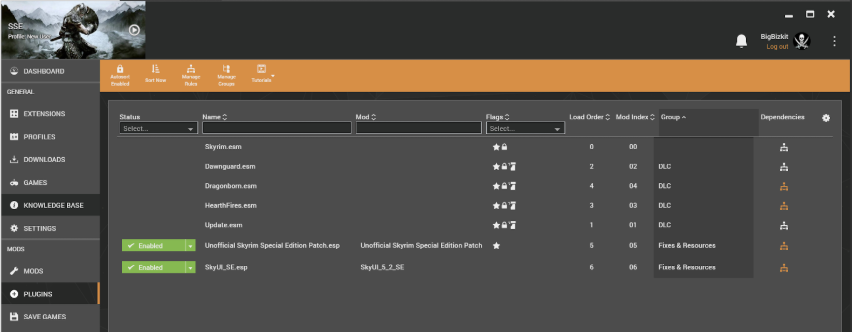
If you have followed this guide correctly until now, your plugin list should now look like this:
Note that SKSE64, while correctly installed, will not appear either in the plugins list nor the mod list. This is because we have installed SKSE64 manually by extracting its contents directly into the game folder, rather than using Vortex to do that. While it is possible to use Vortex to install SKKSE64 (or other script extenders) it requires a few extra steps and is only recommended for intermediate modders.
For a recap on how to install SKSE64 manually, as well as for instructions on how to install it via Vortex, please consult our wiki: Tool Setup: Script Extenders.
Immersive Armors and Immersive Weapons
Immersive Armors and Immersive Weapons are two mods that add plenty of lore-friendly armours and weapons to the base game in a seamless way.
You can monitor your download in the Downloads section within Vortex, or in the bottom left corner where your active downloads are displayed:
Once the download is finished, click the install button on the notification that comes up - just like with the Unofficial Patch and Sky UI:

Since this is a large mod, extracting the files might take a while, so, please, be patient as Vortex prepares the installation.
Immersive Armors comes with something that is often referred to as a “scripted installer” or “FOMOD”, which is, essentially, a little mod installation menu that allows you to pick and choose various options. How involved it is, how many steps there are, and how many options to pick from, depends on the mod itself. The “scripted installer” for Immersive Armors is fairly simple and will announce itself to you like this:
images
As it says on the screen, if you are using the UNP body mod, tick the box next to “Install UNP Support”. Since, for the purpose of this guide, we are not using that body mod, simply click “Finish” in the bottom right without ticking the checkbox.
Other than Sky UI and the Unofficial Patch, however, Immersive Armors comes with multiple plugin files and Vortex will, therefore, now ask you whether you want to enable them all:

Whether it is safe to enable all plugins on a given mod or not, cannot be answered in general. Some mods will provide several plugins in order to give players options. For example, a grass mod might come with a plugin for long grass, one for medium grass, and one for short grass. In that case, you will want to only pick one plugin to enable.
Other times, mods will include one plugin for the mod, and several other plugins as patches so the mod works well together with other mods. In those cases, you should only enable plugins corresponding to mods that you actually have in your load order.
Lastly - and this is the case with Immersive Armors’ plugins - some mods may come with multiple plugins where one plugin is the main plugin for the mod, and other plugins adding additional, optional features. Enabling all of those will not cause harm, but it is up to you to decide whether you want those additional features in your game.
As Vortex cannot make the decision for you, it is best to consult the mod author’s description to get an idea of what the additional plugins are intended to do.
As for Immersive Armors, if you navigate to your plugins view, you will find two different plugins (Hothtrooper44_ArmorCompilation.esp and Hothtrooper44_Armor_Ecksstra.esp) which are currently disabled (and, therefore, not sorted):
image
It is safe to enable both of them by either selecting “Enable all” in the Vortex notification, or by toggling them to “Enabled” individually by clicking on their status button (grey button that reads “Disabled”).
Your newly added MCM (Mod Configuration Menu, thanks to Sky UI) will pick up on the menu that Immersive Armors is adding to the game and Immersive armors will start configuring. Since Immersive Armors is a large mod, this will take a while, so, please, give it up to 60 seconds.
image
Once Immersive Armors has finished configuring it will display one final message:
image
If you bring up the menu (Escape) you will see that you now have a new section labelled “Mod Configuration”. This is where mods will display their mod specific configuration menu - if they have one (not every mod comes with an MCM).

In your mod configuration menu, you should now see Immersive Armors where you will be able to e.g. toggle the availability of certain armours on or off - depending on your preferences.
Unlike Immersive Armors, Immersive Weapons does not come with a scripted installer or multiple plugins, so it installs similarly to e.g. the Unofficial Patch. Simply click “Install” when prompted by Vortex, and “Enable” after the installation.

Your plugin list should now look like this:
A Quality World Map
Once you have decided on the version you want, click the “Mod Manager Download” button on that file. This will ensure that Vortex downloads the right file for you.

Your plugin view should now look like this:
Summary and Review
Congratulations! You have just installed and enabled your first five mods!
Hopefully, following this guide you are now equipped with the knowledge to add many more mods to your game - if you so desire.
Here is a quick recap summarising the various things we have covered in the guide:
Installing your first mod:
Download / Install Vortex
If needed, log in to the website using the tools found at the top-right corner of the website.

Navigate to the 'files' tab of the Vortex download page and click "Manual Download". This will start the download.
According to your browser's settings, you may be asked where to save the file or it may be saved to a specified location.
After the download has completed, run the downloaded file which will begin the installation process. After a few moments, the installation process will be complete and Vortex will launch automatically.
Configure Vortex

First, you'll need to authorize Vortex to access your Nexus Mods account. Click the "Login or Register" button found at the top of Vortex:

Your browser open and display the Nexus Mods website which will ask you to confirm authorisation:

After granting Vortex access to your account, you will need to specify which games you would like to manage. Click "Select a game to manage" found under "Let's get you set up" in the dashboard:
Navigate to the 'Discovered' tab. Vortex will try to automatically find valid installations of games it supports, which will be displayed there. Once the game you wish to manage is shown, click it's image to enable mod management (for this guide, please choose Skyrim Special Edition or Fallout 4). After your selection has been made, you will notice the game's image at the top left of Vortex, denoting that it is the game currently being managed.
FOR USERS WITH MULTIPLE PARTITIONS / STORAGE DEVICES
If you have installed your games to a different partition or storage device than Windows, you will need to reconfigure Vortex to ensure that mods can be properly deployed. To do so, navigate to settings and click the 'mods' tab. There, set your base path to a folder that is located on the same partition as your game and ensure that the Deployment Method option is set to "Hardlink deployment".
Add a mod to your game
Traditionally, this would be the messy part. Thankfully though, Vortex makes it incredibly easy to download and manage mod installation. The first mod you will be installing will be a simple one that replaces the background of your game's main menu, adding a Nexus Mods logo.

Navigate to the "Files" tab and click the "Download with Vortex" button:

Your browser may request permission for Vortex to handle the task, which is normal.
After initializing the download, Vortex will then be launched, brought to the forefront of Windows, and commence the download process. You can view the progress of the download by navigating to the "Downloads" list accessed from the left column of Vortex.

After the download is complete, you will you will be alerted in Vortex with a notification message. Clicking the "install" button found in this notification will start the initial mod installation process. Alternatively, this can be done by navigating to the "Downloads" list within Vortex. There, you can click on the "install" button next to the mod's title.
After installation, which extracts the mod's files to Vortex's staging area, those files will need to be properly deployed to your game's folder. This step can be done simply by clicking the notification shown after installation is complete.

You're finished! Run the modded game!
You're ready to begin your modding journey. Well done! But this is just the beginning…
General Tips:
Always read a file's description in its entirety before installing.
Authors and uploaders almost always include important instructions and information about the installation and intended use of their work. If the description seems beyond your needs or understanding, it may be best to come back to it after you level-up gain more modding experience.
Take things one step at a time.
Try to test each mod as you install it just to ensure that things are working as intended, disabling or uninstalling them if issues arise. Keeping this in mind will no doubt prevent potential headaches in the future.
Be aware of file requirements.
Sometimes, mods require other mods to have been previously installed in order to function properly. When applicable, this information can always be found in the "Requirements" box at the top of each file's description, or otherwise described below by the author, reinforcing the importance of reading each description carefully.
Understand that modding can create incompatible save files.
Before installing a mod, it's best to save your game directly before installing the mod. Then, if an issue should arise after adding a mod, you can return to your previous save after disabling the mod.
When issues inevitably arise, trial and error sometimes works best.
If you're having some issues, try to disable the most recent mod and try again If that doesn't help, try the next, and so-on, returning to a previous save or starting a new game as needed for testing.
Ask your fellow community members for help.
Leave a polite and detailed comment (or bug report) on the file page or take to the forums where you can find help from authors and experience mod users.
If a file description references Nexus Mod Manager (NMM) or another mod manager, it's likely safe to assume Vortex will be able to properly manage the file.
Next Steps:
Common file requirements
Skyrim Script Extender (SKSE) and Fallout 4 Script Extender (F4SE) allow for mod authors more freedom when modifying Skyrim / Fallout. Many mods require their use so installation is recommended.
Installation is of course optional, but highly recommended.
Searching for More mods.
Disabling and Uninstalling mods.
There, you are also provided the option to remove the mod's original archive file as well. Doing so will remove the mod entirely from your game, your file system, and from Vortex.
Where can I learn more about Vortex?
Vortex has been created to be a deep and powerful modding tool and the tutorial above only scratches the surface. For detailed more information about Vortex and it's usage, see our see our Vortex FAQ ([1]) Support Wiki ([2]).
30 сен. 2019 в 12:11Steam is installed on drive E, my game is installed on drive E and Vortex is installed on drive E, so why do I get the mods can not be deployed message?
I've been messing with this for hours this started suddenly, it worked fine for years but now it doesn't.
30 сен. 2019 в 12:54 30 сен. 2019 в 13:30 So Vortex always has a reason for mods not deploying or for that matter any problem (at least that's been my experience). So when you select "Show more" what is indicated? 30 сен. 2019 в 13:43I got the mods installed manually, I just wanted a companion and I'm happy to say the interface works on my 1440 by 3440 monitor.
Last time I installed the game it had issues with cutting off the top and bottom of the menus.
They open a little slow but everything else seems to work fine now.
I don't have any mods on the display but I can see right to the edge now.
It seems that my mods don't work. E.g. I have full dialog installed, selected correct language but it doesn't work in game.
If I go in Vortex to Mods a icon is "blinking/glowing red" Deploy Mods. What does that mean? Why do I need to deploy them if I installed them already.
You have to select a deployment method first FIX |DISMISS
--> Fix
Mod Staging Folder (Fallout 4), I red the tool tip but still don't know what to do.
Mod location see bellow.
First I setup Vortex to install the mods to D:/Games
After I noticed that they don't work I clicked on Deploy Mods and
changed them to D:/Games/Mods
I installed the F4SE loader and I am starting the game through f4se_loader.exe
There is an empty Mods folder in Fallout4 dir, which I deleted now, still not working.
my setup:
C: Windows
D: Steam, Fallout4, Vortex
D:\Games\Mods (downloaded mods) (this is set in Vortex/Settings/Mods)
Games has only one folder Mods, with all downloaded mods.
Maybe stupid question: You did the following first?
Before you can mod Fallout 4 you need to modify the Archive section of the game's configuration files to allow mods to run in the game. Don't panic, you must do this in order to mod your game. This is what you need to edit:
You need to add the following lines to the Fallout4Prefs.ini file below the section entitled:
[Launcher]
bEnableFileSelection=1
Then add the following line in Fallout4Custom.ini below the section entitled:
[Archive]
bInvalidateOlderFiles=1
sResourceDataDirsFinal=
Vortex deploys the mods you enable in your fallout dir, there is top right a message if it should deploy as far as i remember. That means you have a download dir, but the deploy is as far as i remember the game folder. I didn't like Vortex and installed mod organizer 2 which is in my eyes far more user friendly and easier. (As I say as far as I remember, it's a while since I tried Vortex)
25 апр. 2020 в 11:24 Still not working, I restored everything, did the steps from @esbvb09 and can install the full dialogue lines mod.>>That means you have a download dir, but the deploy is as far as i remember the game folder.
I think you are wrong, I created a thread in Vortext forum:
"Why do you have a MODS folder inside your game folder.
DO NOT DO THAT."
I didn't created that folder, I also don't have it.
25 апр. 2020 в 18:53
there are plenty of tutorials on the vortex screen for beginners, id start there. if the mods arent deploying open vortex click the MODS tab, then near the top of the screen is a horizontal bar with icons on it find the DEPLOY MODS icon click it. see it that works
other than that your gonna hafta watch a tutorial or two to run the software properly.
I tried mod organizer and found vortex to be a little more user friendly. it took a while to figure everything out especially how to manage rules and plug in order.
something that solved a similar issue for me was changing the option for the deployment method, then changing it back. The apply button was disabled initially, like the deployment method had already been applied, but still I couldn't deploy mods thanks to a deployment method not available error or whatever, but after changing the method in the drop-down menu to something else and then back seemed to reenable the apply button. Then I clicked apply and deploying mods worked. Still haven't seen if mods actually loaded in game but at least it got rid of the red rectangle in the menu.
Plus this might have been that I messed something up weirdly in installation though, so idk if it'd work in most cases.
16 дек. 2020 в 8:05 There are tutorial videos in Vortex, watch those those are very easy to understand and learn. 29 янв в 23:53
something that solved a similar issue for me was changing the option for the deployment method, then changing it back. The apply button was disabled initially, like the deployment method had already been applied, but still I couldn't deploy mods thanks to a deployment method not available error or whatever, but after changing the method in the drop-down menu to something else and then back seemed to reenable the apply button. Then I clicked apply and deploying mods worked. Still haven't seen if mods actually loaded in game but at least it got rid of the red rectangle in the menu.
Plus this might have been that I messed something up weirdly in installation though, so idk if it'd work in most cases.
this worked for me i just changed it to experimental then back to hard (standard) and it worked (and asked me to load game with mods as well ingame)
Modding Skyrim Special Edition with Vortex
These mods were selected to give you a good modding foundation and in order to convey some basic knowledge regarding Skyrim modding.
Note: you may choose to install other/more mods than the ones listed above, but please note that this guide is focused on describing the exact process for those exact mods.
Читайте также: