
Как сделать аватарку в стиле geometry dash
Обновлено: 17.05.2024
Драсте, сегодня расскажу как сделать крутую аву или шапку канала с вашей иконкой в ГД!
(Это если нет возможности и умений в каких то адобах фотошопах фигопах)
Открываем GD, берём и скриншотаем ту иконку, которую вы хотите на своей аве. Не обязательно куб, можно паука, робота, шар, если НЛО или корабль, то куб тоже.
Открываем Background Eraser. Нажимаем сюдым.
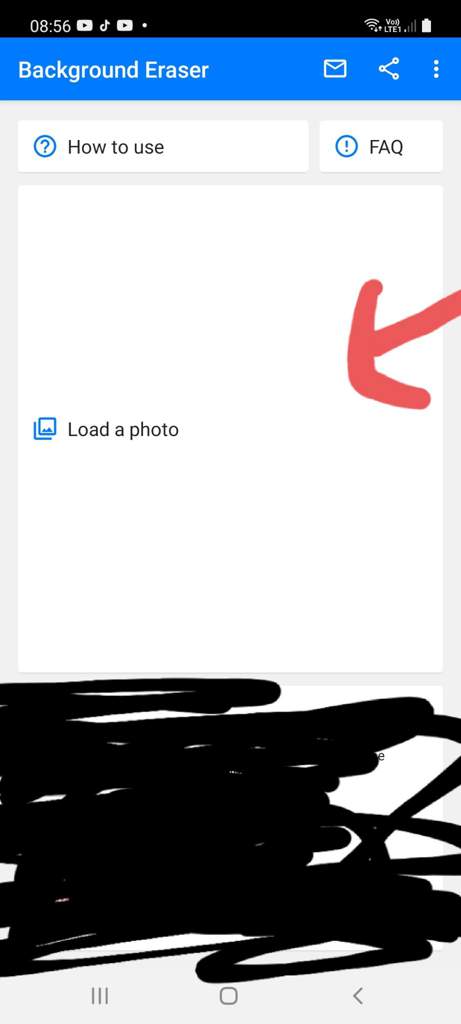
, выделяем как можно больше вашу иконку. Далее разбираемся с нужным интерфейсом.

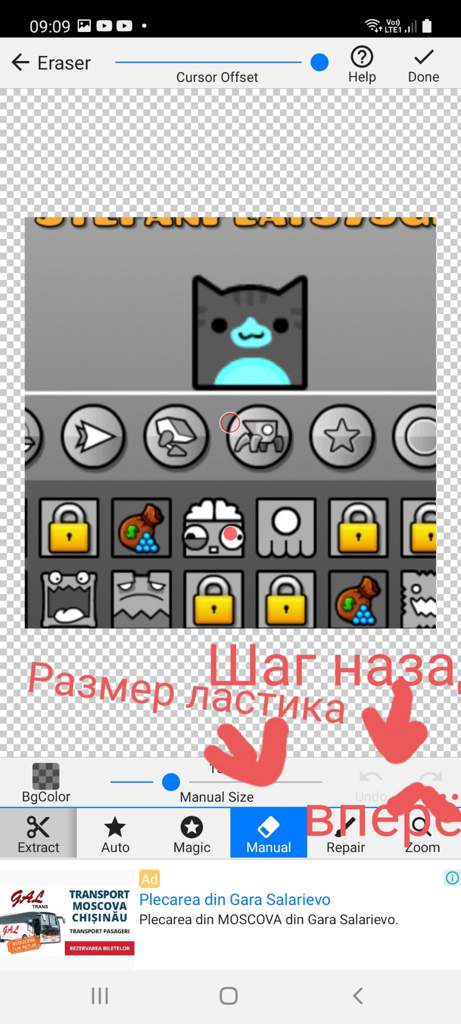
И стираем как надо.

Сохраняем. И. открываем сохранённую картинку! И выделяем до краёв.


Должно получится вот так.
Если с корабликом, делайте так же.

Вводим ID уровня, для которого вам нужен пароль, и нажимаем "Получить Пароль". Если это демон, то найдите авто версию которую можно скопировать. Отключаем Show Percentage и Progress Bar. И делаем вот так:
Во время того как уровень идёт, делайте скриншот в нужном вам моменте.
Вашего персонажа не должно быть видно, как и трейла.
Открываем PicsArt. Сначала выбирайте фон.

Далее нажимаете "Добавить Фото" и добавляете вашу иконку, и если захотите, корабль, редактируете размер, расположение, да всё что хотите! Далее нажимаете на стрелочку в правом верхнем углу, и сохраняете фото.
Открываем Pixel Lab и добавляете любой шрифт, который вам нравится. Далее нажимаете на три точки и нажимаете "Use Image from Gallery"
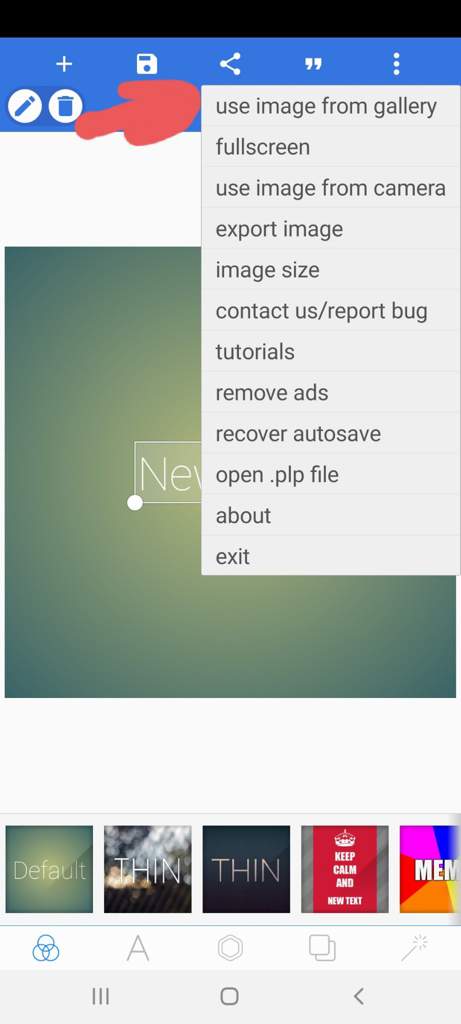
Далее выбираете нужную картинку. Чтобы редактировать текст:

Наслаждайтесь своей аватаркой!
Вот то что я уже здесь делал:

Я не профессионал в этом деле, но когда узнал что для начинающего достаточно 3 приложения и пара скриншотов, честно говоря, офигел. Для профессионалов это не фокусы, а для новичков, найс! Так что хватит оскорблять новичка.
Как сделать аватарку в стиле geometry dash
Драсте, сегодня расскажу как сделать крутую аву или шапку канала с вашей иконкой в ГД!
(Это если нет возможности и умений в каких то адобах фотошопах фигопах)
Открываем GD, берём и скриншотаем ту иконку, которую вы хотите на своей аве. Не обязательно куб, можно паука, робота, шар, если НЛО или корабль, то куб тоже.
Открываем Background Eraser. Нажимаем сюдым.
, выделяем как можно больше вашу иконку. Далее разбираемся с нужным интерфейсом.
И стираем как надо.
Сохраняем. И. открываем сохранённую картинку! И выделяем до краёв.
Должно получится вот так.
Если с корабликом, делайте так же.
Вводим ID уровня, для которого вам нужен пароль, и нажимаем "Получить Пароль". Если это демон, то найдите авто версию которую можно скопировать. Отключаем Show Percentage и Progress Bar. И делаем вот так:
Во время того как уровень идёт, делайте скриншот в нужном вам моменте.
Вашего персонажа не должно быть видно, как и трейла.
Открываем PicsArt. Сначала выбирайте фон.
Далее нажимаете "Добавить Фото" и добавляете вашу иконку, и если захотите, корабль, редактируете размер, расположение, да всё что хотите! Далее нажимаете на стрелочку в правом верхнем углу, и сохраняете фото.
Открываем Pixel Lab и добавляете любой шрифт, который вам нравится. Далее нажимаете на три точки и нажимаете "Use Image from Gallery"
Далее выбираете нужную картинку. Чтобы редактировать текст:
Наслаждайтесь своей аватаркой!
Вот то что я уже здесь делал:
Я не профессионал в этом деле, но когда узнал что для начинающего достаточно 3 приложения и пара скриншотов, честно говоря, офигел. Для профессионалов это не фокусы, а для новичков, найс! Так что хватит оскорблять новичка.
Как сделать аватарку в стиле geometry dash

Notice how a lot of Steam users have their own custom Geometry Dash Avatar?
Fancy making one yourself? Here's how!
This guide merely explains where to gather the resources for your avatar and what to do with them. It is not intended to be a detailed Photo-Manipulation/Graphic Design tutorial. I'm assuming users of this guide already have a basic understanding of software. If not, there are tutorials online that can help. The guide is heavily text based (So much to the point that there aren't any images).

| 2,125 | уникальных посетителей |
| 24 | добавили в избранное |

First of all you need to.
- Adobe Photoshop CS/CC
- GIMP
- PaintShop Pro
- Lightroom
- DxO
For the purpose of this tutorial, I will be using my personal favorite, and probably most common program, Adobe Photoshop CC.
Once you've decided which piece of software to use, you'll need to find and download some of the images in which you'll be using in your avatar.
First of all, there are a few bits and pieces you can steal from the Program Files of the game.
Your games files will be stored within your Steam Apps, which are stored in your Steam Install Directory.
This is most commonly found here 'C:\Program Files (x86)\Steam\steamapps\common\Geometry Dash'.
You might have, for example, installed your Steam games on a separate HDD, if your OS is installed on a smaller SSD. In which case, navigate to where ever you have stored them.
- Go to 'Resources>Fonts' and then install 'Marker Felt.ttf' (Double click>Install)
- Copy some of the backgrounds that are stored within the Resources folder. Their file names all begin with 'game_bg_0'. You can store all these in a folder somewhere.
- The rainbow that follows your icon is in the Resources folder too, if you wish to save it.
- There are also various buttons and icons etc. that are used in the game.
In-Game Icons & Ships
I found it a lot easier to simply Google 'Geometry Dash Icon/Ships' to find these. The most popular ones all appear in one search and are of a relatively high resolution (For a low res, 200KB avatar).
edit: I've uploaded some of the ones I used into an archive, use the link at the bottom of the guide.
Anything else you wish to add.
Again, the majority of this is up to you. You can find everything you need on the Internet. Any custom backgrounds, fonts, icons etc. that you wish to add.
- It is either a .PNG or a .JPEG. That's 'PNG (*.PNG;*.PNS)' or 'JPEG (*.JPG;*.JPEG;*.JPE)'.
- It is less than 200KB's in size. I would recommend using a JPEG so you can adjust the quality when rendering the image. Photoshop shows the file size on the fly when using the quality slider.
- Resolution wise, ensure it is square. Don't go mental though, and keep the PPI low-ish. I use 1000x1000px @ 72PPI. 500x500px will be fine though. As long as its <200KBs.
- If you're getting 'Missing image from upload. Try again!'. Then your file is too big/wrong type.
- The Steam Community will automatically scale your avatar to 184px, 64px & 32px.
The 'traditional' RobTop Style Avatar has the yellow curved border around it. Which can be found within the Resources folder of the Geometry Dash Program Files (As mentioned in the section above).
People also seem to put their Steam Name initial at the top right hand corner (In the Marker Felt Font).
Choose your ship and icon (Preferably one you have unlocked, and use) and place them where ever you wish. Photoshop users, Ctrl + T, while the layer is selected, will enable you to transform your image. Then, while holding Alt + Shift, you can proportionally re-size your image. Then press Enter on the Numpad, or click the tick at the top to apply your changes. Pressing 'G' on your keyboard will select the fill tool. (If it doesn't shop the Fill Bucket, click and hold the icon to bring up the other options). Change your foreground and background colours to your in-game colours. Then press 'X' on the keyboard to switch between them when filling in your icon.
I don't want to go into too much detail in terms of designing the avatar itself. If you're new to graphic design software, please use tutorials online. There are hundreds of them available, however, you only need a very basic understanding for this particular guide.
- Click 'Edit Profile'
- Under the 'Avatar' Section, Click 'Choose File'.
- Navigate you where ever you saved your image.
- Click 'Open' (In the Windows Explorer window) and then 'Upload'.
- Then press 'Save Changes'.
ps: Feel free to comment if you think anything needs adding/removing/correcting etc. Also please ask for any help if needs be, especially if you are using Adobe Photoshop too.
Читайте также: