
Как изменить hud в half life 1
Обновлено: 07.07.2024
12 сен. 2015 в 6:47
Hud cvars used in config.cfg and / or userconfig.cfg
hud_draw 1
Enables drawing of the HUD.
hud_capturemouse 1
If disabled, there is no mouse cursor in the command menu. This doesn't work in CS 1.6 and DoD 1.3 because the command menu no longer accept number binds. But this still work in HL, TFC and some others mods.
hud_centerid 0
Toggles whether the player names are shown in the lower left corner or in the middle of the screen. Player name is shown when your aiming at another player.
hud_classautokill 1
If enabled, automatically kill yourself after choosing a new player class in TFC.
hud_deathnotice_time 6
Sets the amount of seconds death notices are shown.
hud_drawhistory_time 5
Sets the ammount of seconds HUD icons are shown. For example buy icons.
hud_fastswitch 0
Toggles fast weapon switch. If on, then weapons switch immediately, when you press a number key(They must be bound to slotX commands). This has no effect when you're scrolling through your weapons(using invprev and invnext).
hud_saytext 1
It enables the in-game chat (Same as hud_saytext_internal for CS, CZ & DoD).
hud_saytext_internal 1
It enables the in-game chat. hud_saytext (cmd) toggles this CVar. This is only in CS, CZ & DoD.
hud_saytext_time 5
Sets the amount of seconds chat messages are shown.
Изменение цвета HUD'а(полное)!
HUD в играх на GoldSrc [ ]

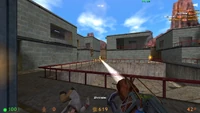
В играх на GoldSrc интерфейс игрока отображается шрифтом, который создаётся из т. н. спрайт-листа. Основные элементы HUD (на примере Half-Life) приведены на картинке справа.
- В левом верхнем углу находится меню выбора оружия, поделённого на 5 категорий (в Opposing Force — на 7). Наличие боеприпасов (как первичных, так и вторичных) обозначено зелёными полосками слева от иконок. На иллюстрации показана иконка MP5, выбранного из 3-й категории.
- В правом верхнем углу размещён индикатор заряда фонарика/прибора ночного видения (в Opposing Force), окрашивающийся в красный цвет, если фонарик/ПНВ разряжен.
- В правом нижнем углу отображается количество боеприпасов для выбранного оружия. На иллюстрации показаны текущее количество патронов в магазине и общий доступный боезапас (в данном случае — 50 патронов в магазине + 100 запасных) для MP5, а также текущее количество гранат для подствольного гранатомёта.
- В левом нижнем углу отображается информация о состоянии здоровья и брони (заряде костюма). Если здоровье игрока составляет 25% или ниже, индикатор здоровья окрашивается красным.
- В центре экрана расположено прицельное перекрестие, уникальное для каждого вида оружия. Если в настройках игры включено автоприцеливание, прицел «подсвечивается» красными точками при наведении на противника.
- Когда игрок сталкивается с определённым типом опасности (например, с электричеством, огнём/дымом, радиацией, кислотой или потерей кислорода), слева над индикатором здоровья отображаются соответствующие значки. Также, при повреждении от опасных сред или атак противников в центре экрана появляются красные указатели, показывающие, с какой стороны был получен урон.
- При подборе нового оружия, предмета или боеприпасов иконка, обозначающая данный объект, появляется в правой части экрана на короткое время и исчезает.
- Если игрок управляет каким-либо видом транспорта (в частности, вагонетками), в центре нижней части экрана (при нажатии клавиши «Использовать») отображается индикатор, позволяющий регулировать скорость передвижения с помощью кнопок перемещения вперёд-назад.
Спрайты для HUD в GoldSrc имеют палитру в оттенках серого; это сделано для определения прозрачности спрайта и настройки его цвета (чёрный — прозрачный, белый — непрозрачный, оттенки — разная степень прозрачности). Внутриигровой цвет спрайтов по умолчанию одинаков для всех основных элементов интерфейса.
| Игра | Цвет HUD (R, G, B) | Шрифт |
|---|---|---|
| Half-Life | 255, 160, 0 | Trebuchet MS |
| Half-Life: Opposing Force | 0, 160, 0 | OCR-A Std |
| Half-Life: Blue Shift | 95, 95, 255 | Trebuchet MS |
| Half-Life: Decay | 160, 160, 192 ( Джина Кросс ) | |
| 255, 128, 64 ( Колетт Грин ) |
Дополнительные элементы HUD [ ]
Новые элементы HUD при установленном RofiDLL.
Движок работает с игровой библиотекой («client»), в которой записана информация о расположении элементов HUD, цвет элементов движок берет в файле «clientscheme.res». С помощью сторонней клиентской библиотеки RofiDLL в игру добавляются такие элементы HUD, как Source-подобный чат, показатель скорости игрока и цвет показателя здоровья в зависимости от значения. Также RofiDLL упрощает для игрока распрыжку.
Как изменить hud в half life 1
Изначально HUD в играх отсутствует; чтобы его включить, необходимо подобрать HEV-костюм.
Изменение цвета HUD'а(полное)! Но прицелы придётся переделывать вам самим! Сдесь я перевевёл туториал с twhl.info на русский язык!


Заходим в папку исходников в Single Player Source или в Multiplayer Source(смотря какого типа вашь мод). Далее, идём в папку cl_dll и открываем hud.cpp . В районе 306 строки находим это:
CVAR_CREATE( "hud_classautokill", "1", FCVAR_ARCHIVE | FCVAR_USERINFO ); CVAR_CREATE( "hud_takesshots", "0", FCVAR_ARCHIVE );
Добовляем посли этих значений ещё 3 значения:
CVAR_CREATE( "hud_red","0", FCVAR_ARCHIVE ); CVAR_CREATE( "hud_green", "200", FCVAR_ARCHIVE ); CVAR_CREATE( "hud_blue", "0", FCVAR_ARCHIVE );
Значение высчитывается по цветам RGB, первый красный, второй зелёный и соответственно третий синий.
Теперь открываем файл cl_util.h. В районе сточки 153 и заменяем этот код:
inline void UnpackRGB(int &r, int &g, int &b, unsigned long ulRGB)
Таким образом мод говорит движку какой цвет будет по умолчянию. Цвета пока не работают, можете проверить! Откройте health.cpp и перейдите в район строки 233.
FillRGBA(x, y, iWidth, iHeight, 255, 160, 0, a);
FillRGBA(x, y, iWidth, iHeight, r, g, b, a);
This will tell the engine to read the health color from our CVARs.
ПРЕДУПРЕЖДЕНИЕ : Если при компиляции будут ошибки в файле hud_spectator.cpp, откройте его и перейдите в район сточки 1079 и заменим эту строку:
i = float sqrt (i);
ПРЕДУПРЕЖДЕНИЕ : Я тестировал это в сингплеере, но в мултиплеере тоже должно работать!
Я надеюсь это поможет вам в создании ваших модов! Рекомендуйте этот урок тем, кто нуждается в помощи по смену цвета HUD'а.
Содержание
Как изменить hud в half life 1


| 2,317 | уникальных посетителей |
| 73 | добавили в избранное |

This section details how I made these custom files. If you are not interested in the creation process, skip to the "Downloads and Installation Instructions" section.
This is where the bulk of the work is. I used GIMP to edit the .BMPs, but it only exported valid .BMP files when I checked the "Do Not Export Color Information" box when exporting. Also, i could not figure out how to create a functional .BMP from scratch, so I worked off of existing images when I needed to make a new file. I would imagine that other popular photo editors such as Photoshop and MS Paint would be able to handle .BMPs, but I cannot offer any advice.
It would be easy and straightforward to multiply the size of every .BMP by our desired amount, but the .SPR format has some unfortunate limitations. First, they cannot be larger than 256 pixels in width or height. Since most of Half-Life's .SPR files already approach the limit, I had no choice but to split up the graphics within each image and upscale each one individually, piecing them together afterward.
The next two numbers are the X and Y coordinates for the start of the sprite within its .SPR image, measured in pixels naturally. The origin (0, 0) is the top left corner, and increasing X moves right while Y increasing goes down. The last two numbers are the X length and Y height of the sprite in the same format as the previous two. As a quick reference, translate a text file line as
spritename videomode>=640 filename(.spr) X-location Y-location length-right height-down
Half-Life, 3x in 1020x1080:
Half-Life, 2x in 1280x1024:
Opposing Force, 3x in 1920x1080:
Blue Shift, 3x in 1920x1080:
Personally, I think this turned out pretty well, but there are a few downsides to address. Certain graphics, particularly wide ones, could not be scaled any larger than they already were due to the 256 pixel dimension limit. The most persistent cases are the weapon icons in the top left menu, but the Half-Life opening title text is the one that annoys me the most. Other sprites could only be scaled up to 2x or 3x their original size, such as the crossbow's zoomed in crosshair, the red damage direction indicators, or the train control graphic. Worst of all, the item pickup icons have not re-positioned well, and the ammo icons are almost entirely offscreen.
If you plan on switching resolutions frequently, this mod is also inconvenient, as smaller resolutions will now have oversized and overlapping graphics, with the exception of very small resolutions below 640x480.
Despite the issues, I would much rather replay Half-Life like this than with an absurdly small interface or an unfavorable resolution. Give it a try if you're interested.
To revert any of these mods, delete the "sprites" folders inside of "valve, "gearbox" and "bshift". Then, you can either copy the files from the "1x" download or use Steam's "verify integrity of game files" option. The latter option will most likely remove other mods, however.
HUD в играх на Source [ ]

В играх на Source HUD отображается посредством наложения панелей VGUI2 или символов из специальных текстовых шрифтов (например, boxrocket), которые могут меняться в цвете, размере и пульсировать. Цвет HUD можно изменить, отредактировав .res-файл в ресурсах игры. Однако, как и предшественник, Source также имеет возможность отображать элементы HUD из спрайт-листов: в частности, так он делает в Half-Life: Source.
Читайте также: