
Flatout 2 как подключить геймпад
Обновлено: 05.07.2024
In this tutorial you will find steps to make x360ce work with FlatOut 4: Total Insanity. This method also works with any game – just do the same easy steps, no special skills needed to make any controller work as an Xbox 360 gamepad. Emulator allows your controller (joystick, wheel, gamepad, etc.) to operate as the most common device, recognized by most of the games without any additional settings and workarounds.
1. The first step is to download x360ce zip file from official site. You have to select 32 or 64 bit version (same as the version of FlatOut 4: Total Insanity you use). If you don’t know the version of your game or download wrong one accidentally, you will be notified later and have a chance to use another version.
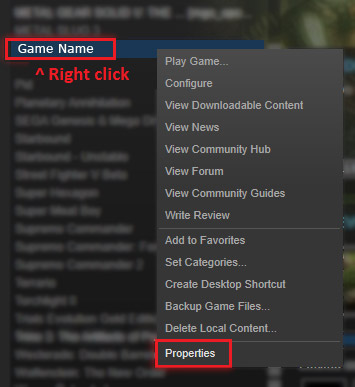
2. Now we have to find the installation folder of your game. You can easily do this by looking into game shortcut settings or finding the game in your Steam library list. If you choose the Steam variant, right click the game name and select “Properties”.
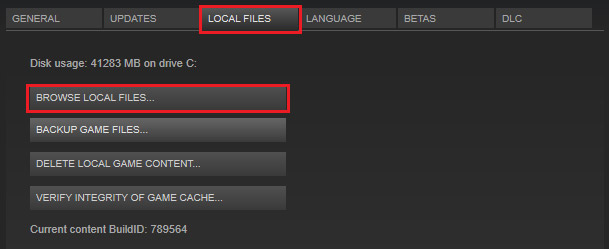
3. Navigate to “Local files” tab and press “Browse local files. ” button.
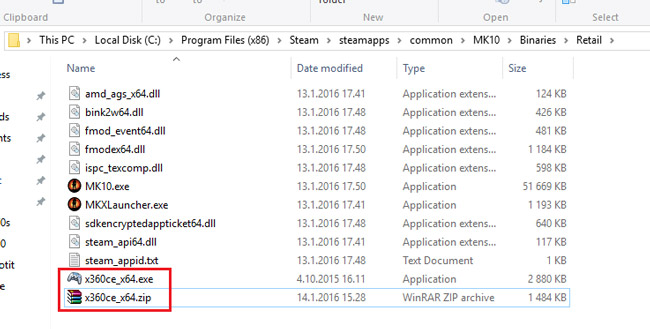
4. Now you need to find the folder with FlatOut 4: Total Insanity executable. In the example picture they are located in Binaries / Retail subfolder. You need to extract downloaded x360ce ZIP file to folder with your game executable file.
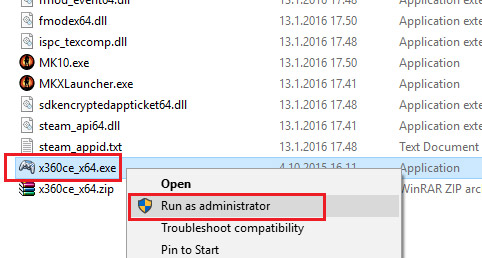
5. Click on x360ce exe file with the right mouse button and select “Run as administrator” from dropdown menu.
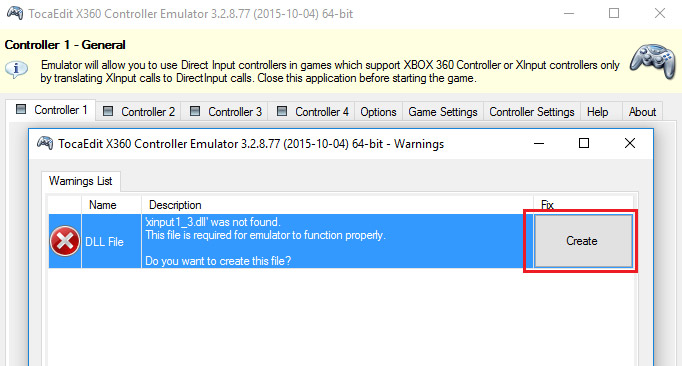
6. You will see window with warning – “xinput 1_3.dll was not found. This file is required for emulator to function properly.” Don’t worry, just click “Create” button to make them appear.
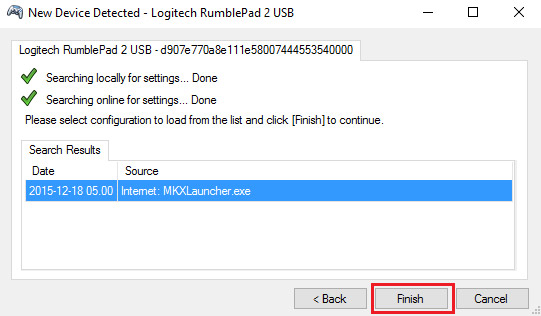
7. When x360ce will inform you that new device was detected, use automatic search for settings from internet – just hit “Next” button.

8. Click “Finish”, when installation completed.
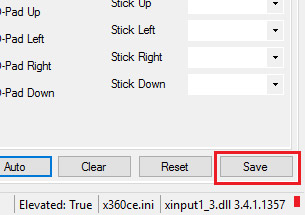
9. Hit the “Auto” button to make all settings set to defaults. Confirm changes by clicking “Yes” in popup window. All the buttons will be filled automatically.

10. Now just hit “Save” button to make all your settings saved. You can also change buttons assignment before hitting “Save”, if you like.
Now you can normally launch FlatOut 4: Total Insanity and use your controller with x360ce emulator – it will be starting automatically with each game launch.
Как зайти в настройки FlatOut 2?
Добрый день. Многие геймеры сталкиваются с проблемой открытия окна настроек игры, которое они видели при первом ее запуске. Если оно вдруг вам понадобилось, вы можете открыть свойства исполняемого файла игры и в параметрах запуска вписать -setup, после настроек эту строку можно удалить. Окно настроек также появится еще раз, если вы удалите сохранения из папки Savegame игры. Наконец, можно держать кнопку Alt нажатой при запуске игры, настройки также появятся.
Локальная игра во FlatOut 2
Локальную сеть можно настраивать через коммутаторы или маршрутизаторы, но мы с вами рассмотрим подключение одного компьютера к другому напрямую, через кабель Патч-корд.
Итак, приступим. Для того чтобы подключить компьютер к компьютеру необходимо по порядку выполнить следующие действия:
Шаг 1. Возьмите кабель Патч-корд (RJ 45) и один конец подключите к задней панели материнской платы в разъем Ethernet, а другой конец в другой компьютер в такой же разъем.
Шаг 2. Подключив кабели, запускаем оба компьютера и приступаем к настройке локальной сети. Итак, для первого и второго компьютера выполните следующие общие действия.
Нажмите правой кнопкой по значку Мой компьютер и выберите Свойства. В открывшемся окне Система в левой части нажмите на ссылку Дополнительные параметры системы.
Откроется окно Свойства системы. В этом окне перейдите на вкладку Имя компьютера и нажмите на кнопку Изменить.
Шаг 3. В окне Изменение имени компьютера или домена в поле Имя компьютера задайте Компьютеру 1 и Компьютеру 2 РАЗНЫЕ ИМЕНА (Например Comp1 и Comp2).
Символьные имена (Имя компьютера) должны состоять из латинских букв и цифр.
В поле Рабочая группа задайте имя рабочей группы (Рекомендуется оставлять по умолчанию).
Название рабочей группы на обоих компьютерах должно быть ОДИНАКОВЫМ.
Введя имя компьютера и название рабочей группы нажмите ОК.
Шаг 4. Далее нажмите меню Пуск выберите Панель управления и кликните по ссылке Центр управления сетями и общим доступом.
Шаг 5. В появившемся окне, в левой части щелкните по ссылке Изменение параметров адаптера.
Шаг 6. Если вы корректно установили драйвера, то в новом окне должна появиться иконка сетевого адаптера. Правой кнопкой мыши кликните по этой иконке и нажмите Свойства.
Шаг 7. В открывшемся окошке Подключение по локальной сети выберите Протокол интернета версии 4 (TCP/IPv4) и нажмите кнопку Свойства.
Шаг 8. В окне Свойства ставим переключатель Использовать следующий IP-адрес.
Далее, в окне Компьютер 1, для пк 1 прописываем следующий ip-адрес 192.168.1.1 и маску подсети 255.255.255.0.
В окне Компьютер 2, для пк 2 прописываем ip-адрес 192.168.1.2 и маску подсети 255.255.255.0.
Оставшиеся поля не заполняйте, оставьте их пустыми.
Прописав указанные ip-адреса и маску подсети на обоих компьютерах нажимаем ОК. Через несколько секунд на обоих компьютерах должно установиться соединение.
Теперь нужно проверить соединение. Для этого, на Компьютере 2 зайдите в меню Пуск - Все программы - Стандартные и нажмите на команду Выполнить.
В открывшемся окне напишите следующую команду ping 192.168.1.1. и нажмите на кнопку ОК.
В случае успешного соединения у вас должно появиться следующее окно. От компьютера 1 должен поступить ответ.
Теперь вам нужно с Компьютер 1 выполнить такую же процедуру проверки соединения. Только нужно указать ip-адрес компьютера 2, ping 192.168.1.2.
В случае успешного соединения с компьютером 1 должен произойти обмен пакетами.
На этом все. Мы с вами рассмотрели простой способ как подключить компьютер к компьютеру.
How to use x360ce emulator with FlatOut 2 on PC
In this tutorial you will find steps to make x360ce work with FlatOut 2. This method also works with any game – just do the same easy steps, no special skills needed to make any controller work as an Xbox 360 gamepad. Emulator allows your controller (joystick, wheel, gamepad, etc.) to operate as the most common device, recognized by most of the games without any additional settings and workarounds.
1. The first step is to download x360ce zip file from official site. You have to select 32 or 64 bit version (same as the version of FlatOut 2 you use). If you don’t know the version of your game or download wrong one accidentally, you will be notified later and have a chance to use another version.
2. Now we have to find the installation folder of your game. You can easily do this by looking into game shortcut settings or finding the game in your Steam library list. If you choose the Steam variant, right click the game name and select “Properties”.
3. Navigate to “Local files” tab and press “Browse local files. ” button.
4. Now you need to find the folder with FlatOut 2 executable. In the example picture they are located in Binaries / Retail subfolder. You need to extract downloaded x360ce ZIP file to folder with your game executable file.
5. Click on x360ce exe file with the right mouse button and select “Run as administrator” from dropdown menu.
6. You will see window with warning – “xinput 1_3.dll was not found. This file is required for emulator to function properly.” Don’t worry, just click “Create” button to make them appear.
7. When x360ce will inform you that new device was detected, use automatic search for settings from internet – just hit “Next” button.
8. Click “Finish”, when installation completed.
9. Hit the “Auto” button to make all settings set to defaults. Confirm changes by clicking “Yes” in popup window. All the buttons will be filled automatically.
10. Now just hit “Save” button to make all your settings saved. You can also change buttons assignment before hitting “Save”, if you like.
Now you can normally launch FlatOut 2 and use your controller with x360ce emulator – it will be starting automatically with each game launch.
Читайте также: