
Star trek online гайд
Обновлено: 07.07.2024
The latest Star Trek Online story update, Season Twenty-four: Reflections, is now live!
Spoiler warnings ahead!
AdvertisementSo you're playing Star Trek Online and have some questions that need answering.
“Where's Sulu?” “What do I do with research samples?” “Who do I have to perform oo-mox on to get Bridge Officers?”
Well, look no further! All your answers are right here in this FAQ. Never before has the phrase "Frequently Asked Questions" been more true.
Contents
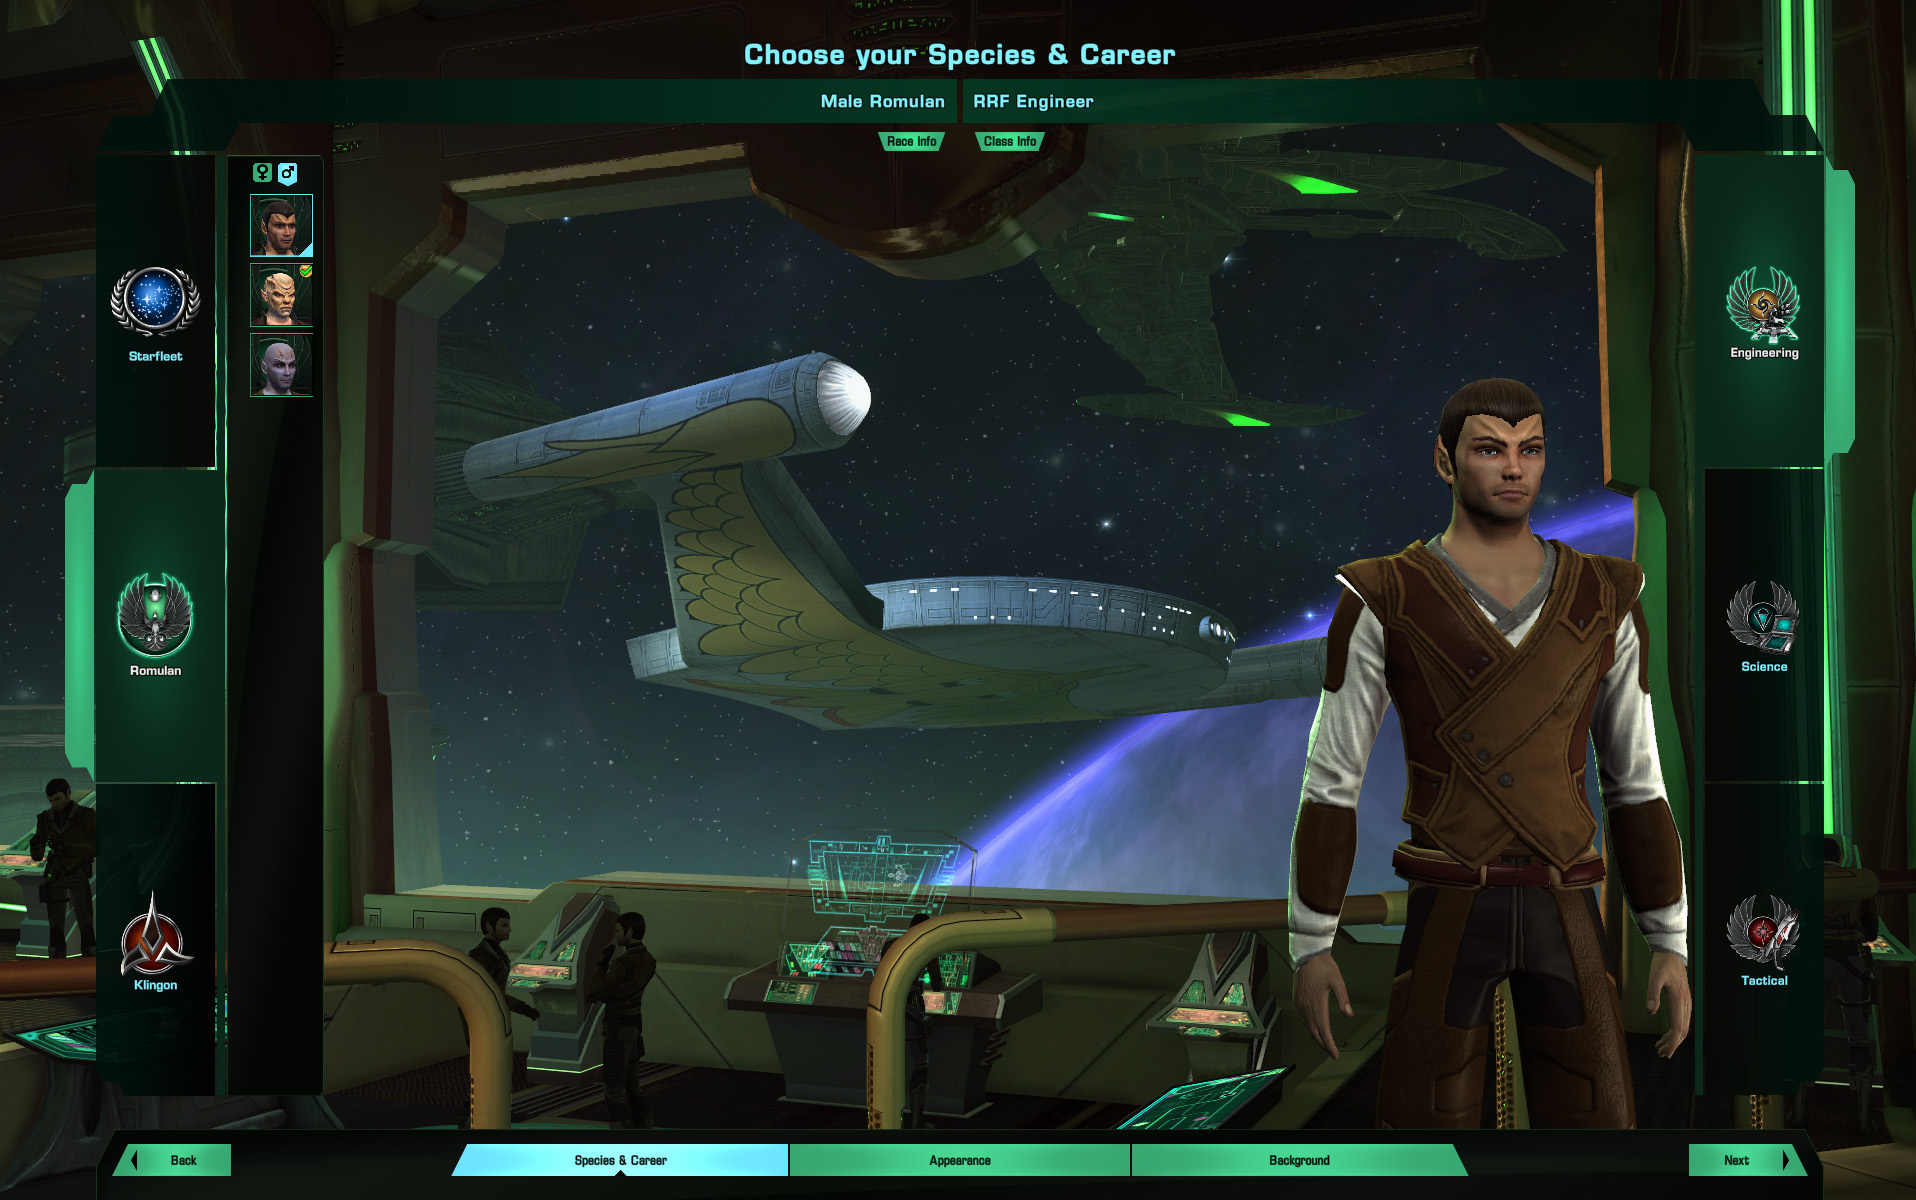
I have a choice of three professions. What do I pick? [ ]
Pick the profession that suits your playstyle. Each offers different set of captain abilities, and occasional encounter of profession specific secondary objectives during the Episode missions. Please read the Profession page for further details.
Where do I respec? [ ]
To respec your skills, go to the Skills tab of the player's character status screen (default key: 'U'). It will require a Captain Retrain Token found in the Services section of the C-Store, costing 300 .
Where is Sulu? [ ]
This question is a running gag in STO that goes back to the early days of the game. Players could not find this NPC so they regularly asked where to find him. Akira Sulu can be found in front of the Admiral's office, right next to Commander Burgess.
How do I travel between Star Systems? [ ]
After the tutorial, you are able to travel around the map freely. Beaming up to your ship for the first time will place you in the local Star System of your faction's major hub, for Federation or Klingon players, or directly into Sector Space for Romulan Captains beaming up from the Romulan Flotilla. To leave the Star System and get to Sector Space, click on the "Warp" icon at the top left of the Minimap. Once in Sector Space, simply fly to any of the Systems within, or up to the border of the next Quadrant, and if permitted, you will be able to cross. Continue on until you reach the Star System you are going to.
Bringing up the sector map (default key: 'M') while in Sector Space will show a list of all Systems and Sector borders within the Sector. You can click on a System to have your officers fly the ship to that location. To navigate to a System in a distant Quadrant, see the following answer.
How do I get to. [ ]
Check out our Galaxy article for a very handy and easy-to-use reference chart of all star systems and their locations.
What do I do with research and development Materials and Components? [ ]
After reaching level 15, Materials and Components are used for crafting of various ground or space equipment, consumables or gear upgrades.
Where's ___ on Earth Spacedock? [ ]
To find out where things are in Earth Spacedock, check out the Earth Spacedock article. There's a map, NPC list, and a brief rundown of where everything is.
How do I customize my clothing? [ ]
Check the for all locations of NPCs which allow character customization. Visit the Cardassian tailor Ghemik Telur in the Requisitions area of Earth Spacedock. Check out the Earth Spacedock article for more information on exactly where that is.
Where can I train my Bridge Officers on Earth Spacedock? [ ]
Go to the Bridge Officer Trainer in the Personnel section of Earth Spacedock. Check out the Earth Spacedock article for more information on exactly where that is.
When can I get a new ship? [ ]
When you reach Lieutenant Commander at level 10 (see next question), you will be able to requisition a new ship. Subsequent ships in tiers available to your rank can be claimed every 10 levels, up to level 40.
Where can I get a new ship? [ ]
On Earth Spacedock, look for the Shipyard section at the left area of the map. The Starship Requisitions Officer is standing at the right side of the desk on the left.
If you just recently ranked up, see Admiral Quinn in person to get a new ship plaque, which allows you get a new ship for free. If you have enough Dilithium, you can buy additional ships, although purchase of Rare tier 5 ships from the exchange may be a cheaper option.
Speak to Ensign Obin in the lower level of the Shipyard to change your current ship.
Once you have your new ship you can rename it by bringing up your Status window (press U by default) and select the pencil icon next to your ship's name. If you cannot change to your newly purchased ship, check your overflow inventory.
What are these abilities I get for leveling up? [ ]
A full list can be seen on the Leveling rewards and Player ability pages.
How do I defeat the Crystalline Entity? [ ]
What are the three main forms of currency, and what are they used for? [ ]
For more information, see the currency page.
What exactly do Mark numbers mean? Is it better to have a higher mark number, or a higher rarity? [ ]
The Mark numbers refer to the minimum level you're required to equip a piece of equipment. Lieutenant Commanders - players level 10 to 19 - may only equip Mark III and IV weapons.
Rarity boosts various attributes, but only to a degree - a blue-rarity Mark IV weapon can be equivalent to a white or green rarity Mark V or VI weapon. In general, it's better to replace lower-ranked but rarer equipment with higher mark numbers as you progress, but it's important to treat each case of upgrading individually.
What's the best piece of armour/shields, or the best weapon? [ ]
See Body Armor, Personal Shield and Ground weapon for more details.Defensively, Energy Dampening armour is highly effective at blocking enemy fire. It is lacking, however, in melee defence. Polyalloy Weave Armour is effective at blocking kinetic damage, like grenades, and melee attacks. The other four armour varieties alter your melee offence (Physical Augmentation), critical damage (recoil compensating), critical chance (integrated targeting), or your own damage (energy harness).
There's only one kind of shield, so finding the best shield for you is a matter of looking for the traits you want in shields: higher capacity (appears as [CAP]) or regeneration (REG), for example. One to keep an eye out is [DIS], which blocks 20% disruptor damage. Disruptors are the most common type of weapon you'll encounter as a beginner until you get into PVP.
What about shipborne shields? [ ]
In summary, shipborne shields come in four flavours: they are outlined here. Most players prefer capacity to regeneration, but it is generally accepted to stick with either high regeneration or high capacity; attempting to get a shield that does both results in a shield that does neither extremely well. Therefore, keep an eye out for Covariant shields with [CAP] or Regenerative shields with [REG].
What's the best ship-based weapon for me? [ ]
Choice of weapon type, ranging from beam arrays to turrets:
-
are the weakest per-shot, but have a full 360 degree arc, and can thus shoot any target from anywhere. are the most common and cause medium damage in a 270 degree arc. can only fire in a 180 degree arc in front of your ship, but cause slightly more damage than Beam Arrays. are the most powerful beam-type weapon, but fires in a 90 degree arc in front of your ship. Notably, this is the same arc as photon torpedoes. have high damage, but a narrow 45 degree arc in front of your ship. are identical to Dual Cannons, but fire fewer, more powerful shots.
Ship types capable of equipping dual cannons: Battle Cruiser, Carrier, Destroyer, Dreadnought Cruiser, Escort, Escort Carrier, Fighter, Lt. Cruiser, Multi-Mission Science Vessel, Raider, Raptor and Warbird. Cruisers and science vessels don't have access to dual cannons or dual heavy cannons.
In conclusion, the more powerful the weapon, the narrower the firing arc.
See Damage type (space) for more details.
There are six standard types of damage. They are mostly the same, with the major differences being in their "procs" - or random effects on a hit. Think about a strategy that works, then ask around for feedback. An example of a basic strategy is using Tetryon weapons to deplete the enemy's shields, then using torpedoes to cause hull damage. It is possible to use all damage types simultaneously, but disadvantage could be inability to stack "procs" of same type.
SPACE ENERGY WEAPON DAMAGE TYPES
There are six damage types used for energy weapons on your ship. Each one has its own unqiue ability.
DAMAGE TYPE: Antiproton
DESCRIPTION: Does more critical damage than other types.
DAMAGE TYPE: Disruptor
DESCRIPTION: Chance to weaken an enemy ship's resistance to damage.
DAMAGE TYPE: Phaser
DESCRIPTION: Chance to disable one enemy subsytem.
DAMAGE TYPE: Plasma
DESCRIPTION: Chance cause plasma damage over a period of time.
DAMAGE TYPE: Polaron
DESCRIPTION: Chance drop enemy power levels.
DAMAGE TYPE: Tetryon
DESCRIPTION: Chance weaken enemy shields.
SHIP PROJECTILE WEAPONS
There are two types of projectile weapons:
SPACE PROJECTILE WEAPON DAMAGE TYPES
There are six damage types for projectile ship weapons. Each one has its own unique ability.
DAMAGE TYPE: Chroniton
DESCRIPTION: Can reduce enemy flight speed and turn rate.
DAMAGE TYPE: Photon
DESCRIPTION: Basic torpedo that causes more damage than others (except Quantum and Tricobolt) and has faster firing rate.
DAMAGE TYPE: Plasma
DESCRIPTION: Can cause plasma damage over a period of time.
DAMAGE TYPE: Transphasic
DESCRIPTION: Can cause some damage that passes through shields.
DAMAGE TYPE: Tricobalt
DESCRIPTION: Can cause large amounts of damage but are slow and destructable.
DAMAGE TYPE: Quantum
DESCRIPTION: Strongest basic torpedo (aside from Tricobalt) and has slower firing rate.
What's the main difference between the torpedo types? [ ]
At first, you'll only have access to photon torpedoes, and quantum torpedoes a few levels later. Photon torpedoes have the highest damage per second, but quantum torpedoes pack a bigger punch per shot; they thus have a longer reload time. Plasma torpedoes cause even less damage but inflict damage over time (think poison). Transphasic torpedoes cause the least amount of damage but have better shield penetration (most torpedoes are only effective when fired into the hull). Chroniton torpedoes are in between photon and plasma torpedoes in terms of power but have a chance to impair the target's movements. Tricobalt cause extremly high damage; however, they take thirty seconds to reload, can be targeted by enemy ships and destroyed en-route to the target, and can damage yourself if you are too close to the detonation.
How do I improve my abilities? [ ]
See Ability for more details.Abilities can be split into three distinct categories:
- Your personal abilities - the ones you use on the ground, depend on Kit Module you equip.
- Your bridge officers' abilities (that is, the abilities used by your away team) can be altered by using the Training Manuals.
- Your ship's abilities are determined by your bridge officer's space abilities. These can be altered and improved in the same manner of the ground abilities.
By spending skill points and ranking up your bridge officers, additional abilities will become available to them.
I'm ranking up my bridge officers, but their abilities aren't showing up. [ ]
Bridge Officers can only use their space abilities when assigned the proper bridge station. They can be assigned to stations on the "Stations" tab at the top of the player's character status screen (default key: 'U'). The default Miranda class light cruiser, for example, has only Ensign slots; thus, any assigned bridge officer can only use their Ensign ability regardless of whether they've unlocked their Lieutenant abilities or not. Choosing which officers to assign to which stations is an important choice, and it is the major reason your next ship will be more powerful than your current one.
Bridge Officers may use their ground abilities at any time.
I noticed I have my own abilities. It looks a lot different than what my other people have. [ ]
Your personal skills are passive in terms of their effects. They alter your ship's ability to cause critical damage, its evasive abilities, among other things.
Ranking these up passively improves your ship and your captain. Some of these skills provide the ability to train bridge officers in certain abilities that can only be obtained in this manner. A Science player who invested 2 points in Engineering track of the Skill system will be able to train Hazard Emitters III, for example.
Which of these you rank up depends on your playstyle. If you intend to use your phasers a lot, for example, it is suggested to rank up Energy Weapon Training.
How can I stop the Borg adapting to my weapons? [ ]
How can I exchange dilithium for EC? [ ]
Simple answer: You can't.
Complex answer: Trade your dilithium for Zen in the Dilithium Exchange. Buy something that is not bound in the C-Store, like for example a Master Key. Sell this item in the exchange for EC.
Where should I sell extra stuff for EC? [ ]
You'll get the most by selling in Exchange, but that takes time and some things won't sell and will eventually end up in your mail box.
Some vendors will give you 50% of the list EC price of an item. A partial list of such vendors can be found under List of vendors buying at 50%. Alternatively, use Recycle option from your inventory.
Equipment Mark Levels? [ ]
What's the highest Mark a weapon or device goes up to?
Weapons, shields, consoles, etc. can go up to Mark fifteen. Devices, however, do not have a mark number and are affected only by the player's skills.
What does support system do when i transfer power th it?
I have another question! [ ]
That is what this Wiki was created for. Try the search function or leave a question on the talk page.
Thanks, and enjoy the rest of the wiki! Help us grow and pitch in. Create articles that need to be created, and edit articles that need to be fixed or added to. Everybody is welcome to join in!
The latest Star Trek Online story update, Season Twenty-four: Reflections, is now live!
Spoiler warnings ahead!
Advertisement
Contents
Фракции [ ]
В окне создания персонажа Вы можете выбрать Фракцию, расу(слева), также как и путь развития(справа) .
- ↑ (with Reman sub-faction purchasable from C Store or unlocked via reputation system)
Пути Развития [ ]
В Star Trek Online, существует три пути развития, которые игроки могут выбрать. Они соответствуют трем главным отделам в Звуздном Флоте: Инженерный, Научный and Тактический. Пути развития в Star Trek Online очень похожи на классы в большинстве других MMORPGs, за исключением того, что они не настолько ограничены, насколько жестко определены. Игрок любого пути развития может летать на любом типе кораблей и надевать любую A player of any career path can fly any type of starship and equip any броню or оружие. Во время некоторых миссий Вам будут доступны опции, которые соответствуют вашему пути развития.
Сравнение [ ]
Каждый класс имеет определенную направленность и играть одну или несколько ролей в группе, также как и корабль наиболее подходящий под этому классу.
- Тактические офицеры наиболее успешно могут наносить DPS (Damage Per Second - Урон в секунду), т.е. наносить максимальные повреждения; они делают свою работу лучше всего, нанося повреждения врагам в наземных и космических боях. Тактические офицеры обычно носят красную форму и лучшим способом используют Эскорты (Федерация) and Рейдеры или Рапотры (Империя Клингонов), которые являются лучшими кораблями для нанесения урона врагам. Они достигают этого посредством максимального увеличения исходящего урона их энергетического (Лучевое оружие & Пушки) и реактивного вооружения (Торпеды & Мины), и через увеличение этого потенциала с помощью Моделей Атаки (Attack Patterns (α, β, Δ, and Ω)).
In ground combat, tactical kits give powers that allow the player to put out increased damage as well as spike damage (one-time concentrated bursts of firepower), AoE (Area of Effect) damage via grenades, and abilities that improve the damage output and staying power of allies.
- Engineers are best suited to the Healer and Tank roles. Engineers wear the color gold for their uniforms and are ideally matched with Cruisers (Federation) and Battlecruisers (Klingon Empire), which are also best suited for tanking. Tanks take the brunt of damage in battle and try to attract all enemies to themselves, while the DPS or Damage players do the majority of the actual firing and damage. As healers, Engineers are adept at healing hull damage, although they also have strong shield healing. Their focus is primarily on survivability and resilience in space combat, while supporting their Away Team in both space and ground combat with fixed-position automated weaponry, shield and medical generators, technological buffs, and other repairs and improvements.
In ground combat, engineering kits generally involve fabricating turrets and shields, supporting your team with weapon buffs and seeker as well as support drones, and laying mine barriers and bombs.
- Science officers are most useful in the Healer and "Buffer/Debuffer" roles, where they provide healing and buffs for allies (and themselves), as well as powers that weaken and disable enemy NPCs. Science officers wear the color blue and are ideally matched with Science Vessels (Federation) and Warships (Klingon Empire), ship classes whose onus is to weaken and control their enemies, and provide some healing on the side.
In ground combat, science kits offer team healing and AoE (Area of Effect) damage, but can also grant abilities that control or debuff enemy resiliency, damage and movement.
Races [ ]
See also our guides on custom-built canon-aliens & canon-uniforms.Each faction has its own collection of playable races, each coming with a specific, fixed racial trait. The important thing to remember is that there are no "Uber"-races. Go with what you feel comfortable with.
Traits [ ]

Your traits can be re-viewed and -selected in the traits menu at any time during the game.
Traits are mostly passive bonuses that can be activated by assigning them to slots. Picking your race (or choosing to create your own custom race) automatically means picking one specific non-customizable racial trait (or creating one for your custom alien). Also, three additional race-typical traits are assigned to each preset race, however, these can be customized once you are in-game (see image on the right). As you level your character up, two additional personal trait slots (1 space, 1 ground) become available every 10 levels, so each player has a total of 18 (9 ground, 9 space) customizable personal traits and one fixed racial trait at level 60 (the Reputation System grants further traits from level 50 onwards; more information on the trait-article).
Levels & Ranks [ ]
Star Trek Online lets your character progress through different levels by accumulating Experience Points, just like many other MMORPGs. In STO, however, each bracket of 10 levels also comprises a rank (Ensign & Lieutenant counted as one rank). At each level, character gains level rewards and Skill points (explained below). Furthermore, new tiers of starships are opened up to each new rank.
- ↑Jem'Hadar captains begin at level 60. NPCs and Bridge Officers use these rank names, and they appear in the rank progression reward list.
- ↑ Since Rise of Discovery, All Tier 6 ships have become Scaling ships and are now available to all players after finishing their faction's tutorial.
- ↑ The Prototype Walker Light Exploration Cruiser, Kobayashi Maru Freighter, and Tong'Duj Freighter are all Tier 4 level scaling starships
- ↑ Each subsequent specialization level after reaching level 65.
Note: Additionally and independently from your military rank you can gain commendation ranks as part of the Duty officer system.
Skills & Specializations [ ]

Skills in Star Trek Online are comparable to "talents" in other games and are distributed as your character gains skill points while leveling up.
Skills (comparable to "talents" in other games) are unlocked at level 5 and increase the effectiveness of abilities and/or improve certain base stats, e.g., critical hit chance or hit points.
Skills are seperated into two major groups: Space & Ground. Space skills are subgrouped into "Tactical", "Engineering ", and "Science"; ground skills into "Weapon", "Health and Armor", "Personal Shields", and "Kit". Every player, regardless of the career path, can access any skill.
Space skills have five levels (Lieutenant, Lt. Commander, Commander, Captain, and Admiral), which require 0, 5, 15, 25, and 35 spent "space points" to be accessed, respectively. In total, there are 90 space skills and a level 50 player will have 46 space points to spend (one every level from 5-50). Ground skills have no such hierarchical order. In total, there are 20 ground skills and a level 50 player will have 10 ground points to spend (one every 2 levels from 5-50).
At level 50, the skill system is maxed out and players begin to earn points that can be spent in the Captain Specialization system. This is a very similar, talent tree-like system, but it is not capped at a certain maximum number of spent points, but instead allows players to keep earning specialization points indefinitely.
Abilities [ ]
Abilities are the actions that you and your bridge officers can take in combat. There are both space and ground abilities. You gain access to abilities in various ways:
- Players will learn a few new abilities as they rank up. The majority of ground abilities available to players, however, will be based on the kit modules you have equipped.
- Your starship's abilities are determined by your bridge officers - their space abilities and the rank of the station you assigned to them. A Commander-rank bridge officer at an Ensign station will only be able to use his/her Ensign ability, regardless of the officer's actual rank.
- Bridge officers can learn new abilities using the Training Manuals sold by the Bridge Officer Trainers.
Cooldowns [ ]
In addition to their normal recharge time, abilities that are linked to the same subsystem (e.g. if they have "System: Batteries" in their descriptions) share an additional cooldown time during which no other abilities of the same subsystem may be used. For example, the Emergency Power to Weapons I ability triggers a 20-second cooldown on your ship's Batteries subsystem, during which time no other "System: Batteries" Ability (such as Emergency Power to Shields) may be used.
Bridge Officers [ ]
See main article: Bridge OfficerIn Star Trek Online, your character can be assisted in ground combat by an away team of up to four computer-controlled Bridge Officers (comparable to "pets" of other games and with up to four ground-abilities per officer). In space combat, Bridge Officers (or "BOffs") bring with them most of the abilities you can use (up to four space abilities per officer).
See also: Guide: KeybindsThis is a very basic guide to the initial controls of the game, both in flight and ground modes, and also a couple of "tricks" to help you along the way.
Please Note The following key mappings are true for the Windows English keyboard layout. Other OSes or language layouts may vary.
The game has two basic playing modes:
Ground Mode [ ]
See also: Ground combatThis is where your character is in person on the screen either in friendly territory such as a starbase or in enemy territory such as a ship or planet.
Basic Controls [ ]
| Key | Action |
|---|---|
| W | Run Forward |
| Shift + W | Sprint Forward |
| S | Run Backward |
| A | Turn Left |
| D | Turn Right |
| Q | Strafe Left |
| E | Strafe Right |
| R | Toggle continuous sprint on / off |
| F | Interact with an object near to you, such as a person, crate or turbolift |
Space Mode [ ]
See also: Space combatThis is where you are guiding your ship through either open space or within a star system
Basic Controls [ ]
| Key | Action |
|---|---|
| Q | Decrease flight speed |
| E | Increase flight speed |
| R | Toggle full speed |
| Shift+ R | Toggle Full Impulse |
| A | Bank Left |
| D | Bank Right |
| W | Nose down |
| S | Nose Up |
| F | Interact with an object near to you, such as an anomaly, or accept a prompt |
Player abilities [ ]
See also: Player abilitiesOn the screen in either mode are controls for actions that your character can perform. In ground mode you will be shown your weapon's main action (normal "fire") and other possible actions such as "Exploit attacks". These each have a number to the top left of their control, and can be activated by pressing the corresponding key on your keyboard (1 through 0)
You can have up to four rows of controls on screen at any one time in both ground and space modes, to set these click the icon to the top right of the control module that looks like three stacked playing cards. This brings up a control that allows you to select between one and four rows of controls.
On the left hand end of these rows is a number between 1 and 10 with up and down arrows. These allow you to set up your own configurations and scroll between available controls.
What do A, C and Sh mean? [ ]
These are the methods of using that control on the keyboard
A = ALT, C = CTRL, Sh = Shift.
Bridge Officer abilities [ ]
See also: Bridge Officer abilitiesEach Bridge officer has training in different capabilities allowing them to vastly change the basic setup of your ship, be it by adding extra power to your next phaser shot or healing your shields mid-combat.
The initial play setup gives you a row of icons below your main ability section, showing the face and abilities of each of your bridge officers. When you start the game each officer will only have one ability, but as you progress through the game the number and class of abilities increase (you can also train your officers either through your own abilities, additional bridge officers or at certain starbases).
These action icons will generally have "A" and a number in their action boxes. To control with the keyboard hold the ALT key and press the appropriate number.
Remember, when purchasing a new ship, set the bridge officers! Also you might try to remember to keep them as trained and as promoted as possible to increase their additional abilities.
Moving Controls [ ]
The game has a funny habit of moving your controls around, especially when you gain new abilities, even as far as new weapons!
To stop your firing actions, heals, buffs and debuffs being all over the place you can move the controls around as you wish them to be. Just do this when not in a combat area to avoid some blushes and much muttering of "Where did my phasers go!?"
To move a control, drag it with the right mouse button from where it currently resides to your required location. This can be within or across action bar rows (see above). After you have your actions set up the way you want them, you can click a checkbox that locks your action bars to prevent your abilities from being moved around or from accidental removal altogether.
Advanced control setup [ ]
All of the key mappings and controls can be adjusted and moved around the screen using the controls in the option menu. To manually adjust the placement of monitor panels and controls, click the game options icon to the right of the minimap and select the top HUD option, then drag the corresponding green boxes to your convenience.
Войти
Нет аккаунта? ЗарегистрироватьсяАвторизуясь в LiveJournal с помощью стороннего сервиса вы принимаете условия Пользовательского соглашения LiveJournal
Нет аккаунта? Зарегистрироваться А также руководства и описания игр (РПГ, ММОРПГ, WoT), литературное творчество, музыка и клипы.Star Trek Online - снаряжение для полевых баталий
Немного про наземные бои в Star Trek Online

1 часть из 3 (а может и не 3)
За полтора года игры в Star Trek Online накопилось достаточно много материала - частично в файликах, частично в голове. Начну, пожалуй, выкладывать все это дело, пока достаточно бессистемно. В любом случае, это хоть немного пожизненнее будет, нежели 100 лет назад написанное прохождение Ведьмака (к которому все равно придется искать нормальные скрины). Не обессудьте за некую несистематизированность материала, по Fallen Earth я начинал с меньшего. Итак, поехали.
Почему вообще стоит играть в наземку?
Во-первых, награда за наземные бои в последнее время стала как бы не лучше, чем за космические сражения. Во-вторых, это удовольствие стоит гораздо дешевле космических боев. Ведь вам нужно всего-навсего 4 предмета - кит (который Kit), броня, щит, и ствол (подробнее чуть ниже). Ну и в-третьих, наземка - это просто весело и, как правило, быстро.
С какого уровня начинать ходить на STF?
Если вы новичок в игре, то начинайте сразу, как только откроется к ним доступ. Просто чтобы составить впечатление о том, что такое СТФка. Тема снаряжения раскрыта чуть ниже. Но вообще то, считать открытым свое участие в STF вы можете с 50-го уровня. Почему с 50-го? Потому что становятся доступными к прохождению Advanced STF, и вы уже можете применять MK XII снаряжение различного вида - репутационное, флотское, любое другое.
Снаряжение для наземных боев
Многие игроки не желают участвовать в СТФках, ссылаясь на плохое снаряжение. Сейчас уже к 50-му уровню, не особо напрягаясь, можно накопить достаточно ресурсов для изготовления снаряжения из репутации Омега и Нукара. Единственной, но крайне неприятной проблемой остается то, что для изучения репутации на 100%, вам потребуется очень много времени - 40 дней для первого персонажа. И 20 дней для последующих - по достижению максимального уровня в репутации вы сможете крафтить токены, удваивающие количество получаемой репутации для всех заданий. Передаются только в пределах аккаунта, увы. Впрочем, не о базе игры в Стар Трек здесь речь, вернемся к снаряжению для наземного/подземного/станционного боя.
Есть минимум три способа получить нормальное снаряжение к 50-му уроню:
1. Бюджетное снаряжение с аукциона (который Exchange):
- Polyalloy Weave Armor MK X [Mob] [Tox] - броня с очень неплохой защитой (100 Physical/Kinetic, 37.5 Energy, +15 Toxic, +27 Root/Knockback). Стоит около 10к (т.е, 5.000-10.000 энергокредитов - жуть как дорого).
- Personal Mobility Shield MK XI [Cap] [Reg] - емкость - 291.8, +5.3 регенерация в бою, +27 Root/Knockback res. Еще один предмет вожделения Рокфеллеров - цена примерно такая же, как и у брони.
- Оружие - любой Very Rare (фиолетовый) лучемет (Split Beam Rifle) или дробовик (Pulsewave Assault) Mk XII с особенностью [KB3]. Стоимость - 10-20к.
3. Флотское снаряжение. К 50-му уровню вполне можно подкопить себе дилития и флотских кредитов на дробовик (или лучемет), щит и броню. В дальнейшем просто отдадите все это тому офицеру, кто наиболее часто сопровождает вас в наземных зонах боевых действий.
Немного подробнее остановлюсь на оружии. Прокачивая репутацию, мы получаем ящики, из которых, бывает, выпадают очень даже приличные экземпляры. Также оружие и снаряжение для наземного боя выпадает из наградных ящиков на Дефере (награда за Hard missions) и на Нукаре. Ищите оружие с особенностью [KB3], сбивать противника с ног всегда очень приятно.
Kits & Modules (Киты и модули)
Плавно переходим к китам (нет, все равно я не буду называть их комплектами) и модулям. Вот это снаряжение будет стоить как минимум на порядок (а как правило, на два) дороже, нежели броня/щит/пушка. Но именно при помощи модулей вы создаете персонажа под себя, дополняя и усиливая то, что развили в своем билде. Правильно подобранное под себя оборудование - залог не только побед, но и, что весьма немаловажно, получения от игры максимума удовольствия. Кому-то нравится врываться в толпу противника, щедро раздавая пинки направо и налево. Кто-то любит спокойно отстреливать врагов издалека. Призвание третьего - быть везде и повсюду, оказывая посильную помощь там и тут.
В общем, по факту, модули - это и есть ваши боевые навыки. В дополнение к имеющимся классовым капитанским. И эффективность их применения зависит от того, как вы распределили свои умения (те, которые Skills). Необходимо сразу уяснить (усвой повстанец, если ты не дятел - АТ-АТ в бою непобедим) - персонаж, не применяющий свои навыки в полной мере, подлежит незамедлительному расстрелу. Поэтому как можно более внимательно отнеситесь к выбору своих навыков - читай, модулей.
Каждый класс может использовать два типа модулей. Грубо говоря - атакующие (включая дебафы) и защитные (включая, соответственно, бафы). Аналогия правда очень грубая, но объясняет саму суть наличия двух типов модулей:
Тактик
- Assault - как правило, здесь идут так называемые "директ-дамажные абилки". В смысле - навыки, напрямую наносящие пользу противнику, как то гранаты или Lunge.
- Strategic - в большинстве своем, полезные как себе самому, так и всей партии бафы - Rally Cry, Overwatch, Stealth, и так далее.
Инженер
- Mechanic - аналог тактических Assault модулей. Мины, бомбы. Здесь же - оффензивные дебаффы и лечилки щитов.
- Fabrication - конструкции. Турели, генераторы, дроны, и иже с ними. Опять же, аналог Strategic модулей.
Ученый
- Research - разработчики всегда были жестокими людьми. Тут вам на выбор - отравить противника радиацией, или же просто сжечь его экзотермической индукцией. Про аналогии, думаю, говорить уже не нужно.
- Medic - ну что можно сказать, если это слово и по-русски, и по-английски звучит одинаково? Все, имеющее отношение к лечению и бафам. В отличие от тактика, бафы ученого - куда как более защитно ориентированы.
Где взять необходимые Kits & Modules?
Где же можно раздобыть хорошее оборудование в виде китов и модулей? Как обычно, минимум 3 варианта на выбор:
- Мусор, выдаваемый за прохождение сюжетных миссий (а бывает и вовсе не мусор!);
- Флотское посольство (Embassy) и Spire;
- Аукцион;
- Репутация.
За множество сюжетных миссий нам дают в награду кит и модуль. Как правило, и то, и другое, достойно в лучшем случае продажи на аукционе, а в худшем - в магазине. Но случается, что выпадают очень неплохие варианты, например фиолетовые MK XI+. Смотрим, что получили, и используем/продаем на свое усмотрение.
Флотские киты и модули
Продаются за дилитий и флотские кредиты в посольстве (Embassy) и в Спайре (Spire). Не стоит бросаться и покупать MK XII. MK XI более чем достаточен. Мизерная прибавка к капитанским умениям никак не компенсирует огромного увеличения стоимости. А к модулям стоит присмотреться очень внимательно. Некоторые из них обязательны к покупке вашему капитану. Итак, перечень флотских китов и модулей.
Spire. Spire Kits. MK XI-XII
- Тактик - Prototype & Experimental (2 Strategic + 2 Assault + 1 Tactic)
- Инженер - Prototype (4 Fabrication + 1 Engineering) / Experimental (4 Mechanic + 1 Engineering)
- Ученый - Prototype (4 Research + 1 Science) / Experimental (4 Medic + 1 Science)
Embassy. Romulan Kits MK X-XII (не берите MK X - там только 4 слота)
- Тактик - Romulan Tactic (4 Assault + 1 Tactic)
- Инженер - Romulan Engineering (4 Fabrication + 1 Engineering)
- Ученый - Romulan Science (2 Research + 2 Medic + 1 Science)
Модули
Тактик
- Rally Cry (Strategic, Spire) - однозначно нужен любому. Очень полезный баф, к тому же флотская версия лучше того, что можно достать на аукционе.
- Lunge (Assault, Spire) - на мой взгляд, также нужен любому. Это один из самых сильных (если вообще не самый сильный) атакующий навык тактика. Опять же, флотская версия лучше аукционной.
- Plasma Grenade (Assault, Embassy) - лично я гранаты не использую, но если вы используете - обязательно к приобретению.
Инженер
- Chronitron Mine Barrier (Mechanic, Spire) - покупать, даже не думая. Одна из основных "пассивно атакующих" особенностей любого себя уважающего инженера.
- Shield Generator (Fabrication, Spire) - дело вкуса, брать или не брать. Вещь полезная, но в хозяйстве не обязательная.
- Beam Turret (Fabrication, Embassy) - огнемет. Очень хорошая турель, если вы их используете. Но лично я в них в последнее время разочаровался, хватает и мортиры. Если так уж нравятся турельки - копите 10кк на Biotech
Ученый
- Sonic Pulse (Research, Spire) - на мой взгляд, не заслуживающий внимания модуль. Есть куда более приятные способы нанести пользу противнику.
- Medical Tricorder (Medic, Spire) - одно из важнейших умений ученого - умение быстро и качественно лечить. Есть и другие лечащие модули, но этот, на мой взгляд, необходим каждому.
- Stasis Field (Research, Embassy) - по мне, так годен исключительно в ПВП. В общем, обидели научника с флотскими модулями.
Аукцион
Заходим на аукцион во вкладку Personal Equipment / Kits, и выбираем что-нибудь из Delta Expedition. Желательно [CrtD] или [CrtX]. Из прочих особенностей всячески приветствуется что-то из [Armor], [Shield], [Weapon]. Это всегда хорошо для любого персонажа - защита и атака. Для каждого класса существуют свои модификаторы, подробно останавливаться на них не буду, но для тактика вполне подойдет [Combat] - повреждения, [Spec] или [Squad] - +к бафам. Инженеру - [Demo] для усиления его бомб, а ученому - [Part] для увеличения эффективности файрболов или [Medic] - лечение.
Ни в коем случае не берите киты с [Threat]! Лишний аггр нам не нужен. Если Delta Expedition киты слишком дороги для вас (а здесь цены могут достигать и 200-300к), посмотрите другие фиолетовые варианты MK XII-XII.
Так, все, на сегодня хватит. Перечитал - у самого кругом голова пошла, как все сложно. Хотя на самом деле - все проще простого. Список модулей добавлю в следующую часть, уж больно не систематизирован он у меня, да и комментариев похабных там полно.
Чего еще напишу? Про тактику боя и роль каждого класса на поле битвы - однозначно. 100% в процессе меня немного заклинит на билдах, так что про них тоже чего-нть будет. Ну и, конечно же, то, с чего я собственно и начал сегодня написание сего труда - тактика прохождения НЕборговских СТФок. Всего то хотел написать, как быстро проходить UIE/BHE/NTTE/DRSE.
The latest Star Trek Online story update, Season Twenty-four: Reflections, is now live!
Spoiler warnings ahead!
AdvertisementIn Star Trek Online, the tutorials encompass the first few missions for each faction. With the help of several tooltip pop-ups, the player is slowly introduced to the game's UI and mechanics of ground and space combat.
The missions introduce the player to their faction's story and also provide the narrative for how they gain command of their first starship. These missions also award the first few bridge officers that players receive, notably [ Elisa Flores ] , [ K'Gan ] , [ Tovan Khev ] , [ Tarsi ] , and [ Evelyn Savea ] .
They are non-repeatable but can be passed if the player has already played them on another character. If passed, the player will be taken through a different, accelerated arc of tutorial missions that takes much less time to complete, but is designed to bring the character to a similar level of development and aggregate rewards by the end of the arc.
Tutorial missions [ ]
Introductory missions [ ]
Note, Dominion characters start at level 60 so do not have a tutorial as it is assumed they are familiar with the game's mechanics. They do however have a non-repeatable introductory arc: Engineered for War which cannot be passed, even if the player has already played the arc on another character.
Removed missions [ ]
Upon launch, Starfleet had a tutorial arc called Tour of Duty that had the player begin aboard a starship under attack from the Borg. The arc focused entirely upon the Borg attack on Vega IX without the inclusion of the Klingons or Starfleet Academy. It also had a much larger role for the Khitomer Emergency Medical Hologram (voiced by Zachary Quinto). This was replaced in 2013.
At launch, the Klingon faction began at level 20 without a full tutorial as they were unlocked once the player had levelled up a Starfleet character. Instead, they had a simpler introductory arc called Tour First City. When the KDF was expanded to a full faction 2013, its role as a faux tutorial was removed. However, all but the initial 2 missions in the arc are still available as an introduction to Qo'noS.
Читайте также: