
Мегамен 2 прохождение
Обновлено: 05.07.2024
Содержание
Сюжет [ ]
Финальный босс (Комиксы Арчи)
Нововведения [ ]
Слабости роботов [ ]
| Имя | Оружие | Слабость |
|---|---|---|
| Air Man | Воздушная пушка | Лиственный щит |
| Crash Man | Разрушающая бомба | Воздушная пушка |
| Quick Man | Быстрый бумеранг | Остановка времени, Крэш-бомба |
| Metal Man | Металлическое лезвие | Быстрый бумеранг, Металлическое лезвие |
| Wood Man | Лиственный щит | Атомный огонь(заряженный), Металлическое лезвие, Разрушающая бомба |
| Heat Man | Атомный огонь | Скользкий пузырь |
| (Bubble Man | Скользкий пузырь | Металлическое лезвие |
| Flash Man | Остановка времени | Металлическое лезвие |
Боссы замка доктора Вайли [ ]
| Босс | Слабость |
|---|---|
| Mecha Dragon | Атомный огонь, Быстрый бумеранг |
| Pikopiko-kun | Скользкий пузырь, Металлическое лезвие |
| Guts Tank | Быстрый бумеранг, Атомный огонь |
| Boobeam Trap | Разрушающая бомба |
| Wily Machine №2 | Атомный огонь (1 фаза), Разрушающая бомба (2 фаза) |
| Alien | Скользкий пузырь (остальное оружие лечит его и не причиняет ему вреда) |
Оружие ![]()

Полная комплектация игры на Famicom
Мега бластер (P) - стандартное оружие. Не требует затрат энергии.
Металлическое лезвие (M) - игрок стреляет лезвием, которое способно лететь вверх, вниз, вперёд, по диагонали.
Быстрый бумеранг (Q) - игрок стреляет скорострельными бумерангами летящими на небольшое расстояние и потом возвращаются к нему.
Остановка времени (F) - замораживает всё вокруг кроме игрока. Можно использовать только один раз. Наносит урон Быстрому Человеку.
Разрушающая бомба (C) - игрок стреляет бомбой, которая липнет к поверхностям и взрывается через несколько секунд. Разрушает некоторые стены. Неэффективна, если врежется во врага.
Воздушная пушка (A) - игрок выпускает 3 торнадо, которые летят вверх. Проходят сквозь врагов, если пробили их с первого удара.
Лиственный щит (W) - игрок создаёт щит из листьев, которые при движении отлетят в ту сторону в которую пошёл игрок. Если не отходить, то убьёт с первого удара некоторых врагов и не потратится (эффективно, если вы стоите на движущейся платформе).
Скользкий пузырь (B) - игрок стреляет пузырём который скользит по поверхностям.
Атомный огонь (H) - игрок стреляет огненными шарами. Можно зарядить кнопкой "огонь".
Предмет-1 (Item-1) - игрок стреляет платформой, которая медленно летит вверх. Даётся после победы над Heat man`ом.
Предмет-2 (Item-2) - игрок стреляет платформой, которая летит по прямой пока не ударится об стенку. Даётся при победе над Air Man`ом.
Предмет-3 (Item-3) - игрок стреляет платформой, которая карабкается по стенам. Даётся при победе над Flash Man`ом
Прошло полгода с момента событий первой части. С восстанием Мавериков под предводительством Сигмы было покончено. Икс и другие охотники постепенно уничтожают оставшихся Мавериков. Однажды от доктора Каина поступает информация, что Маверики обнаружены на заброшенной фабрике по производству реплоидов. Охотники направляются туда, чтобы навсегда покончить с угрозой. Но они и не подозревали, что настоящая война только начинается…
Особенности игры
Геймплей Megaman X2 не сильно изменился по сравнению с первой частью, но есть и кое-что новое: теперь Икс может делать рывок с места (Dash) изначально, без дополнительных усовершенствований. Также здесь наряду со стандартными боссами уровней появились уникальные противники, с которыми можно сразиться в специально отведенных для этого комнатах (местонахождение этих комнат я укажу в разделе секретов), а можно и не сражаться вовсе. В конце игры сюжет будет зависеть от того, были ли побеждены уникальные боссы.
Прохождение
Первый уровень проходит на вышеупомянутой фабрике реплоидов. Настоятельно советую начинающим игрокам потренироваться в управлении: научитесь использовать прыжок во время рывка (удерживая кнопку Dash, нажмите кнопку Jump) и стрелять усиленным зарядом (удерживайте кнопку Shot до тех пор, пока вокруг Икса не появятся маленькие желтые частицы, потом отпускайте). В конце уровня предстоит сразиться с первым боссом этой игры – гигантским роботом-механилоидом. Если вы научились стрелять усиленным зарядом, то босс не доставит особых проблем - нужно нанести четыре заряженных выстрела ему в голову. После его смерти смотрим сюжетную сценку, после которой, как и положено играм серии Megaman, появится экран, где на выбор дается восемь уровней, в конце каждого из которых вас ждет босс. Еще одна стандартная особенность игр серии Megaman – возможность получать от побежденного босса его оружие. Каждое оружие будет наиболее эффективно против какого-то конкретного босса, что позволит с легкостью убить его. Но это не означает, что с боссами нельзя сражаться стандартным оружием (X-Buster): выбор целиком и полностью остается за вами. Определите, какой уровень наиболее прост для вас. Когда вы его пройдете и получите новое оружие, начинайте искать босса, уязвимого к этому оружию. Таким образом, игра станет для вас значительно легче.
Те, кто хочет пройти Megaman X2 самостоятельно, могут на этом месте закончить чтение статьи.
Уязвимости боссов
Уязвимости описаны следующим образом: имя босса – оружие, к которому он уязвим. В скобках указано, какого босса нужно победить для получения этого оружия.
Wire Sponge – Sonic Slicer (получаем от Overdrive Ostrich)
Morph Moth – Speed Burner (получаем от Flame Stag)
Flame Stag – Bubble Splash (получаем от Bubble Crab)
Magna Centipede – Silk Shot (получаем от Morph Moth)
Overdrive Ostrich – Crystal Hunter (получаем от Crystal Snail)
Bubble Crab – Spin Wheel (получаем от Wheel Gator)
Wheel Gator – Strike Chain (получаем от Wire Sponge)
Crystal Snail – Magnet Mine (получаем от Magna Centipede)
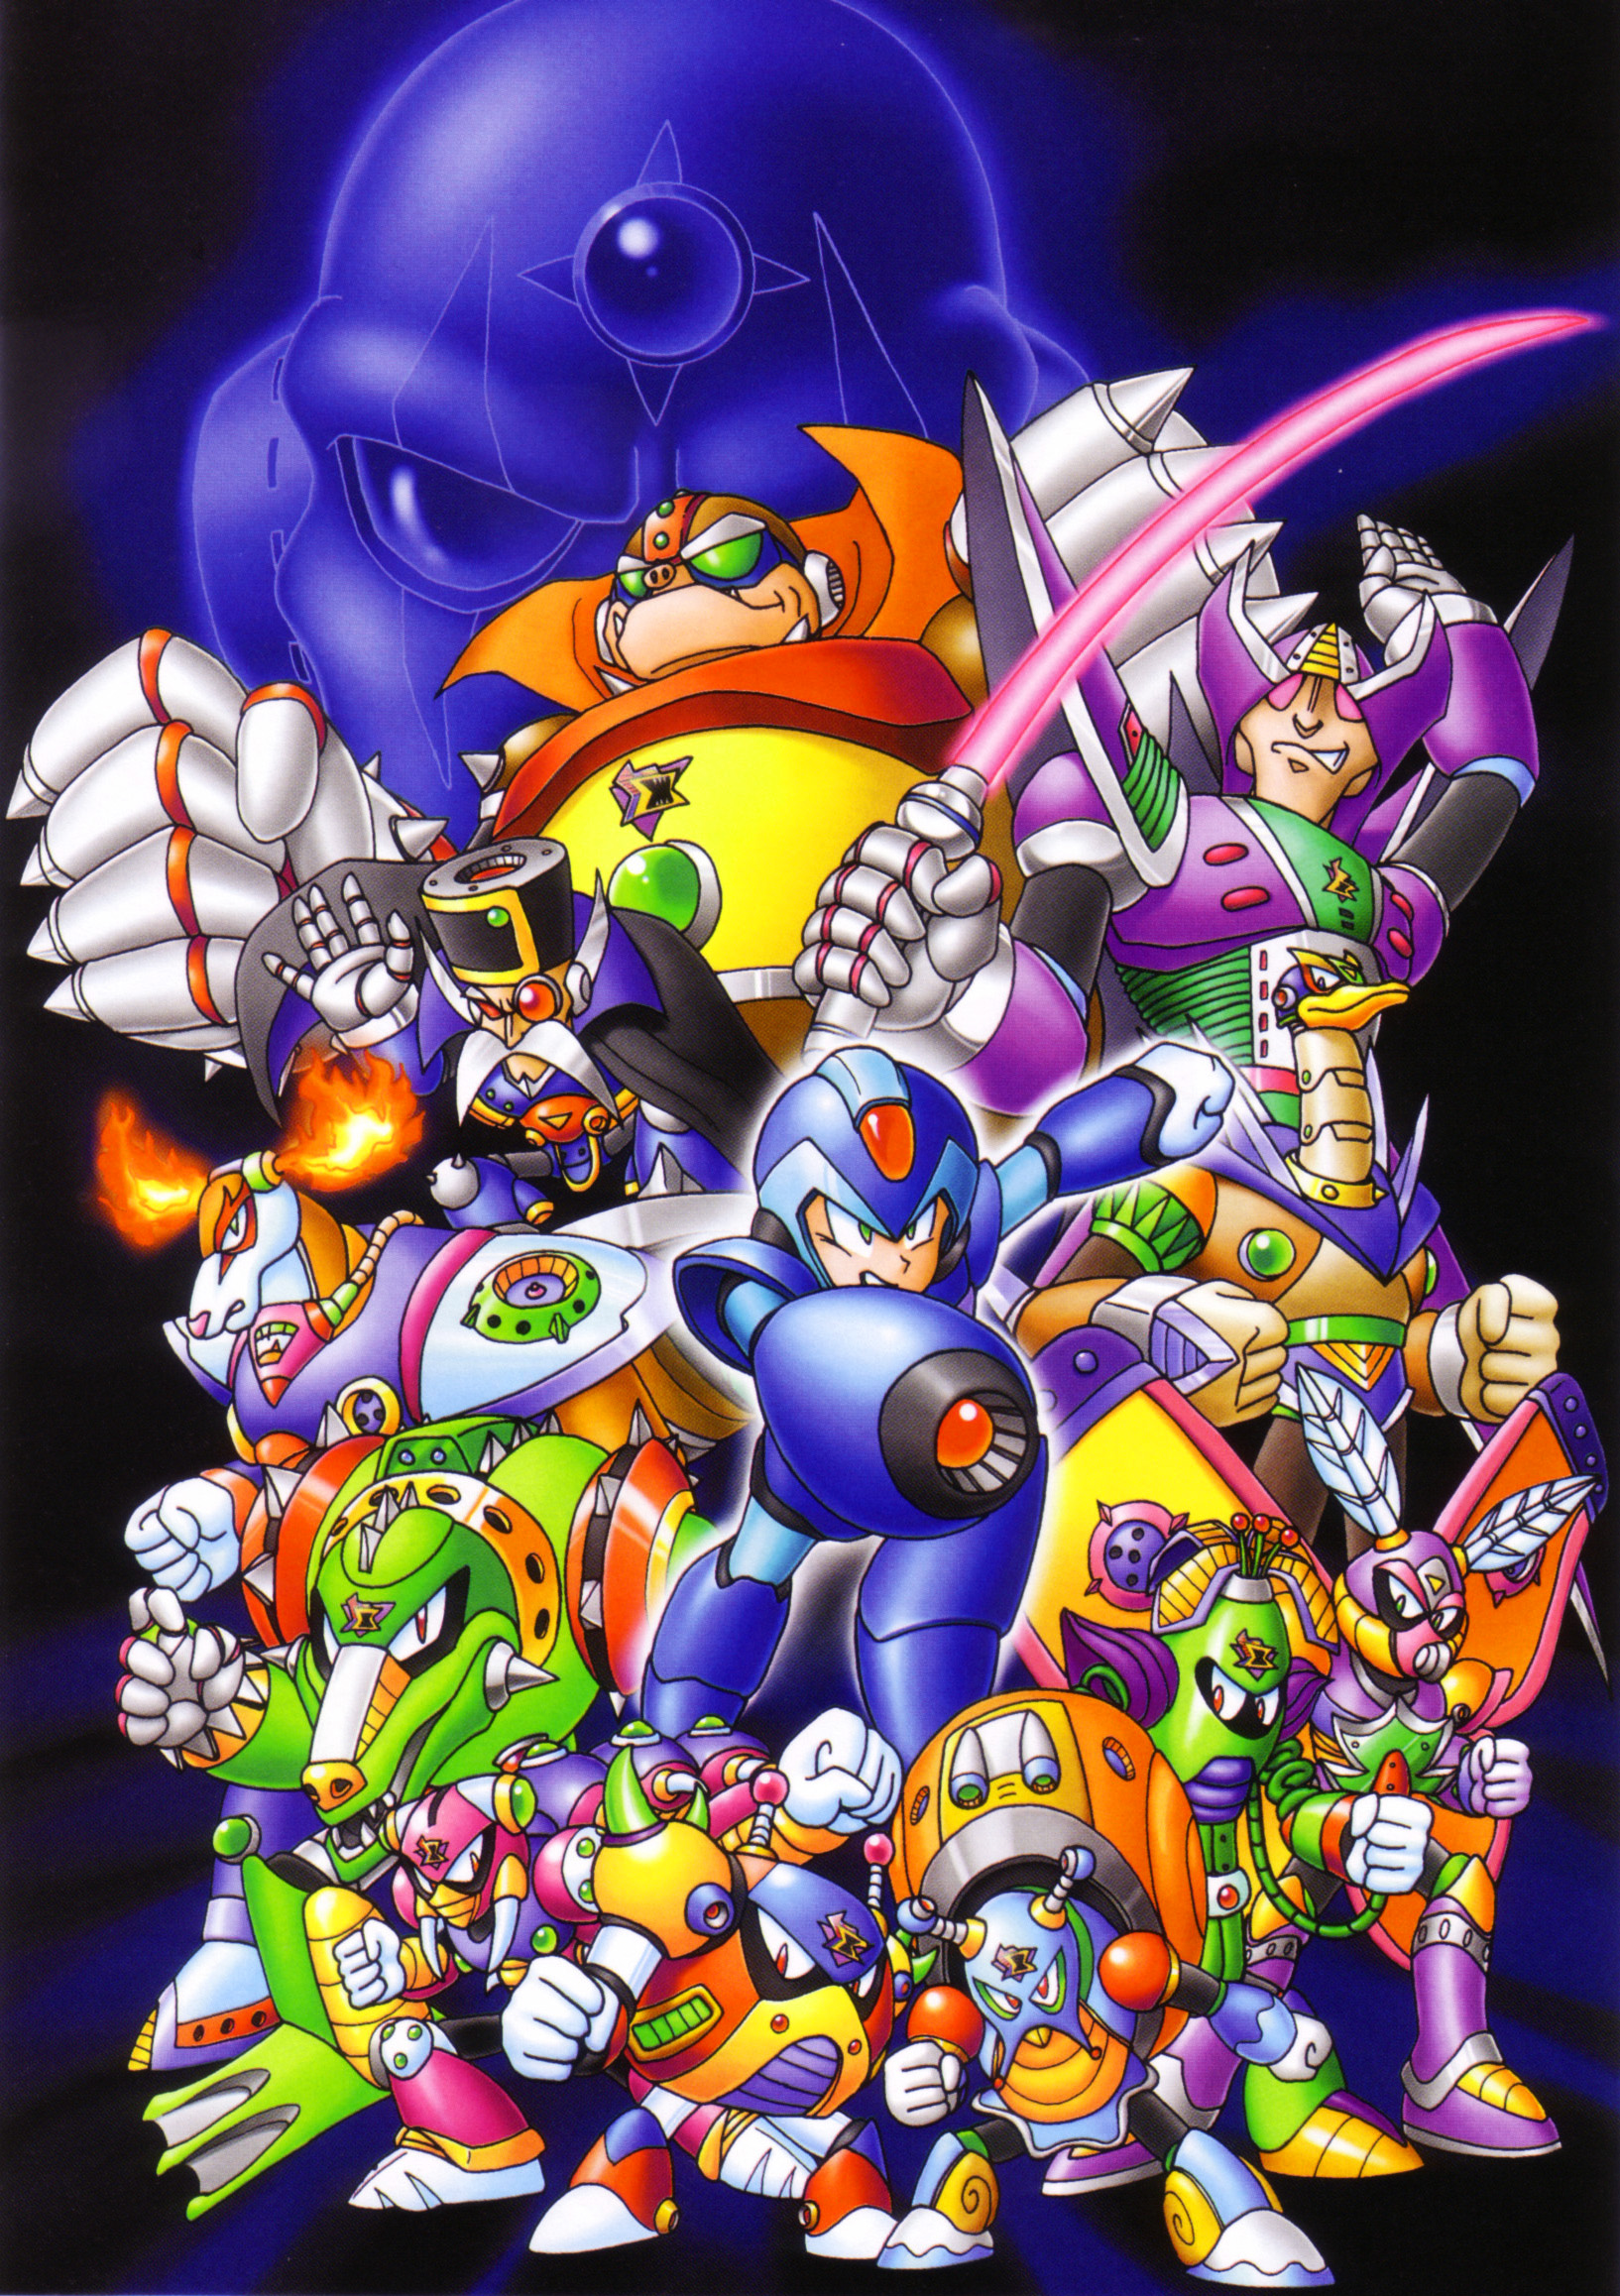
X-Hunters – уникальные боссы, о которых упоминалось выше. О них – поподробнее:
Serges – Маверик, похожий на старика. Во время битвы он находится на летающей платформе. Он примечателен тем, что может блокировать ваши атаки: его платформа может генерировать защитное поле, пробить которое не получится. Лучше всего атаковать его, когда он устанавливает мину – в этот момент поле исчезает. Его слабость – Sonic Slicer. После победы над ним вы получите первую часть Зеро.
Violen – крупный Маверик, отдаленно напоминающий гориллу. Это один из самых сложных врагов во всей игре – его шар с шипами наносит очень тяжелые повреждения и от него трудно увернуться из-за необычной траектории его движения. Постарайтесь победить его как можно быстрее. Его слабость – Bubble Splash. Заряженный Bubble Splash сносит боссу больше энергии, чем незаряженный, но в этом случае придется подходить к нему почти вплотную, что небезопасно. После победы над ним вы получите вторую часть Зеро.
Agile – высокий Маверик с красным мечом. Его основная атака – огромные энергетические волны. Советую в этой битве побольше находиться на стене – там проще уворачиваться. Его слабость – Magnet Mine, хотя этого босса вполне реально одолеть стандартным оружием. После победы над ним вы получите третью часть Зеро.
Финальные боссы – это противники, с которыми предстоит сразиться после окончания восьми основных уровней. Они описаны в порядке прохождения финальных уровней:
Уровень 1 – Violen. Тактика его прохождения точно такая же, как и в разделе «X-Hunters». Единственное отличие – появляющиеся в комнате блоки, которые влияют на траекторию движения шара с шипами. Его слабость не изменилась.
Уровень 2 – Serges. В начале битвы вы не сможете атаковать его – он сидит в гигантском механизме с пушками. Чтобы до него добраться, нужно уничтожить все пушки. Наиболее быстро это можно сделать с помощью G-Crush (про получение G-Crush написано в разделе «Секреты») или Silk Shot. После уничтожения пушек корпус механизма взорвется. Теперь уже можно атаковать самого Serges. Его слабость не изменилась, но чтобы было легче в него попасть, лучше зарядить оружие.
Уровень 3 – Agile. Он будет все время находиться в верхней части экрана. Здесь есть одна хитрость: если здесь забраться по стене до упора (Икса не будет видно на экране), то электрозаряды босса не причинят вам вреда. Его слабость не изменилась.
Уровень 4 – здесь предстоит сразиться с копиями боссов восьми основных уровней. Их слабости не изменились. Финального босса тут нет.
Уровень 5 – на этом уровне несколько противников:
1) Zero. Этот босс появится только в том случае, если не были собраны все три части Зеро. Его слабость – Speed Burner.
2) Neo Sigma. Он будет пытаться ударить вас своими когтями, от которых вы улетите на немаленькое расстояние. Также он обстреливает вас самонаводящимися снарядами и пускает электрические волны. Его слабость – Sonic Slicer.
3) The Sigma Virus. Финальный босс игры. Этот противник летает по комнате, стараясь задеть, создает разных врагов и пролетает от стены до стены, поджаривая пол лазером. Ближе к концу битвы начнет телепортироваться. Его слабость – Strike Chain.
Секреты
Life Up – приз в виде сердца. Каждый Life Up немного удлиняет шкалу энергии. Их местоположение:
1) Weather Control stage – в самом начале уровня вскарабкайтесь на левую стену, там будет скрытый проход с Life Up.
2) Robot Junkyard stage – с помощью оружия Crystal Hunter превратите в кристалл первого на этом уровне врага с щитом. С кристалла залезьте на стену справа, вверху будет Life Up.
3) Volcanic Zone stage – его невозможно не заметить, вы увидите его во время побега от лавы. Чтобы успеть уничтожить охраняющего его врага, взять его и не погибнуть от лавы, используйте оружие, которое быстро убьет врага, например, Spin Wheel.
4) Central Computer stage – в начале уровня залезайте в первый ведущий вверх туннель с помощью висящей слева неактивированной кубической турели (если активировали, пройдите немного вперед и вернитесь). За пушку можно зацепиться либо простым прыжком с места с немедленным отскоком от самого края пушки, либо использованием заряженного Speed Burner с выступа справа.
5) Desert Base stage – вы заметите его на шипах в конце уровня. Чтобы туда попасть, нужно доехать до этого места на мотоцикле – он сможет проехать по шипам. Этот Life Up нужно брать очень осторожно, поскольку мотоцикл может разбиться о шипы на стене, а без него вы не сможете там выжить.
6) Deep-Sea Base stage – в месте, где под водой открывается проход вниз, забирайтесь на правую стену. Слева вверху будет видно летающую платформу. Зацепляйтесь за нее и по платформам доберетесь до Life Up.
7) Dinosaur Tank stage – после врагов в Ride Armor, забравшись по лестнице, слева увидите шипы на стене. Life Up – наверху, туда можно попасть с помощью заряженного Speed Burner с правого выступа.
8) Energen Crystal stage – когда в начале уровня вы сядете в Ride Armor, вернитесь влево и падайте в яму, придерживаясь левой стороны. Вы упадете на уступ, с которого нужно прыгнуть максимально далеко влево, чтобы достичь другого уступа, на котором и лежит Life Up. Но здесь будет недостаточно даже прыжка во время рывка, поэтому действуйте так: нажмите и удерживайте кнопку «Dash» для разгона, потом нажмите и удерживайте кнопку «Jump» у самого края уступа. Когда вы будете на максимальной высоте, быстро отпустите кнопки и тут же зажмите их снова, и когда уже будете падать – выпрыгивайте из Ride Armor. Если вы все сделали правильно, то Икс сможет вскарабкаться на уступ и взять этот труднодоступный Life Up.
Sub-Tank – приз в виде контейнера с буквой «Е». Он позволяет накапливать жизненную энергию (она подбирается во время игры и переходит в Sub-Tank только если шкала энергии полная) и использовать ее для восстановления вашей собственной энергии. Их местоположение:
1) Weather Control stage - когда увидите летающие платформы, заберитесь с них наверх. Там на одном их уступов лежит Sub-Tank.
2) Volcanic Zone stage - Sub-Tank дожидается вас в левом верхнем углу уровня. Туда можно попасть с первого летающего жука в самом начале.
3) Central Computer stage - в вертикальном туннеле перед комнатой с голографическим мечом. Берется так же, как и Life Up с этого же уровня.
4) Deep-Sea Base stage – когда вы дойдете до электрических медуз, заряжайте Bubble Splash (это позволит Иксу очень высоко прыгать в воде) и исследуйте верхнюю часть уровня. Sub-Tank найдется слева на уступе над водой, его можно взять, выпрыгнув из воды и прыгнув еще раз над водой.
Части брони – приз в виде больших капсул. Подойдя к такой капсуле, будет короткий диалог с доктором Лайтом, после чего можно входить в капсулу и получить часть брони. Местоположение капсул:
1) Desert Base stage – от места с шипами и Life Up пройдите направо к обрыву и запрыгните на стену справа. Там разбейте кучу камней оружием Spin Wheel. В капсуле получаем броню на ноги – она позволит делать рывок в воздухе.
2) Dinosaur Tank stage – перед первой летающей платформой вскарабкайтесь на стену справа. Теперь вам нужно с помощью рывка в воздухе забраться по туннелю наверх. В капсуле получаем броню на руки – она даст возможность заряжать любое из доступных оружий, а из стандартного оружия теперь можно выпускать два заряженных выстрела подряд.
3) Energen Crystal stage – когда дойдете до ямы с летучими мышами над ней, падайте в нее, держась левой стороны - там будет туннель. В капсуле получаем шлем, дающий навык I. Tracer, помогающий искать секреты.
4) Robot Junkyard stage – после секрета с Life Up вы войдете в помещение. После висящих в воздухе врагов есть место, где можно пробить пол оружием Spin Wheel. Чтобы найти это место, используйте I. Tracer. В капсуле получаем броню на туловище – теперь доступна особая атака G. Crush. Накопить энергию для нее можно, получая повреждения.
В игре есть еще одна капсула, но она дает не часть брони, а специальную атаку.
5) X-Hunter stage 3 – на уровне есть место, где на правой стене шипы и лестница сверху. Чтобы добраться до лестницы, используйте Crystal Hunter на летучих мышах, перед этим заманив их к лестнице. Забравшись наверх, идите вперед, пока не увидите извилистый проход вниз, покрытый шипами. Это место можно пройти с помощью рывка в воздухе с последующим использованием заряженного Speed Burner. Далее сползайте по левой стене – вы попадете в секретную комнату с капсулой (ВНИМАНИЕ – капсула там будет только при наличии ВСЕХ Life Up, Sub-Tank (полностью заполненных энергией) и частей брони, а также полной шкалы энергии). В капсуле получаем особый прием Shoryuken, убивающий подавляющее большинство противников с первого удара. Его выполнение: вперед, вниз, вперед+вниз+Shot. Если шкала энергии неполная, вы не сможете его выполнить.
Комнаты X-Hunters – специальные комнаты, в которых вы сможете сразиться с X-Hunters. Они доступны только после прохождения двух основных уровней (любых) и наличии на уровне одного из X-Hunters (это будет показано на карте соответствующим значком). Как в них попасть:
1) Weather Control stage – когда дойдете до лифта, не поднимайтесь на нем, а пройдите направо.
2) Robot Junkyard stage – в месте, где вы будете очень долго спускаться вниз по лестнице, зайдите в верхний проход справа (там стоит враг с щитом).
3) Volcanic Zone stage – заставьте второго летающего жука сломать верхнюю каменную перегородку. Войдя в тоннель, забирайтесь наверх.
4) Central Computer stage – после сражения с голографическим мечом вы будете спускаться вниз. Как только спуститесь – сразу и очень быстро передвигайтесь вправо – дверь комнаты находится в конце зала с падающими блоками, но если вы не будете достаточно быстры, то дверь будет заблокирована блоками.
5) Desert Base stage – в начале уровня пройдите вперед и разбейте кучу камней с помощью Spin Wheel.
6) Deep-Sea Base stage – ближе к концу уровня будет дверь, войдя в которую, вся вода исчезнет. Не входите в нее. Вместо этого заберитесь наверх – в конце вы подниметесь прямо в комнату. К этому времени большая механическая рыба обязательно должна быть уничтожена.
7) Dinosaur Tank stage – поднимайтесь до конца на второй летящей вверх платформе.
8) Energen Crystal stage – находясь в Ride Armor, дойдите до места с маленьким бонусом-энергией в узком туннеле, закрытом двумя кристаллическими блоками. С того места запрыгните на платформу слева и ударами Ride Armor ломайте блоки наверху. Далее по летающим платформам заберитесь наверх.
Бонусные комнаты – особые места, где, зарядив оружие Silk Shot, вы сможете притягивать большое количество энергии. Эти комнаты очень полезны, если нужно заполнить энергией Sub-Tank. Вот где их можно найти:
1) Desert Base stage – выезжая на мотоцикле из помещения, разбейте мотоцикл об мост. Слева от этого места будет проход с кучей камней, разбиваемых оружием Spin Wheel. Заряжать Silk Shot нужно в конце прохода.
2) Deep-Sea Base stage – в месте, где под водой открывается проход вниз, сползайте по левой стене – вы попадете в бонусную комнату.
3) Energen Crystal stage – пройдя немного вперед от ямы с летучими мышами над ней, вы увидите наверху лестницу в бонусную комнату. Это единственная бонусная комната, где притягивается энергия для оружия.
This is the fastest route to collect all of the 16 items in the game. Each step assumes you are defeating the boss at the end of that stage unless otherwise specified or they have already been defeated. It is recommended to die to exit Overdrive Ostrich's stage on the first visit as he may be too difficult for some players and his weakness will not yet have been acquired.
- Wire Sponge's stage. Acquire heart and sub tank. (2 / 16 items)
- Wheel Gator's stage. (None/Optionally heart. Refer to Wheel Gator's stage section below.)
- Overdrive Ostrich's stage. Acquire heart and Air Dash. (Die to exit stage) (4 / 16 items)
- Bubble Crab's stage. Acquire heart. (5 / 16 items)
- Flame Stag's stage. Acquire heart and sub tank. (7 / 16 items)
- Wheel Gator's stage. Acquire (if not taken at first visit) heart and X-Buster. (9 / 16 items)
- Bubble Crab's stage. Acquire sub tank. (10 / 16 items)
- Morph Moth's stage. Acquire armor upgrade. (11 / 16 items)
- Magna Centipede's stage. Acquire heart and sub tank. (13 / 16 items)
- Crystal Snail's stage. Acquire heart and helmet scanner. (15 / 16 items)
- Morph Moth's stage. Acquire heart. (16 / 16 items)
- Overdrive Ostrich's stage. (None)
- X-Hunter, stage 3. Acquire flaming uppercut upgrade (Bonus item).
Opening Stage: Maverick Factory
Dinosaur Tank: Wheel Gator
- Buster Upgrade: (Leg Upgrade Necessary) Shortly after going inside the Tiranos, bait it to fire it's bullets at you, avoid the bullets and follow them to the left, right when they're about to diminish, jump up and get hit by it. The temporary invurnerability from being hit let's you walljump the spikes, in which you can get the heart tank.
- Wheel Gator: Avoid being on the ground for too long, as he uses it to launch his surprise attacks (and bite X off to rend some of his life). When he starts to use his Spin Wheel, go to the wall and dodge it as it comes to you. Hit him at any opportunity. He will be quite weak to the Strike Chain.
- Weapon: Spin Wheel
- Weakness: Strike Chain
Deep-Sea Base: Bubble Crab
- Heart Tank: Once entering the water, it won't be long until you encounter the Sea Canthller. Simply follow it until it reaches a gate in the floor, the Sea Canthller will open it for you. Jump over the large pit that just opened and once you reach the wall on the right, climb until you find an energy capsule. Dashjump to the left from the large wall you just climbed and you should see a vertical platform moving upwards, climb it and take the heart tank.
- Sub-Tank: (Buster Upgrade AND Bubble Splash Necessary) This one is harder to find, by the large room with all the jellyfish, somewhere around the middle you need to charge the Bubble Splash. Your underwater mobility will be severely increased when surrounded by the bubbles, allowing you to reach the surface in one jump. Jump from the nearest wall, and then off the water's surface onto the platform where the Sub-Tank is.
- Bubble Crab: The Spin Whell can penetrate his defense and make quick work of him. You can make profit of the high tide and jump over him, avoiding his claw attack to unleash another attack of your own. Or, if the tide is low, you can risk using the wall to perform a Dash-Jump over him. He is quite an easy boss.
- Weapon: Bubble Splash
- Weakness: Spin Wheel
Volcanic Zone: Flame Stag
- Sub-Tank: Early in the level, you'll encounter a Beetron, it will try to charge you, and it's used to gain access to the passage that is walled off. Don't let it hit the wall by the passage as it will destroy the Beetron, instead, let it hit a normal wall, this way you can jump up on its back (the flat part), and let it take you far up the sky, jump off to the left when possible and take the Sub-Tank.
- Heart Tank: You'll encounter a room that will fill up with lava right after encountering 3 Barite Lastar. Don't pick anything on the way up, as you climb you'll notice a larger crevice with a heart tank, but there's a Bar Waying blocking the way (as seen in the intro stage), fastest way to kill it is by a fully charged shot, preferably charged before entering the room. Pick up the heart and dash out as fast as you can. The lava will shoot out of the pit you just climbed, so be careful if you want to take the energy capsule.
- Flame Stag: He tends to leap constantly from wall to wall and, when in ground, launch two fireballs that flies forward and then up. You can jump over them and hit Stag with the Bubble Splash with no effort. He will speed himself up at half health, and start performing a vicious combo, which you can jump over using the wall. Just keep up with his rhythm and he will be defeated.
- Weapon: Speed Burner
- Weakness: Bubble Splash
Robot Junkyard: Morph Moth
- Armor Upgrade: The armor upgrade can be hard to find, you need the Spin Wheel. Right after the first room with the magnetic roof (note that the roof can not be used as a reference, instead look at the orange support beams) there's a breakable floor that takes you to the upgrade capsule. Refer to this page for a picture of where the floor is breakable.
- Heart Tank: (Crystal Hunter Required) Right after the first three hanging robots there is a robot with a shield. Hit him once to knock his shield off and then hit him with your Crystal Hunter to freeze him. After that jump off of him to the right and right after the free life is a heart container.
- Morph Moth will start the fight as a cocoon, spilling junk and spinning around to hit you. The Speed Burner will prove an effective weapon against him, as you avoid the junk spill. Avoid letting him absorb too much debris, as he grows up by this means. At circa one third of his health, Moth will finally reveal himself (quite late indeed), had he absorbed enough junk or not. This fight will become easier; be close to the wall to avoid the pollen and dash under the laser attack when he unleashes it. From this point, he's even easier to finish off with the Speed Burner.
- Weapon: Silk Shot
- Weakness: Speed Burner
Central Computer: Magna Centipede
Energen Crystal Mine: Crystal Snail
- Heart Tank: (Requires Strike Chain) This is probably the hardest Heart Tank to get. Early in the stage, you'll find a Ride Armor, get in it and walk back to the left. There's a gap here, jump down through it, hugging the leftside wall, there's a platform on the left to land on. Here you need to dashjump with the Ride Armor, holding jump in order to hover, once the Ride Armor starts to fall, jump out of the Ride Armor and proceed left, you'll almost get to the lowerside wall of the platform with the Heart Tank. Use the Strike Chain to hit the wall and pull yourself to it, then walljump up and proceed in taking the Heart Tank.
- Head Upgrade: Right after the miniboss there's a emerald smasher block which will follow you all the ramp down, after that there's a hole. Jumping in the hole there's a path leading to the left that will guide you to the head part armor. You will be able to find secrets witch the I.Tracer provided by the armor head.
- Crystal Snail: The Magnet Mine can get him out of his shell. Use it to your advantage, as you can hit the shell with a Dash and make it collide with him. You can also troll him by shooting a Magnet Mine at the wall behind X and then hitting another mine at Crystal Snail, making the two magents attact each other, with Snail stuck to one of them. When he hides himself on the shell, avoid his charges. The same can be done when he slows your perception to make you slower.
- Weapon: Crystal Hunter
- Weakness: Magnet Mine
Desert Base: Overdrive Ostrich
- Heart Tank: Easy to spot. It's by the end of the level. The problem is, it's surrounded by spikes. You need to ride the Ride Chaser all the way to the heart tank. There will be 'checkpoints' where you can pick up another RideRide Armor Chaser if you lose your first one, just go back to find it. In order to jump the largest gap you need to destroy the sandstorm-controller, this can be done by crashing into it with a Ride Chaser and you need perfect timing with both dashing and jumping from the ramp. This takes a few tries to do. If you are having trouble, you can also just use an air dash followed up by a charged Speed Burner, too, but be prepared to lose a life or two.
- Leg Upgrade: Right after where the heart tank is, there's a gap where you're supposed to drop, jump to the wall on the right and fire the Spin Wheel at the darkish colored blocks, proceed to get the Leg Upgrade.
- Overdrive Ostrich: You got to fight him in an open space with virtually no walls. And on top of that, he is imprevisible. Jump over his charges; you will need to position yourself right to avoid his charged Sonic Slicer. Keep yourself moving to avoid being stomped by him from afar, when he goes to the background. You can freeze his systems by hitting him with the Crystal Hunter, just be ready to avoid his counterattack. If you time it right, you can freeze him as he thaws out of it, trapping him in a loop just like Spark Mandrill in Mega Man X.
- Weapon: Sonic Slicer
- Weakness: Crystal Hunter
Weather Control: Wire Sponge
- Heart Tank: Right at the beginning of the stage walljump up the left wall and in the top-corner by the ceiling; there's a small hidden passage with a Heart Tank.
- Sub-Tank: When you reach the first weather-control orb that summons rain, there are vertical platforms that go up and down above a bed of spikes. Jump on the first vertical platform, then jump to the wall to the left (the building that holds the weather-control orb) then walljump to the wall on the right, climb that wall until you reach the top, then head right. You'll see an extra life, it's safe to pick this up as long as you jump back up to the platform you came from, jump the gap to the right and proceed moving to the right and you'll find the Sub-Tank.
- Wire Sponge: If you're smart, you can beat him even with the X-Buster. He will grapple himself to the walls and the ceiling as his tactics for fighting. Blow the weeds he throws at you out of the way. The Sonic Slicer can bypass his vine defense. At half health he will start to electrify himself and shoot thunders at you; keep moving and wait for him to go back to normal to resume your attack. You can troll him by splitting him in half if you use Sonic Slicer to serve him the last blow. Another trolling can be done by hitting him with the Speed Burner, another of his weakness.
- Weapon: Strike Chain
- Weakness: Sonic Slicer, Speed Burner
X-Hunter Stages
Stage 1: Neo Violen
The only real difference between this fight and the one prior is that now Violen summons blocks that appear in random spots in the room you fight him in. These blocks can either help you or hinder you when Violen unleashes his mace ball attack. As for battle strategy, Bubble Splash is the weapon he is weak to. But due to its short range, you would probably be better off just hitting him with super-charged X-Buster shots (hit him with the double X-Buster shot for extra damage).
Stage 2: Serges Tank
Fighting Serges isn't as difficult as some would make it seem (that is if you know what to do). First, destroy the 4 turrets at the front of his machine. One Silk Shot should take out a single turret, thus making Serges move the machine closer to you. Once all four turrets are down, Serges will be exposed and you can hit him now. Sonic Slicer is the weapon to use on Serges, but it will be hard to land hits with simple shots as the Slicer takes a second to reach full speed and Serges is always moving around. A good way to avoid damage and hit the X-Hunter is to jump down onto the exposed piece of the machine where the turret wall used to be. Standing here will give you a better chance at avoiding Serges' attacks and land more effective hits. While down there, charge up the Sonic Slicer and unleash the blade rain on him. They do much more damage than single shots of the Slicer and if you stand in the right spot, you'll almost always land a hit.
Stage 3: Agile Flyer
Obtain the final upgrade by making your way to the top right hand corner of the level. You'll approach a section where you gradually climb by moving a flying board that changes directions and takes you up the screen. Manoeuvre your way up the screen, and when you get to the top, continue by taking the board into the right (towards the wall spikes). You'll notice a set of stairs at the top of the screen, which can only be accessed by jumping off the flying board, so make sure to bring the board all the way to the top. Climb, and make your way to the right, using Speed Burner to make your way over the spikes as required. The most difficult part of this section is when you reach the top right-most part of the level, where there is a set of spikes surrounding an extra life. Dash jump your way across the first set, and Speed Burner your way to the left just before you land on the next set of spikes to obtain the extra life. Go down the opening, but cling to the left wall all the way down. About halfway down you'll fall into a hidden opening, where if you've collected all the heart pieces, containers, and upgrades, a capsule will be there to give you the final upgrade: a flaming uppercut, which is an instant kill to bosses. It can only be used when you have full health, and is performed with [down + left/right + fire]. Another one of Capcom's tributes to Street Fighter character Ryu, but this time it's the 'shoryuken' uppercut (a similar secret weapon existed in Mega Man X, giving X the 'hadoutken' shot).
The easiest way to defeat Agile is to charge up the magnetic mine and jump up and fire it at him, it will move through him slowly doing max damage, dodge his attacks by dash jumping over the holes in the floor.
Stage 4: Teleporters
The fourth X-Hunter stage is the classic Mega Man stage with a rematch against the eight bosses. They can be fought in any order.
Last Stage: Central Computer
This is Magna Centipede's stage, except that the music changed to the one from the Opening Stage. So for the walkthrough, refer to the first visit. The stage is the same until where the Chop Register was. If you didn't get the Zero Parts, you'll face. ZERO! He fires charged and normal Z-Buster shots, slashes with his Z-Saber, does a giga impact, where he slams his saber into the ground, which causes debris to spray. Worst of all, he blocks every weapon! He can only be hit when he fires his buster or has his back to the screen. You only need to deplete his energy column until he has 1 bar left, then you win. If you collected all the Zero Parts, there will be a black Zero instead, which Zero destroys. Either way, he'll destroy a section of the floor, and he tells X to go after Sigma, while he tries to destroy the Central Computer. Drop into the hole and when you hit the bottom, the fight with Sigma will begin. Sigma will sometimes dash at you, then slash with his claws. He'll also fire electric shots. They home in to where X is located. Luckily, they only need to lock on to X, so scatter the shots. It's best to stay away from Sigma and fire at him with charge shots or with Sonic Slicer that is his weakness. When he's low on health, he'll gain a new attack: Nightshade Electric Spark. This acts exactly like the Electric Spark's charge shot from Mega Man X1. Stay on the top to avoid this. When Sigma's defeated, it's not over yet. Sigma finally reveals his true form: the Sigma Virus. In this form, Sigma is a giant wireframe version of his head. You'll notice that this form of Sigma does not have an energy column, so this is more like a miniboss fight. There is, however, a way to find out how much health he has left: His color. When he's green, Sigma has either full health or he has lost very little health. Sigma goes from green to light blue to dark blue to orange to red and finally to dark red. Sigma reflects almost all weapons, except for the Strike Chain, the Shoryuken (which you can use if you want to be cheap), and Level 3 or higher X-Buster shots. He'll use Viral Laser, where he fires a laser straight down. He also uses Viral Summon Shot, where he fires blue wireframe orbs that become either Scrivers, Tiranoses, or Fisherns. When he's red or dark red, he'll use his ultimate attack: Error and Delete. He'll appear on X and drain X's health. Keep dashing when he disappears to avoid this. Sigma takes 56 hits in his virus form. Now watch the ending.

1. Metal Man ![]()

- Weapon: Metal Blade
- Primary Weakness: Metal Blade
- Other Weakness: Mega Buster | Quick Boomerang
2. Flash Man ![]()

- Weapon: Time Stopper
- Primary Weakness: Metal Blade
- Other Weakness: Atomic Fire | Crash Bombs | Bubble Lead
3. Quick Man ![]()

- Weapon: Quick Boomerang
- Primary Weakness: Flash Stopper
- Other Weakness: Atomic Fire | Air Shooter | Crash Bombs
Читайте также: