
Майнкрафт rftools гайд
Обновлено: 05.07.2024
This is a community-written guide. It was written to help players get accustomed to using the RFTools Builder as a quarry.
Содержание
About this Guide
This guide is not an exhaustive description of items, nor a tutorial on using each item. It is a helping hand to get you started with using the RFTools Builder as a quarry. Throughout this guide you'll find links to various blocks and items. Be sure to explore these links for full details, descriptions and illustrations.
The Builder
The Builder is an incredibly versatile machine, capable of both destruction and creation in a myriad array of shapes and sizes. In this guide, we're interested in the Builder's appetite for destruction. For more information on the Builder, see the guide The RFTools Builder and You.
To use the Builder as a quarry, you'll need to make a Shape Card (Quarry), a Builder and a Lever. You'll also need a source of power and a big chest to put everything in.
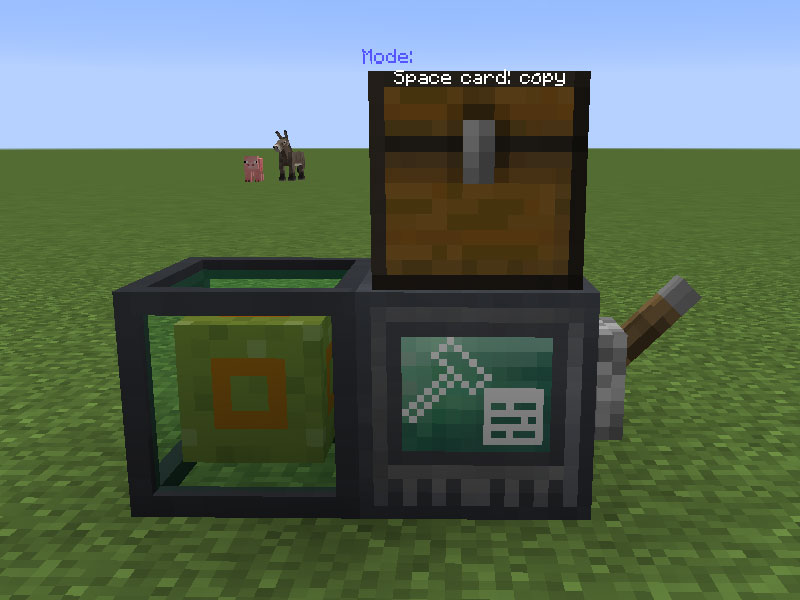
Placing the Builder
- Find a suitable place to quarry.
- Place the Builder.
- Hook up power to a side face.
- Place a chest on top.
- Place a lever on the other side.
That was pretty easy, wasn't it?
Defining an area to quarry
- Hold your Shape Card (Quarry) in your hand
- Sneak right-click the card on the Builder. The Builder will be highlighted in yellow and you'll see a message in chat to select your first corner.
- Right-click on a spot of ground near your quarry. The block will be highlighted in yellow and you'll see another message in chat to select your second corner.
- Move to another spot and right-click a block. You'll see a message in chat that the settings have been copied to the card.
- Right-click the card in the air and the card's GUI will open. Near the top you'll see some buttons that allow you to change the shape. Below that, the number of affected blocks and boxes to manually enter dimensions and offsets. On the right, a visualizations of the area selected. At the moment, you'll just see a flat rectangle.
- The numbers are the X, Y & Z coordinates. Change the middle "Dim" number to 200 and the middle "offset" number to -100. This will change the area to go up 100 blocks and down 100 blocks. Don't change the others yet. The visualization will update to show the new area.
- Check all the boxes at the bottom, to automatically void the garbage.
- Now right-click the Shape Card onto the Builder. You've now set the area to quarry.
Caution: When selecting the area to quarry, ensure the Builder and any support equipment is outside the area. The Builder will mine ducts and other machines.
Operating your quarry
- Flip the lever. Your quarry is now operational. So long as it has power and available space in the chest, it will mine for you. Dealing with the output is your problem.
Note: Be aware that the Builder draws quite a lot of power so you'll need a decent power generation setup to feed it. You may want to create a dedicated power system for the Builder so that your other machines don't run empty. If your power supply cannot provide all the power the quarry needs, the Builder will pause until it has enough.
Visualizing the Area
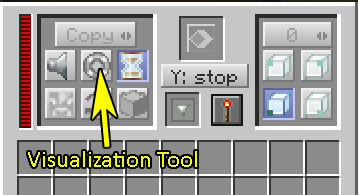
In the Builder's GUI, there's a button with a life preserver icon. This is the visualization tool.
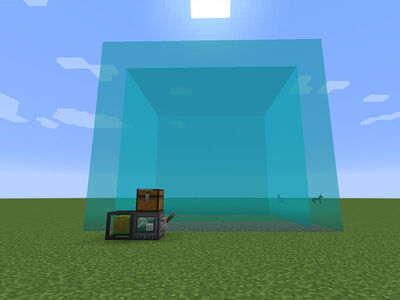
Clicking this button will cause the Builder to project a border of light-blue blocks around the affected area, allowing you to easily see the area affected. Rendering of these blocks may be problematic for very large areas.
Afterword
As mentioned earlier, this guide is a quick HOW-TO and is restricted to using the Builder as a quarry. For more information on using Shape Cards and Builders, please see the guides The RFTools Builder and You and All About Shape Cards.

Это гайд по телепортации в крупном моде RFtools, как телепортироваться, какие есть нюансы итд. Данный гайд писал не я, я просто перенес его на наш сайт для сохранения ценного контента в рунете. Играете с модом RFtools? тогда почитайте данную инструкцию, возможно найдете что то новое.
Другие гайды и инструкции по RFtools:
Для того чтобы совершать телепортацию вам понадобятся:
1. Энергия
2. Три прибора.
Собственно энергия - это может быть любая энергия подаваемая в приборы непосредственно проводом (ну или любым другим путём передачи энергии в приборы).
Важная особенность - вас может переместить и без энергии, но на вас наложатся отрицательные бафы и вы умрёте. Так что RFTools наказывает халявщиков =) И да, Приёмник и передатчик материи пассивно не потребляют энергию, а только при телепортации. То есть когда приборы ничего не делают, просто стоят они не потребляют энергию, но когда вы совершаете телепортацию - потребляет и приёмник, и передатчик материи. Количество потребляемой энергии зависит от отдалённости приёмника от передатчика.

Итак приборы:
Первый прибор - это передатчик материи. работает он следующим образом - вы на него встаёте и он телепортирует вас на приёмник материи.
Выглядит он так:
Второй прибор, как вы наверняка догадались - это приёмник материи. Это вторая сторона "портала" он принимает вас в своё местонахождение. То есть вы встали на передатчик материи и через определённое время перемещаетесь на приёмник материи.(время телепортации зависит от отдалённости приёмника от передатчика).
Выглядит он так:
Третий прибор - это модем. Он нужен для привязки приёмника к передатчику.
Подробней о привязке вы узнаете дальше в разделе интерфейс.
Выглядит он как то так:
Интерфейс:
Интерфейс передатчика/приёмника материи:
Красная полоска с верху - это количество энергии в приборе.
Кнопки Public, Private :
Public - Все игроки видят ваш прибор в модеме(небезопасно, не советую)
Private - прибор видят только те игроки которые вписаны в фильтр прибора(про фильтр передатчика и приёмника см. ниже).
Шкала Name - имя прибора, нужно для привязки приёмника и передатчика в модеме. Чтобы что-либо напечатать нужно нажать лкм или пкм по шкале после слова "Name" и вводить название с клавиатуры.
Фильтр передатчика/приёмника (разницы нету)
Выглядит он ват так:
Работает фильтр только при выбранной настройки безопасности - Private.
Чтобы добавить игрока в фильтр нужно - нажать на строчку пкм/лкм(выделена красным на скриншоте(ниже)), напечатать ник игрока и нажать на кнопку add(выделена жёлтым на скриншоте(ниже)).После чего настройки приватности механизма изменятся и вписанный игрок сможет видеть название прибора в модеме.
Интерфейс модема:
В интерфейсе модема показывается все публичные приёмники и приватные приёмники материи в которые вы вписаны. Чтобы в интерфейсе модема стало отображаться название передатчика нужно чтобы модем стоял рядом с передатчиком. А если передатчик приватный нужно чтобы вы были в нём вписаны и так же рядом. Наглядно интерфейс модема выглядит так:
С вверху, выделено жёлтой рамкой (на скриншоте ниже) - это список доступных вас передатчиков материи.
Ниже, выделено оранжевой рамкой (на скриншоте ниже) - это список доступных вам приёмников материи.
Выглядит это так:
Кнопки: Dial ; Interrupt.
Dial - соединяет передатчик с приёмником образуя телепорт-соединение.
Interrupt - разрывает телепорт-соединение.
Чтобы привязать передатчик к приёмнику, нужно выбрать в списке название нужного вам передатчика(просто нажав на него) после чего выбрать название нужного вам приёмника и так же нажать на него, после чего оба эти названия выделятся и нужно нажать кнопку Dial(для разрывание - тоже самое, но вместо кнопки Dial нажать Interrupt).
Кнопки: Dial once ; Check.
Dial once - делает единичное телепорт-соединение.
Check - проверяет телепорт-сеть на возможность безопасного перемещения (чтобы получить доступ к это кнопки нужно сделать следующие действия:
1. Скрафтить - Анализатор целей.
2. Расположить их правильном порядке(показано на скриншоте ниже))
Анализаторам энергия не нужна, модему и передатчику нужна.

Так же есть заряженный телепорт (работает по прицепу передатчика материи(для работы нужен приёмник материи))
Выглядит так:
Чтобы начал работать, нужно:
Зарядить, привязать к приёмнику материи. Чтобы привязать нужно нажать Shift + пкм на приёмник материи с "заряженным телепортом" в руке.
Для телепортации с помощью переносного телепорта, нужно - взять его в руку и нажать пкм. Если в приёмнике и заряженном телепорте есть энергия телепортация пройдёт успешно.
На этом я заканчиваю свой гайд о телепортах в Rftools.
Удачи вам в изучении мода RFTols.
И большое спасибо за внимание!
Гайд написал _gaz_
This is a community-written guide. It was written to help players get accustomed to autocrafting with RFTools.
Содержание
About this Guide
This guide is not an exhaustive description of items, nor a tutorial on using each item. It is a helping hand to get you started with autocrafting with RFTools. Throughout this guide you'll find links to various blocks and items. Be sure to explore these links for full details, descriptions and illustrations.
Crafters
Crafters are machines added by RFTools that will automatically craft items given a recipe, the necessary components and RF power. Multi-step crafting can be done in a single machine, limited only by the number of recipe slots.
-
can remember 2 recipes. can remember 4 recipes. can remember 8 recipes.
The Interface
The Crafter's interface consists of four main parts. At the top-left is a list of memorised recipes. At the top-right is a crafting grid used to program in the recipes. In the middle is the input inventory and the output is at the bottom-left. There are also several buttons and a filter slot.
Creating a Recipe
Multi-step Crafting
Using multiple recipes in the same crafter, you can create advanced items. The following illustration shows a Crafter programmed to turn Oak Wood into Oak Planks and then to turn Oak Planks into a chest.
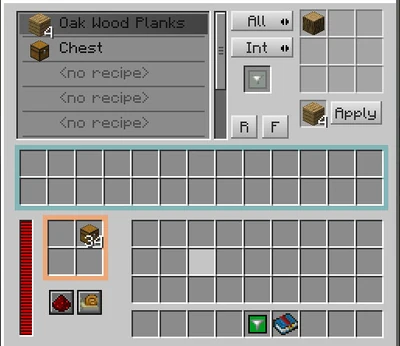
Note the setting of the Crafting Destination toggle on the first recipe. It is set to Int so the planks are delivered directly to the main inventory and only Chests are delivered to the Output Inventory.
Advanced Multi-step Crafting
With some creative thought, Crafters can be an integral part of complex multi-step crafting processes. For example, in conjunction with Thermal Expansion machines and ducts, you could set up a system to craft iron ingots into buckets, send the buckets to a Fluid Transposer to be filled with water. The water buckets then return to the crafter where they are combined with Sawdust to make Paper.

This is a community-written guide. It was written to help players get accustomed to using the RFTools Builder.
Содержание
About this Guide
This guide is not an exhaustive description of items, nor a tutorial on using each item. It is a helping hand to get you started with using the RFTools Builder. Throughout this guide you'll find links to various blocks and items. Be sure to explore these links for full details, descriptions and illustrations.
The Builder
The Builder is an incredibly versatile machine, capable of both destruction and creation in a myriad array of shapes and sizes. In this guide, we'll try to provide a comprehensive overview of the Builder's many features. You may also be interested in the guide Quarrying with RFTools.
Shape Cards
An RFTools Shape Card is required to instruct the Builder on where to work. Shape Cards are sufficiently powerful as to rate their own Guide, so check out All About Shape Cards before proceeding.
Clearing Space
Clearing a large volume is easily achieved using the Builder as a quarry. See Quarrying with RFTools. However, you're not limited to rectangular spaces. By configuring the Shape Card to a different shape, the Builder will clear a space of any shape you like. If you don't want to keep the blocks in the cleared area, consider using a Shape Card (Void) .
Building a Simple Shape
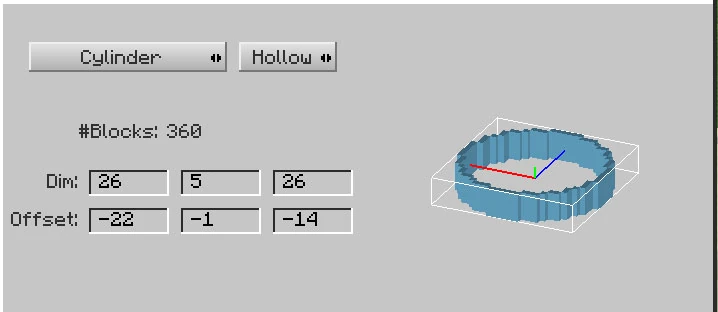
I have a Forestry Multifarm that I'd like to build a wall around. I start by programming a Shape Card to create a Hollow Cylinder.

Using the Support/Preview mode in the Builder's GUI, I fine tune the shape until I'm happy with it. Note that the offsets are between the center of the shape and the Builder.

After placing a chest full of Mossy Stone Bricks on top of the Builder and activating the Builder with a Lever, a wall appears within a matter of seconds.
Combining Simple Shapes
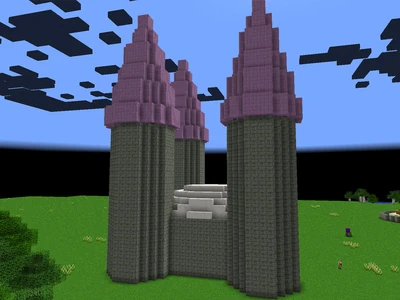
The castle pictured below is hardly a masterpiece but it shows what can be constructed in 15 minutes by combining a few simple shapes. With the hard work done by the Builder, a player could use this as the basis for a masterpiece.
Feeding Materials
Unless specified with a complex Shape Card, the Builder will draw blocks at random from the supply chest on top. Depending on the choice of materials, the result can appear semi-natural or quite colorful.
Читайте также: