
Сфера майнкрафт схема
Обновлено: 18.05.2024
Здравствуйте, друзья! Хотите чего-то нового? Ведь все эти надоевшие сервера с безграничным донатом, кучи неадекватных детишек уже порядком надоели! Это похоже на бездонную пропасть, полную мерзости и печали! но у всего есть конец! Вот и этой пропасти пришел конец! Вы встретили этот сервер! Вот вы спросите, чего такого в этом сервере?
А я Вам отвечу:
- Вы можете начать играть сразу без регистрации.
- Наш сервер без гриферов. Любое гриферство и воровство запрещено.
- Вы можете играть с любого клиента с лицензией.
- Наш сервер майнкрафт без дюпа и без 1000 лвла. Можно сказать ванильный майнкрафт сервер с минимальным количеством плагинов для приятной игры
- На нашем сервере средний возраст игроков 18+, у нас самые адекватные взрослые майнкрафтеры.
- У нас есть уникальные работы. Все работы строились без плагинов, вручную.
- Есть разделение на гражданский и игровой миры.
- Можно играть даже с мобильного устройства!
Подробнее как начать играть.
Однако перед началом игры. Прочтите краткую информацию о сервере, раздел на сайте чаво, а также наши правила.
Но если вам надоел школьный ор, ругань, читерство и гриферство - тогда вам к нам! ;) У нас преимущественно аудитория 18+.
Create perfect hollow spheres using Plotz, the HTML5 modeller for Minecraft. Plotz can model spheres up to 256 blocks diameter. If you are building a sphere using Plotz, this help page will give you all the information you need, then you can launch Plotz Minecraft Sphere generator.
Using Plotz to make Spheres in Minecraft
Launch Plotz Sphere Generator from the link above or select the sphere model from the Plotz model menu. The initial sphere modeller screen will be shown. Plotz modeller always uses the full with and height of the browser. You can resize your window or enter full screen mode to make this most of this. On tablet devices such as the iPad, Plotz will redisplay if you change screen orientation to landscape or portrait.
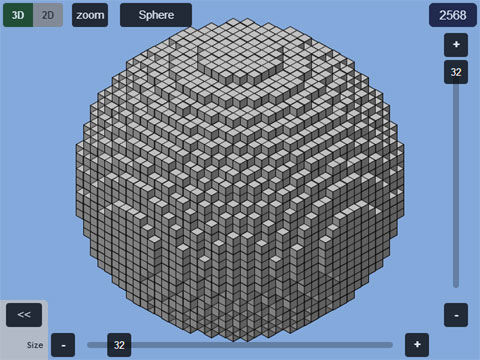
Initially a 32 block diameter sphere is shown as a 3D model. Drag the slider along the bottom to alter the diameter between 8 and 256 blocks. Larger models take longer to render and may display a progress window. You can hide the sliders if required using the << button. You can get the sliders back by selected the size value.
The number in the top right is how many blocks you'll need to build the sphere in Minecraft.
Return to the model menu at any time by going back in your browser OR selecting the model name button at the top.
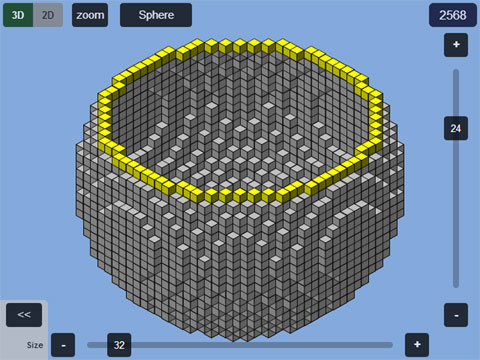
The right hand slider allows you to show a specific horizontal layer of your model. This applies to both 2D and 3D views. In 3D mode only, this layer will be highlighted yellow.
Typical building would see you start at layer 1, make that layer in Minecraft and then hit the + button to see the next layer and continue building vertically.
When you drag the slider back to the top, the top layer is left highlighted yellow. Select the + button to remove the highlight if required.
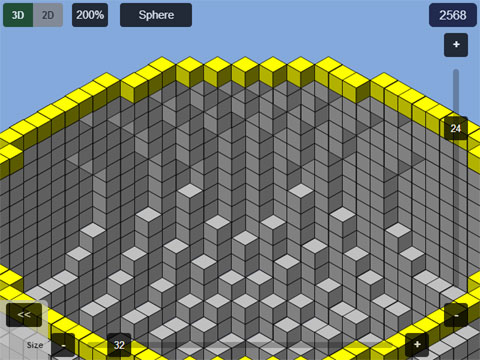
While zoomed in, drag the main canvas to pan around. To save graphics memory, Plotz will only update the display when you stop dragging.
Zoom is particularly useful in 2D mode as almost all models are symmetrical meaning you can zoom to the top left quadrant and build it 4 times to make the whole layer.
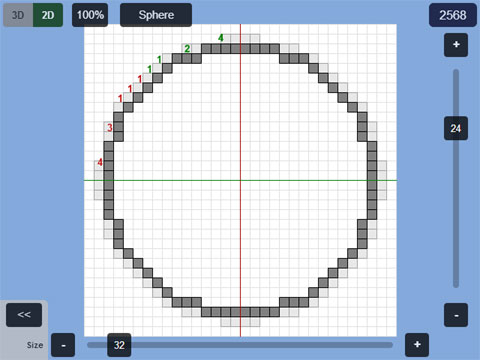
Buttons in the top left toggle between 3D and 2D mode. 3D gives a good idea of how a model will look when built, but 2D mode is arguably more useful when building, especially for larger models.
In 2D mode a layer of your model is displayed as a 2D grid. Blocks on this layer are clearly displayed. Any blocks visible on the layer below appear ghosted out helping you position the current layer.
Many models give block counts in coloured groups of 5 (5 red, 5 green, 5 blue etc.) to help you build curves. These counts are shown in the top left quadrant. Symmetry means most models simply require this quadrant to be built 4 times over.
This data pack generates spheres using rotated and posed armor stands.
To use this data pack, you must hold a Warped Fungus on a Stick in your offhand slot, and then selecting different hotbar slots will select different functions. Right click to execute the function.
Slot 1: Selects and deselects spheres
Slot 2: Moves the selected sphere in the direction you are facing
Slot 3: Changes the material of the sphere to the item in this slot
Slot 4: Increases the radius of the selected sphere
Slot 5: Decreases the radius of the selected sphere
Slot 6: Spawns a sphere consisting of 400 armor stands
Slot 7: Spawns a sphere consisting of 800 armor stands
Slot 8: Spawns a sphere consisting of 1600 armor stands
Slot 9: Deletes the selected sphere

Q: You know we can just use MCEdit, right?
A: People tell me this all the time in the comments. Yes, it would be a whole lot easier to use MCEdit or any other world-editing program, but you're not able to use it on a SMP server, and some people don't know how or are unable to download it.
Q: What about cones?
A: Cones should be easy to figure out. Start out with a horizontal circle, stack blocks in the middle as high as you want your cone to be, and keep adding smaller circles underneath it (or on top if your cone's base is facing down) until it reaches the tip of the stack of blocks. A bit hard to explain without pictures, but you can study this ice cream cone I made to help you out.

Q: How did you learn this technique?
A: I never learned this from anybody. I learned the flat circles pretty fast, and I just studied the spheres and eventually figured out an easy way to make them.
Читайте также: