
Granny crochet hook схемы
Обновлено: 05.07.2024
- basic site functions
- ensuring secure, safe transactions
- secure account login
- remembering account, browser, and regional preferences
- remembering privacy and security settings
- analysing site traffic and usage
- personalized search, content, and recommendations
- helping sellers understand their audience
- showing relevant, targeted ads on and off Etsy
Detailed information can be found in Etsy’s Cookies & Similar Technologies Policy and our Privacy Policy.
Required Cookies & Technologies
Some of the technologies we use are necessary for critical functions like security and site integrity, account authentication, security and privacy preferences, internal site usage and maintenance data, and to make the site work correctly for browsing and transactions.
Feb 16 Amigurumi Crochet Octopus Pattern
Crochet along using the video tutorial, written pattern or combination of both! Crocheted in almost one piece, there is ZERO sewing on of body parts which is fantastic as there is nothing worse than sewing on 101 different bits for amigurmi 😅
Full video tutorial
Amigurumi Chubby Octopus Written Pattern
(USA Stitch Terms)
1 x 100g Cygnet Chunky - available HERE
A scrap of black & a scrap of pink yarn
12mm safety eyes
Magic ring / circle
Sc (single crochet)
Inc (increase = 2sc in same stitch)
Dec (decrease = 1sc over 2 stitches)
BLO (back loop only = work into the back loop of the stitch)
Repeat the pattern between the square brackets “[ ]” the number of times as shown by “X number”
The number in brackets “( )” at the end of each round is your total stitches that you will have worked in that round
Unless specifically instructed, work in spirals; do not join at the end of your rounds.
LEGS
MAKE SEVEN
Magic ring, 6sc (6)
sc in each stitch around (12)
sc in each stitch around (12)
sc in each stitch around (12)
Cut yarn and weave in ends on all seven legs.
LEG EIGHT
Magic ring, 6sc (6)
sc in each stitch around (12)
sc in each stitch around (12)
sc in each stitch around (12)
DO NOT CUT YARN – you are now going to join all the legs together.
For the next round (joining legs) you will be working into SIX stitches only on each leg.
6. sc in 6 stitches on each leg, ending with 6sc around leg EIGHT – for your last 6sc, count 6 stitches back from the original join so that you end in the correct place when crocheting on leg EIGHT (48)

7. BLO sc in each stitch around (48)
9. [2sc, dec] x6 (18)
10. [1sc, dec] x6 (12)
Cut yarn, thread needle and run through the outside loops of the last 6 stitches, pull tight then weave in.
TOP OF LEGS AND BODY
Flip leg section over.
You will now be crocheting into your unworked stitches on the legs.
To avoid having large gaps in you work where your legs join, you will be working a decrease stitch over the gap between the legs.
You may find you are not working a decrease into a proper full stitch, don’t worry, just ensure you attach the first part of your decrease into the leg you are currently on, and end the decrease on the adjacent leg.
If in doubt, you will see you have 6 obvious crochet stitches and half stitch / gaps either side. Work decreases into those gaps.

Count 6 full sc back on any leg and join your yarn to that stitch.
1. [6sc, dec over leg gaps] x8 (56)
2. [5sc, dec] x8 (48)
4. [2sc, dec] x6 (18)
Lightly stuff the legs (legs only!)
The body is made using staggered increases to avoid the hexagonal increase lines you would normally find in standard circle increasing.
You may wish to use your stitch marker here if you aren’t already!
5. [2sc, inc] x6 (24)
6. [3sc, inc] x6 (30)
7. 2sc, inc, [4sc, inc] x5, 2sc (36)
8. [5sc, inc] x6 (42)
9. 3sc, inc, [6sc, inc] x5, 3sc (48)
10. [7sc, inc] x6 (54)
11. 4sc, inc, [8sc, inc] x5, 4sc (60)
12. sc in each stitch around (60)
13. sc in each stitch around (60)
14. sc in each stitch around (60)
15. sc in each stitch around (60)
16. sc in each stitch around (60)
17. sc in each stitch around (60)
18. sc in each stitch around (60)
19. sc in each stitch around (60)
20. sc in each stitch around (60)
21. sc in each stitch around (60)
Place safety eyes between Rows 16 & 17, 10 stitches apart
22. 4sc, dec, [8sc, dec] x5, 4sc (54)
23. [7sc, dec] x6 (48)
24. 3sc, dec, [6sc, dec] x5, 3sc (42)
25. [5sc, dec] x6 (36)
26. 2sc, dec, [4sc, dec] x5, 2sc (30)
27. [3sc, dec] x6 (24)
28. [2sc, dec] x6 (18)
29. [1sc, dec] x6 (12)
Cut yarn, thread needle and run through the outside loops of the last 6 stitches, pull tight then weave in.
Embroider the face with your pink and black scraps of yarn and you are done!
Crochet Hook and Granny Square Quilt Block PDF Pattern.
What this pattern features:
Pattern includes instructions and measurements for 6 inch and 12 inch finished blocks and includes written instructions as well as colored graphics to guide you as you construct the block. All of my quilt patterns are made using traditional machine piecing….no paper piecing required.
I am constantly looking for ways to customize and personalize my quilting and sewing projects! That’s why I started designing quilt block patterns…so that you too can incorporate these patterns into your special projects! My block patterns can be incorporated into quilts, pillows, pouches and bags, etc. The possibilities are endless! There are so many patterns out there that you can build 6 inch and 12 inch block into.
Note: finished block is defined as finished when it is sewn into the project. The block by itself will measure 6 1/2 inches (or 12 1/2 inches) until it is finished in your project.
All of my patterns (including this one) come in PDF instant download format, so there is no wait time! You can download it immediately and it’s ready for you to use!
This pattern is for this one specific block ONLY. Please see my other listings for additional patterns.
Because of the nature of PDF patterns and that they can be saved to a computer, I do not give refunds or returns.
Must have a general knowledge of how to operation a sewing machine, rotary cutter/ruler, etc. to make this block.
This pattern is to be used for personal use only and is copyright Burlap and Blossom Patterns. This pattern is not to be re-produced, distributed or resold. This pattern is not to be used in items to be sold.
******** Thank you SEW much for stopping by my shop! I am constantly designing new patterns so make sure to check back often to see new designs! Please feel free to contact me with questions******
Ваши файлы будут доступны для скачивания после подтверждения оплаты. Это делается следующим образом.
Я не принимаю возвраты, обмены или отмены заказов. Но прошу связаться со мной, если у вас возникнут какие-либо проблемы с заказом.
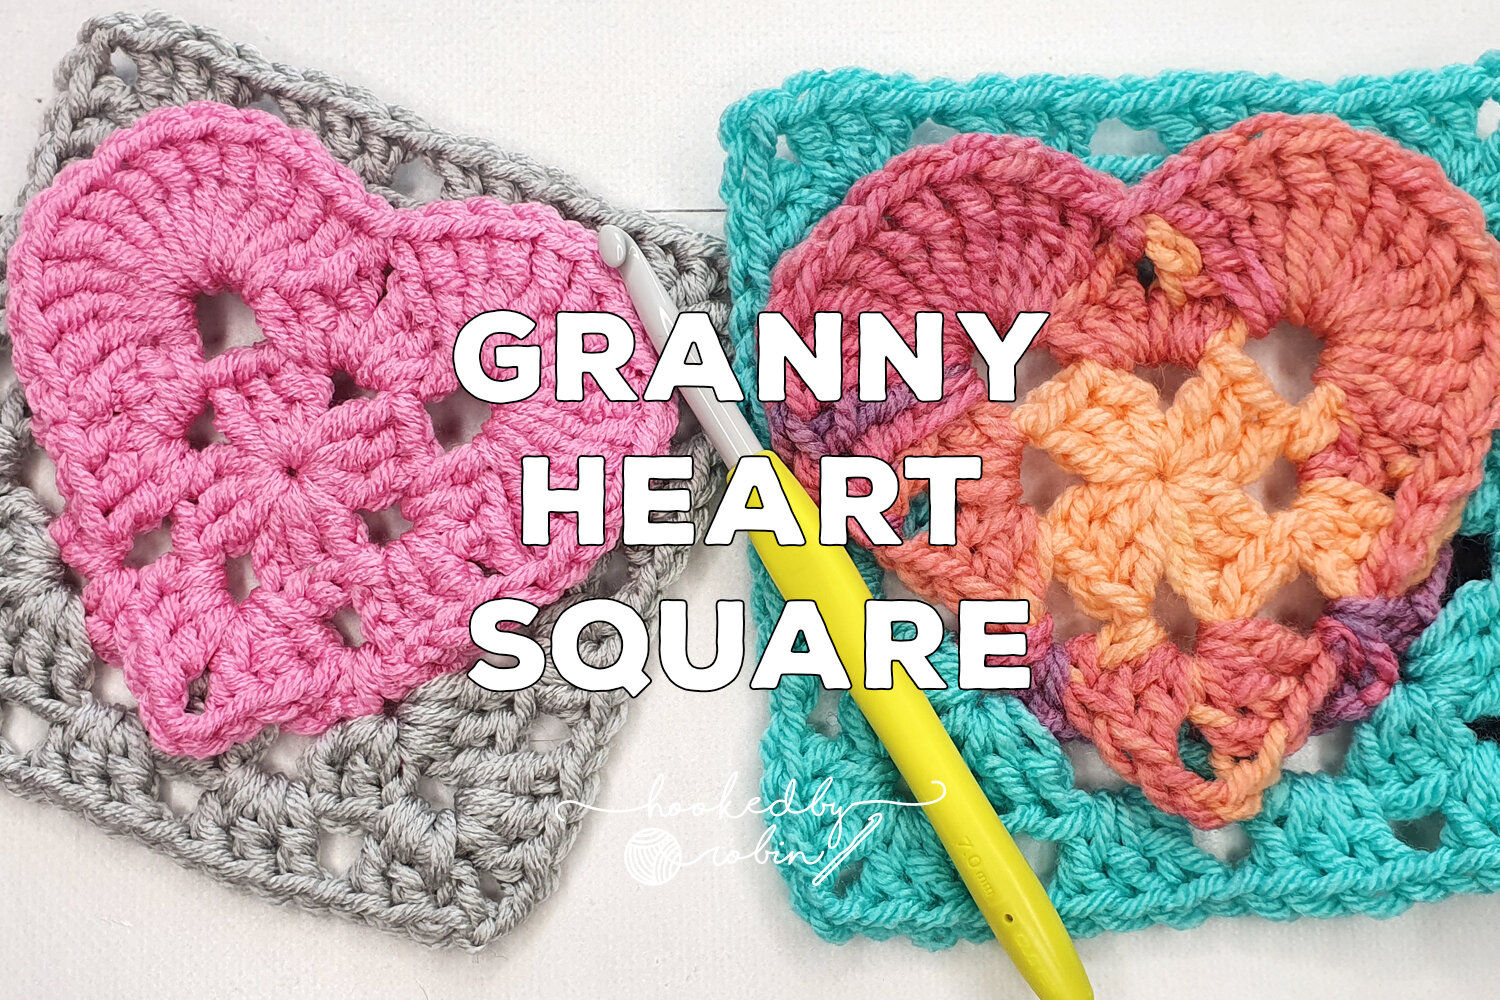
Feb 25 Crochet Granny Heart Square
So many people asked if the Granny Heart Shape could be turned into a square and the answer is YES! Yes it can 😀❤ This method of squaring off gives a 3D textured effect to your square and is an interesting twist on traditional granny squares - definitely something different which I hope you all enjoy!
WRITTEN PATTERN: USA Terms
ch = chain
sc = single crochet
dc = double crochet
repeat the pattern between the * *
Round 1 - in same colour as your Granny Heart
With the front of the heart facing you, join yarn to the side space on the right hand side, just next to the bottom ch3 space of your heart (see video)
in same chain space: [sc, ch3, sc]
ch6, sc into back loop of 6th treble from the heart section, ch3, sc into loop of 7th treble (see video)
ch6, sc into back loop of 6th treble from the heart section, ch3, sc into loop of 7th treble
ch6, [sc, ch3, sc] into the sp on the side, next to ch3 space of the bottom of the heart
ch6, join with slip stitch to inital sc of the round.
Round 2 - in new colour
Join yarn to 1st ch3 space of the round below.
ch4 (counts as dc + ch2) 3dc into same space
*ch1, 3dc around ch6 from round below, ch1
[3dc, ch2, 3dc] into next ch3 sp*
repeat from * to * ending with 2dc back into the beginning ch3 space, slip stitch to 2nd chain of initial ch4, then slip stitch into the ch3 space.
Round 3
Ch4 (counts as dc + ch2) 3dc into same space
*ch1, 3dc in ch1 space from round below, ch1, 3dc in ch1 space from round below, ch1
[3dc, ch2, 3dc] into corner ch2 space*
repeat from * to * ending with 2dc back into the beginning ch3 space, slip stitch to 2nd chain of initial ch4.
Fasten off yarn, weave in ends.


Welcome to my website. Here you will find all my free crochet patterns and tutorials 😀
Click the categories on the left to get started!

Персонализированная реклама
Для показа рекламных объявлений Etsy по интересам используются технические решения сторонних компаний.
Мы привлекаем к этому партнеров по маркетингу и рекламе (которые могут располагать собранной ими самими информацией). Отказ не означает прекращения демонстрации рекламы Etsy или изменений в алгоритмах персонализации Etsy, но может привести к тому, что реклама будет повторяться чаще и станет менее актуальной. Подробнее в нашей Политике в отношении файлов Cookie и схожих технологий.
Welcome to my website. Here you will find all my free crochet patterns and tutorials 😀
Click the categories on the left to get started!
Читайте также: