
Final fantasy 12 the zodiac age доспехи гэндзи
Обновлено: 05.07.2024

Genji equipment ( げんじ , Genji ? ) , also known as samurai equipment, is a recurring set of heavy armor that appears in almost all Final Fantasy games. Genji equipment is always either the best or one of the best sets of equipment, available in limited supplies. It is usually obtained (or stolen) from the recurring boss Gilgamesh. It is described as armor from a faraway land, and consists of a shield, helm, gloves and armor. The sword of the set, Genji Blade or Genji Katana, also appears on occasion, but not as often as the rest of the set.
Non-Final Fantasy appearances [ ]
Kingdom Hearts series [ ]
The Genji Shield is a recurring weapon for Goofy .
Blood of Bahamut [ ]
The Genji Katana and Genji Armor are the only pieces of Genji equipment that appears in the game.

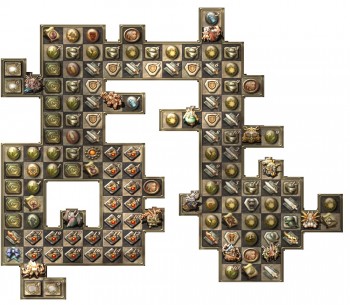
This article lists the armor in Final Fantasy XII, used to provide stat boosts, as well as potential other benefits, such as elemental resistance, permanent buffs, or boosting the elemental damage the wearer dishes out. Wearing multiple pieces of armor that all give the same elemental resistance does not stack, but certain different types do stack:
- Weakness + Halve = Normal damage
- Weakness + Immunity = Immune
- Weakness + Absorb = Absorbs double
- Halve + Absorb = Absorbs half
The cost given is the buy price, though not all equipment can be bought. The sell price is half the buy price.
Contents
Light armor [ ]
Light armor is the most basic of the armor types. It generally offers moderate defensive bonuses and HP boosts, the latter of which can be maximized by using the Bubble spell or equipping a Bubble Belt.
Light armor can be equipped by the Archer, Machinist, Monk, and Shikari.
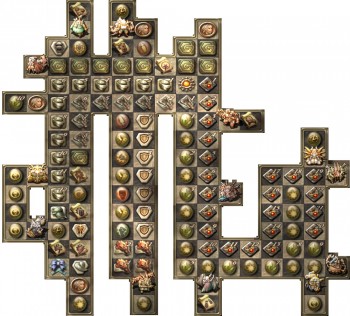
Mystic armor [ ]
Mystic armor offers magick-related bonuses, such as MP and magick power boosts. These have a significant effect on all types of magickal actions, from casting black magick to damage an enemy to casting white magick to heal the party. Magick power is also a factor when determining damage dealt by katana, staves, and maces.
White and Black Robes have hidden elemental potencies: when a character equips them, all damage, both physical and magickal, associated with the element, is boosted by 50%. Elemental affinities do not stack.
In the Zodiac versions, mystic armor can be equipped by the Black Mage, Bushi, Red Battlemage, and White Mage.
Appearances [ ]
Final Fantasy [ ]
Genji equipment can be obtained in the Dawn of Souls and 20th Anniversary remakes. They are found in the bonus dungeons of each release. Additionally, Genji Armor can drop from Warmech in the aforementioned remakes.
Final Fantasy II [ ]
Genji equipment can be found inside chests protected by the four final bosses on Pandaemonium, or in the secret minigame after the spell Toad is leveled up to 16 (GBA/PSP/iPhone version only).
Final Fantasy III [ ]
The complete Genji set can be found throughout the Cave of Shadows. Only the Freelancer, Dark Knight, Ninja, and Onion Knight job classes can equip the set.
Final Fantasy IV [ ]
Originally translated as Samurai equipment, it was corrected to Genji in all subsequent remakes. The complete Genji set can be found in the Lair of the Father, and Kain comes with a set equipped when he joins the party after the defeat of the Giant of Babil.
Final Fantasy IV: The After Years [ ]
The Genji equipment returns and is found in the Subterrane. Although Gilgamesh appears, none can be stolen from him.
Final Fantasy V [ ]
The only way to get Genji equipment is to steal it from Gilgamesh. Therefore, in any of the four battles against Gilgamesh where he actually has the gear, offers a small window for acquisition. The set includes Genji Armor, Genji Helm, Genji Shield and Genji Gloves.
Final Fantasy VI [ ]
Genji equipment appears in the GBA and mobile/Steam versions. The complete Genji equipment can be stolen or dropped from Gilgamesh. The helmet, armor, and shield are equippable armor and among the best in the game, the Genji Glove is a relic that gives the Dual Wield ability.
Crisis Core -Final Fantasy VII- [ ]

Genji Armor obtained.
Genji equipment is one of the best equipment sets.
- The Genji Helm can be purchased from the Net Shop Shade for 1 million gil, but it can only be purchased the first time the shop is visited. When equipped, it grants auto-Libra and 0 AP/MP Cost.
- The Genji Armor is acquired once all slots on the DMW are filled to 100% and the player accesses the DMW menu. When equipped, it sets the HP limit to 99,999 and grants auto-Endure and Regen.
- The Genji Glove is found in a treasure chest in mission 9-6-4. When equipped, it sets the damage limit to 99,999 and grants auto-Critical.
- The Genji Shield is possibly the most difficult piece of equipment to get. The player has to encounter the random enemy Magic Pot in mission 7-6-6 and appease it. It will ask Zack to use Gil Toss, Costly Punch to deal 99,999 damage, and finally to use Sephiroth's DMW move, Octaslash. Using any other damage-causing DMW will make the Magic Pot run. When the player has the Genji Shield equipped, it will enable Auto Barrier and Auto MBarrier, and make Zack immune to all status effects and will absorb all elemental attacks.
Final Fantasy IX [ ]
Genji equipment appears as a three-piece set consisting of a helmet, gloves, and armor. One full set is available from the Chocobo Hot and Cold sidequest; the armor can be found as Chocograph treasure while the helmet and gloves can be found as hidden treasures. A second set can be stolen from Maliris, Kraken, and Lich in Memoria, although solely as bosses, and not the crystallized regular enemies encountered in the Crystal World. Steiner and Freya can equip the Genji equipment. Obtaining the whole set earns the Path of the Samurai achievement/trophy in the latest versions.
Tetra Master [ ]
Final Fantasy X [ ]
Genji armor can be customized for Tidus, Auron, and Kimahri when "Break HP Limit" is the dominant ability. These are the Genji Shield, Genji Bracer, and Genji Armlet. Auron also has a weapon called the Genji Blade, which has Triple Overdrive.
Final Fantasy XI [ ]
Genji equipment is referenced as a National Treasure, and is related to the Feast of Swords annual event (usually late April).
Final Fantasy XII [ ]
Genji equipment is stolen from Gilgamesh and consists of the Genji Helm, Genji Shield, Genji Armor, and the Genji Gloves. The pieces become available to steal one by one after cinematic cutscenes while fighting Gilgamesh. In the Zodiac versions, the Genji Armor can also be stolen from Enkidu in Trial Mode Stage 94, with the Genji Gloves also available from the Hunt Club sidequest and from Judge Bergan in Trial Mode Stage 100.
The whole set shares one license on the License Board. Genji Gloves boosts combo rate for weapons that deal hit combos.
In the original version, Genji Helmet doesn't have any special properties, and Genji Armor boosts counter rate (when Battle Harness is equipped as accessory). In the Zodiac versions, Genji Helm allows the wearer to counter, and the Armor boosts the counter rate, making them perfect to equip to the same character.
In the Zodiac versions, Genji equipment can be equipped by Foebreakers, Knights, and Bushi. The player can get two Genji Gloves, as the player can steal one from Gilgamesh and get one from the Hunt Club. The equipment is also available as steals from the Trial Mode bosses. The player can aim to create two good Genji Glove users, as dealing hit combos is often the fastest way to deal damage. The weapons with the highest combo rate are poles, ninja swords, and katanas. Bushi gets both Genji gear and katanas. Knight and Foebreaker get Genji gear and could be combined with Monk or Shikari for a combo multiplier similar to Bushi alone. The Speed stat is used in combo calculations, but it only varies by three points at level 99, so any character can be used.
Final Fantasy XIII [ ]
The Genji Glove is an accessory that grants the Uncapped Damage ability, allowing the user to exceed the 99,999 damage limit. Only three can be acquired. Dismantling at star level can get the player a Trapezohedron, which is used to make every ultimate weapon. It can be obtained from Cie'th Stone missions 51, 62 and 63.
Final Fantasy XIII-2 [ ]
Serah wields the Genji Bow as part of her downloadable content weapons. It allows Serah to attack more frequently. It can be upgraded to Genji Bow Kiku, Genji Bow Sakura, and True Genji Bow. The Genji Glove returns as an 70 capacity accessory, providing 12% resistance to both physical and magical attacks.
As of the 1.02 update, the Genji Shield is purchasable from Chocolina in the Coliseum; it has 70 capacity and grants 16% elemental resistance. As of the 1.04 update, Genji Helm (70 capacity, Str/Mag+12%) and Delicate versions of the gloves (30 capacity, 6% resist), shield (30 capacity, 4% element resist), and helm (30 capacity, 5% Str/Mag) are now for sale. The delicate versions also make it possible to use their "Warrior's Wisdom" and "Warrior's Spirit" synth, which improves the bonuses from Genji items while the user is critical.
Final Fantasy XIV [ ]
Genji equipment drops as rewards from the Omega raid.
Final Fantasy XV [ ]
Genji Blade is a greatsword obtained from completing Final Fantasy XV: Episode Gladiolus. It is a katana that once belonged to Cor Leonis.
The other piece of Genji equipment is found in the Pitioss ruins. Upon reaching the section with a huge statue of a shackled woman, players must navigate through the obstacles and finally land on the statue, then move down to its belly button to find the Genji Gloves accessory. The effects of the accessory include a 30% damage reduction for lightning, darkness and ballistic damage.
Final Fantasy Tactics [ ]
In the US version, the Genji equipment can be stolen from Marquis Elmdore. In the original Japanese version, Elmdore's job has innate Maintenance ability, and thus the equipment could not be obtained. The War of the Lions remake is based on the original, and thus the player cannot steal from Elmdore; the Genji equipment can instead be obtained via Melee and/or Rendezvous. The Genji Armor can also be obtained in the new sidequest at Lionel Castle in Chapter 4, after defeating Aliste Rosenheim.
Final Fantasy Tactics Advance [ ]
Genji equipment can be obtained as mission rewards. The Genji Armor can teach Reflex to the Paladin job.
Final Fantasy Tactics A2: Grimoire of the Rift [ ]
Final Fantasy Adventure [ ]
The Samurai Helmet and Samurai Armor are the strongest ranked armor in their respected categories, and they are found in the later areas.
Final Fantasy Legend II [ ]
The shield is called Samurai and it has a shield icon before its name. It can be bought in Edo for 26000 GP. It has 50 uses, blocks melee and Ston with 99% chance of success, adds 99 HP to Robots, and increases their Def by 22. It also provides resistance to Change.
Final Fantasy Legend III [ ]
The Samurai Shield, Samurai Helmet, Samurai Armor, and Samurai Glove are all late-game and high rank equipment.
Final Fantasy Type-0 [ ]
Jack's ultimate weapon is the Genji Blade. Genji Armor can be obtained in the second playthrough during "Missions (Type-0)/Machina's Struggle" mission by defeating Gilgamesh 10 times. Genji Helm can be obtained in second playthrough during "Machina's Struggle" mission by defeating Gilgamesh 10 times in the hardest difficulty.
Final Fantasy Crystal Chronicles: Ring of Fates [ ]
The Warrior Sallet, Shogun Sallet, Warrior Harness, and Shogun Harness represent Genji equipment.
Final Fantasy Crystal Chronicles: My Life as a King [ ]
The Genji Shield is a level 85 shield that provides 60 Defense and costs 4,224 gil to buy.
Final Fantasy Dimensions [ ]
This section about equipment in Final Fantasy Dimensions is empty or needs to be expanded. You can help the Final Fantasy Wiki by expanding it.Dissidia Final Fantasy (2008) [ ]
The Genji Helm, Genji Shield, and Genji Armor appear as well as the Genji Blade. They can be traded for in the shop after finishing Inward Chaos, or acquired by defeating the Gilgamesh Friend Card. When any three pieces of the Genji set are equipped at once, they activate the "Soul of Yamato" combination, increasing Luck by three, Regen rate by 20%, the rate at which EX Cores appear, and giving the "HP to Brave" ability.
Dissidia 012 Final Fantasy [ ]
Gilgamesh wields the Genji Blade as one of his eight weapons and is used randomly when attacking and in his EX Mode. It's appearance is based on Auron's Genji Blade. When he attacks with it, it depletes a small amount of the opponent's EX Gauge with every hit.
The Genji set still consists of the Genji Blade, Shield, Helmet and Armor. It can be created with Heike set elements (similar to Dissidia), Samurai's Spirit and Gilgamesh's Battlegen accessories. It can also quite easily be obtained through defeating Lv.100 CPU opponents such as Sephiroth and Exdeath.
Dissidia Final Fantasy Opera Omnia [ ]
This section about equipment in Dissidia Final Fantasy Opera Omnia is empty or needs to be expanded. You can help the Final Fantasy Wiki by expanding it.Pictlogica Final Fantasy [ ]
This section about equipment in Pictlogica Final Fantasy is empty or needs to be expanded. You can help the Final Fantasy Wiki by expanding it.Final Fantasy Airborne Brigade [ ]
This section about equipment in Final Fantasy Airborne Brigade is empty or needs to be expanded. You can help the Final Fantasy Wiki by expanding it.Final Fantasy Record Keeper [ ]
Genji Shield from Final Fantasy IV is a Rarity 5 shield.
This section about equipment in Final Fantasy Record Keeper is empty or needs to be expanded. You can help the Final Fantasy Wiki by expanding it.Final Fantasy Brave Exvius [ ]
This section about equipment in Final Fantasy Brave Exvius is empty or needs to be expanded. You can help the Final Fantasy Wiki by expanding it.Chocobo no Fushigi na Dungeon [ ]
This section about equipment in Chocobo no Fushigi na Dungeon is empty or needs to be expanded. You can help the Final Fantasy Wiki by expanding it.Chocobo's Dungeon 2 [ ]
This section about equipment in Chocobo's Dungeon 2 is empty or needs to be expanded. You can help the Final Fantasy Wiki by expanding it.Final Fantasy Fables: Chocobo's Dungeon [ ]
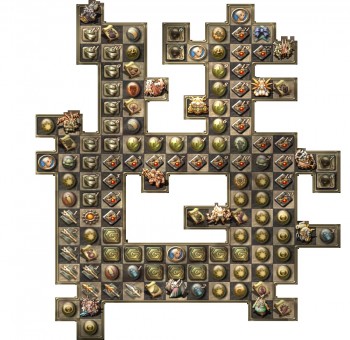
This section about equipment in Final Fantasy Fables: Chocobo's Dungeon is empty or needs to be expanded. You can help the Final Fantasy Wiki by expanding it.Heavy armor [ ]
The strength bonuses offered by heavy armor are beneficial to any character, as all weapon damage formulas except Maces factor in strength alone, or more than other stats, when calculating how much damage will be dealt to the enemy (Guns and Measures ignore stats)
After the player gains access to the Bubble spell and the Bubble Belt accessory, HP becomes less of a concern and reducing the amount of damage taken by the characters becomes more important, for which the player will most likely choose the defense and strength bonuses of heavy armor.
There is a magnetic field during the battle with Vinuskar in the Stilshrine of Miriam, which will severely slow down characters wearing metal armor. Vinuskar also casts Slow, making charge times for those characters excruciatingly long. This also happens in the battle with Ultima, but Ultima does not cast Slow.
Heavy armor can be equipped by the Archer (top rank armor only), Black Mage (medium rank armor only), Foebreaker, Knight, Bushi (high rank armor only), Red Battlemage (medium and high rank armor only), Time Battlemage, and Uhlan.
Shields [ ]
Characters equipped with one-handed weapons or no weapon can equip a shield in their available hand. Shields add to evasion and magick evasion, and sometimes provide beneficial status effects or additional elemental resistance.
Shield Block augments add +5% to physical evasion per augment purchased. If a shield offers magickal evasion, Shield Block adds to that too. Magick evasion does not block status effect spells. Equipping a shield negates the Brawler augment, even if the character is still attacking bare-handed.
Some enemies have Ignore Evade as a passive ability, which causes their attacks to ignore all blocking and parrying. The player can gain the same ability by equipping the Cameo Belt. Shields that provide Magick Evade are still useful, however (though many enemy spells can't be evaded).
In the Zodiac versions, the original Escutcheon has been removed and Ashe's initial shield has been replaced with a Buckler. Shields can be equipped by the Foebreaker, Knight, Red Battlemage, Shikari (Shield Licenses 2 to 7), and Bushi (Genji Shield only).
Other shields [ ]
The following shield models have no names, but do appear in the game data. They were not used as shields in-game, but can be seen in shops and other buildings as background decoration.
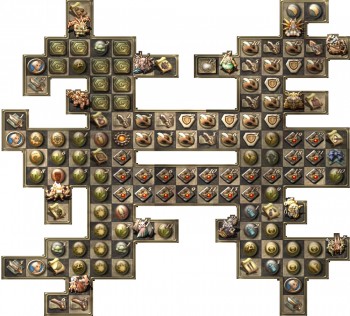
Список экипировки и щитов в Final Fantasy XII
Броня повышает защитные характеристики персонажа и может давать различные бонусы к статусам и элементальной защите. Ещё раз напомню, что есть пять типов «отношения» к элементу:
- Абсорбирование, оно же Поглощение (атака элементом исцеляет персонажа)
- Иммунитет (атака элементом полностью блокируется персонажем и не наносит урон)
- Сопротивление (урон от атаки элементом будет сокращён на 50%)
- Стандартно (урон от атаки элементом не изменяется)
- Слабость (урон от атаки элементом увеличивается на 50%)
Отдельно, вся экипировка делится на четыре типа: щиты, лёгкая броня, тяжёлая броня и мистическая броня
![image]()
Щиты

Подобную способность может получить и персонаж, достаточно экипировать на него аксессуар Cameo Belt.
Он будет у Ashe, когда та присоединится к команде.
Базар (Gilt Shield: 1хFire Stone, 1хMolting)
Базар (Golden Garb: 3хDark Magicite, 3хIron Carapace, 2хTanned Hide)
Базар (Burnished Protectives: 4хEarth Magicite, 2хQuality Hide, 2хWyrm Carapace)
Базар (Forbidding Shield: 2хAged Turtle Shell, 8хDestrier Barding, 1хLeamonde Halcyon)
Базар (Platinum Gear: 6хStorm Magicite, 9хTanned Giantskin, 7хForbidden Flesh)
Базар (Brilliant Shield: 1хUndin Halcyon, 2хRing Wyrm Liver, 2хAncient Turtle Shell)
Заметьте, что персонаж с щитом станет слаб к атакам с элементом молнии.
Сундуки в Feywood, Henne Mines
Заметьте, что на носителе щита постоянно будут очень неприятные статусы. Ribbon и предметы, защищающие от накладываемых статусов, не смогут отменить этих негативных дебаффов.
Возьмите из сундука в Great Crystal of Giruvegan
Заметьте, что в IZJS версии он становится более желанным приобретением.
Невидимый щит, доступный только в IZJS версии. Появляется на том месте, где вы бились с Ultima. Отойдите назад до кристалла (выключите всех персонажей, кроме одного, снимите все статусы, всю экипировку, кроме доспехов и Diamond Armlet, сохранитесь и выключайте консоль. Теперь, включите консоль и бегите к месту, где вы бились с Ultima, повторяйте, пока не появится сундук.
Внимание! Не предпринимайте никаких действий, кроме описанных ниже! Метод основан на обмане генератора случайных чисел.
Если сундук появился меньше, чем через десять заходов, то ударьте себя голыми руками 17 раз. На последнем разе у вас проскочит 2х комбо. Берите свой Gendarme.
Если сундук появился больше, чем через десять заходов, то ударьте себя голыми руками 18 раз. На последнем разе у вас проскочит 2х комбо. Берите свой Gendarme.
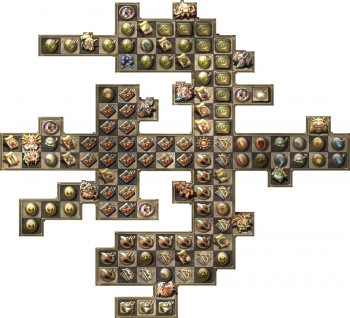
Лёгкая броня
Тип брони для классов, которые рассчитывают на скорость. Лёгкая броня, в основном, даёт средний бонус к защите и бонусы к максимальным НР, которые можно улучшить с помощью статуса Bubble.
![image]()
Шлемы

![image]()
Доспехи

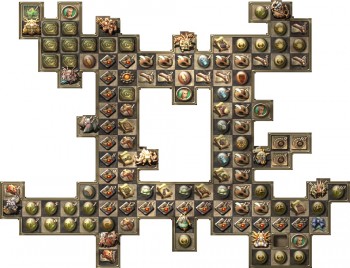
Тяжёлая броня
![image]()
Шлемы
Кража у Гильгамеша
В IZJS версии дополнительно даёт персонажу возможность контратаковать (Counter).
![image]()
Доспехи
Кража у Гильгамеша.
Улучшает шанс контратаковать (см. «Основы»)
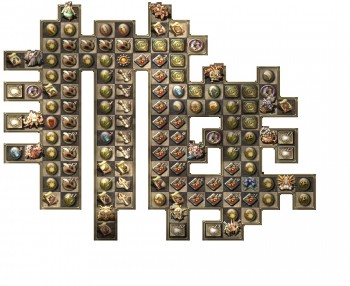
Мистическая броня
Мистическая броня хороша для магов тем, что она даёт хорошие бонусы к МР и магической силе персонажа, что влияет не только на атакующую магию, но и на силу исцеления. Также этот тип брони усиливает урон от булав, посохов и катан, так что обдумайте использование такой экипировки для вашего самурая.
Заметьте, что разница в шлемах IZJS и обыкновенной версии минимальна. Показатели защиты, например, полностью совпадают.
![image]()
Шлемы
В IZJS версии добавлено сопротивление льду.
Сундук в Barheim Passage/Zeviah Span

Final Fantasy XII International Zodiac Job System порадовала нас разделением персонажей по профессиям.
Хироюки Ито и Ясуми Мацуно хотели ввести такое разделение изначально, но тогда посчитали, что оно будет слишком сложным для игроков и сделали общую доску лицензий, чтобы игроки могли сами создать свою уникальную профессию. Игроки, конечно, не сделали как было задумано и активировали всё подряд. Разработчики расстроились и желание сделать переиздание окрепло.
Введение
Итак, каждый персонаж, поступивший в команду, изначально не имеет профессии. Её выбор отдают нам, но помните, выбираем профессию мы на всю игру! Изменить её больше не получится. Вас никто не гонит назначать профессию сразу (очки лицензий сохраняются, хоть мы и не можем их использовать).
Итак, круг профессий.
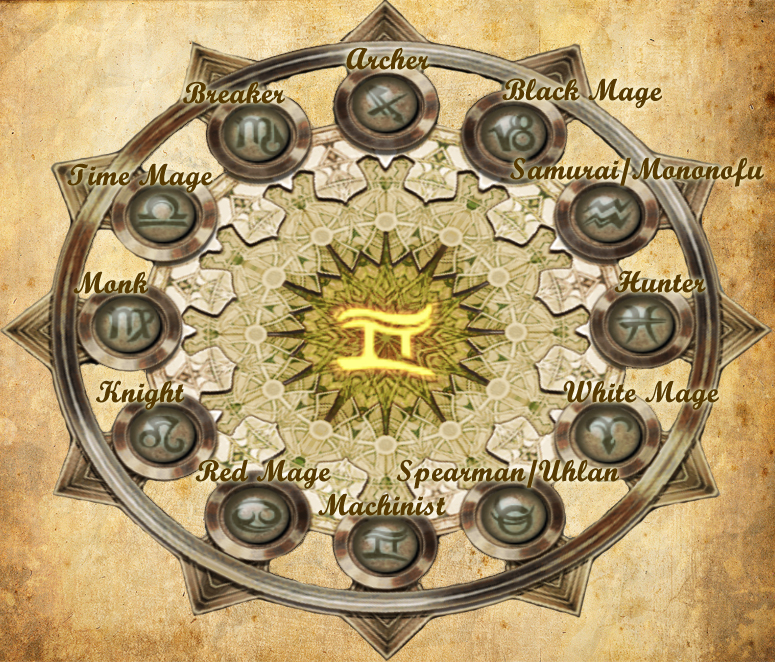
Это интересно: Если нарисовать квадрат, чьи вершины касаются краёв через каждые две профессии, то на его краях мы получим четыре профессии определённой направленности (например, Red/Black/Time/White Mage).
Перед тем, как изучать доску, стоит помнить про несколько изменений:
- Bravery и Faith были перемещены в раздел белой магии.
- Blind, Blindga, Silence, Silencega, Sleep, Sleepga, Poison и Toxify были перемещены в раздел чёрной магии.
- Protect, Shell, Protectga и Shellga перемещены в раздел белой магии.
- Ardor была перемещена в раздел тайной магии.
- Все заклинания тайной магии, кроме Dark\ra\ga и Death были перемещены в раздел магии времени.
- Магия Water была переименована в Aqua.
Выбор профессии, кстати, очень тяжёлый. Вас будет разрывать на части между техниками, магией, защитой и силой. Смотрите не пожалейте потом.
Магические профессии
![1367954530.JPG]()
White Mage

Знак зодиака: Овен
Белые маги используют внутренние силы и разлитую в мире мглу, чтобы исцелять союзников и давать положительные статусные состояния. Владеют жезлами (главное оружие) и некоторым мечами, кинжалами, двуручниками, поэтому неплохо предназначены для ближнего боя. Вместе с возможностью наложить позитивные статусы и исцелять команду, белые маги становятся не только отличными вспомогательными персонажами, но и атакующими. Я вам крайне рекомендую заиметь себе белого мага в команде.
White Magicks 1 (Cure, Blindna), White Magicks 2 (Vox, Poisona),
White Magicks 3 (Protect, Shell), White Magick 4 (Cura, Raise),
White Magick 5 (Dispel, Stona), White Magick 6 (Curaga, Regen),
White Magick 7 (Cleanse, Esuna), White Magick 8 (Confuse, Faith),
White Magick 9 (Bravery, Curaja), White Magick 10 (Dispelga, Arise),
White Magick 11 (Holy, Esunaga), White Magick 12 (Protectga, Shellga),
White Magick 13 (Renew).
Green Magick 1 (Decoy, Oil), Green Magick 2 (Drain, Reverse),
Green Magick 3 (Bubble, Syphon).
![1367957599.jpg]()
Black Mage

Знак зодиака: Козерог
Чёрные маги могут накладывать негативные статусы и наносить элементальный урон врагам. Используют такие ребята посохи и бомбомёты (это означает, что чёрные маги совершенно не приспособлены к ближнему бою). Хоть и некоторая польза от них есть (например, слепота на сильных врагов) и урон монстрам с сильной физической защитой, но профессию можно пройти мимо. Тем не менее, разве можно упустить возможность колдонуть красивую магию на группу врагов? Берите только, когда вы собираетесь усиленно применять магию.
Black Magick 1 (Fire, Thunder), Black Magick 2 (Blizzard, Blind),
Black Magick 3 (Aqua, Silence), Black Magick 4 (Aero, Sleep),
Black Magick 5 (Fira, Poison), Black Magick 6 (Thundara, Blizzara),
Black Magick 7 (Bio, Blindga), Black Magick 8 (Aeroga, Silencega),
Black Magick 9 (Firaga, Thundaga), Black Magick 10 (Blizzaga, Sleepga),
Black Magick 11 (Toxify, Shock), Black Magick 12 (Scourge, Flare),
Black Magick 13 (Scathe).
Green Magick 1 (Decoy, Oil), Green Magick 2 (Drain, Reverse),
Green Magick 3 (Bubble, Syphon).
![1367963126.jpg]()
Red Mage
Знак зодиака: Рак
White Magicks 3 (Protect, Shell), White Magick 4 (Cura, Raise),
White Magick 5 (Dispel, Stona), White Magick 6 (Curaga, Regen),
White Magick 7 (Cleanse, Esuna).
Black Magick 3 (Aqua, Silence), Black Magick 4 (Aero, Sleep),
Black Magick 5 (Fira, Poison), Black Magick 6 (Thundara, Blizzara).
Green Magick 1 (Decoy, Oil), Green Magick 2 (Drain, Reverse),
Green Magick 3 (Bubble, Syphon).
Arcane Magick 1 (Dark, Darkra), Arcane Magick 2 (Death, Darkga),
Arcane Magick 3 (Ardor).
Time Magick 1 (Slow, Immobilize), Time Magick 2 (Reflect, Disable),
Time Magick 3 (Vanish, Balance).
![image]()
Time Mage
Знак зодиака: Весы
При этом, наш маг может быть с тяжёлой бронёй и арбалетом или мечом в руках, что, можно сказать, превращает его в магического танка, который разбрасывается статусами и гравитационной магией во все стороны. Присмотритесь, профессия полезная, стоит только заботливо вырастить нашего персонажа.
Time Magick 1 (Slow, Immobilize), Time Magick 2 (Reflect, Disable),
Time Magick 3 (Vanish, Balance), Time Magick 4 (Gravity, Haste),
Time Magick 5 (Stop, Bleed), Time Magick 6 (Break, Countown),
Time Magick 7 (Float, Berserk), Time Magick 8 (Vanishga, Warp),
Time Magick 9 (Reflectga, Slowga), Time Magick 10 (Graviga, Hastega).
Green Magick 1 (Decoy, Oil), Green Magick 2 (Drain, Reverse),
Green Magick 3 (Bubble, Syphon).
Профессии ближнего боя
![image]()
Knight
Знак зодиака: Лев
Классический танк от FF. У нас есть высокая защита, у нас есть возможность экипировать сильное оружие и, конечно, немного белой магии. Но, вот Zodiac Spear мы ему дать не сможем, а какой смысл в танке, который не может применять сильнейшее оружие? О полезности, пожалуй, судить не буду, для профессии надо учитывать тонкости роста персонажа и думать, как же его впихнуть в битву.
White Magick 6 (Curaga, Regen), White Magick 7 (Cleanse, Esuna),
White Magick 8 (Confuse, Faith), White Magick 9 (Bravery, Curaja).
![image]()
Breaker
Знак зодиака: Скорпион
![image]()
Uhlan
Знак зодиака: Телец
Если вы хотите полностью отключить мозги и просто смотреть кинцо, то выбирайте копейщика и получайте Zodiac Spear.
Black Magick 5 (Fira, Poison), Black Magick 6 (Thundara, Blizzara),
Black Magick 7 (Bio, Blindga), Black Magick 8 (Aeroga, Silencega).
![image]()
Samurai
Знак зодиака: Водолей
Профессии легких воинов
![image]()
Hunter
Знак зодиака: Рыбы
Не самый удачный выбор для атакующего персонажа, если только вы не собираетесь долго плясать с бубном вокруг Yagyu Darkblade (а там пляски почище Tournesol'а). Да и в конце игры появляется нежить и наш персонаж (ой-ей) становится совершенно бесполезным.
![image]()
Archer
Знак зодиака: Стрелец
Очень интересная профессия. У лучников почти нет усилителей магической и физической силы, но они, тем не менее, могут использовать для своих луков особые стрелы, которые имеют разные элементальные и статусные эффекты. В добавок к этому у лучников самое большое количество техник из всех имеющихся профессий и максимальное количество Phoenix Lore.
К тому же, луки используют в формуле расчёта урона скорость нашего персонажа, потому наибольший упор идёт на увеличение именно этого параметра. Ясное дело, тяжёлая экипировка в таком случае строго противопоказана, да и применять нам её не с чем, одни луки.
Большое количество Remedy Lore можно очень красиво объединить с Nihopalaoa и наносить статусы противникам сразу огромными пачками.
![image]()
Machinist
Знак зодиака: Близнецы
Также, машинисты владеют капелькой зелёной и временной магии и могут экипировать себе измерительные приборы. Эдакие поддерживающие персонажи, которые умеют кусаться.
Time Magick 8 (Vanishga, Warp), Time Magick 9 (Reflectga, Slowga),
Time Magick 10 (Graviga, Hastega).
Green Magick 1 (Decoy, Oil).
![image]()
Monk
Знак зодиака: Дева
Стереотипный шаолиньский монах. Целая куча Battle Lore, возможность применять быстрые шесты (которые, к тому же, имеют большую вероятность комбо) и туманная перспектива белой магии после парочки квикенингов и Эсперов. Очень и очень полезная профессия, вам наверняка понравится раздавать тумаки во все стороны Monk'ом. Всё же, ещё с FF3 помним насколько он силён.
Наверняка стоит зарезервировать одного персонажа. Тем более, что возможность получить довольно сильный шест есть уже в Barheim Passage.
White Magick 4 (Cura, Raise), White Magick 9 (Bravery, Curaja),
White Magick 10 (Dispelga, Arise), White Magick 11 (Holy, Esunaga),
White Magick 12 (Protectga, Shellga), White Magick 13 (Renew)
В завершение хотелось бы дать парочку советов для любителей тонкостей.
- Во время выбора профессии учитывайте рост характеристик персонажей. Персонажи обычно вылетают к отметке 99 параметра, на который опирается профессия, но вам стоит знать естественные слабости нашей команды.
Справа у нас «чистые» характеристики наших персонажей на 99 уровне. Даже при беглом просмотре можно заметить, что Пенело, например, имеет наименьший показатель силы и гораздо лучше приспособлена к магическим профессиям, чем, например, Баш или Ваан.
Профессии с Heavy Armor вылетают на 99 в показателе STR, когда Mystic Armor повышают MAG. Конечно, это не должно полностью влиять на ваш выбор ведь машинисты, например, наносят урон даже не обращая внимание на характеристики персонажа.
Если интересует, то играл в зодиак версию. Черным магом у меня была Фран.
Да и не говорю я что чёрного мага НУЖНО избегать. Просто заметил, что играть вполне нормально можно без чёрного мага вообще.
Ну а я потратил тонну Ether'ов чтобы мой чёрный маг мог наносить хоть какой-то урон. Это учитывая, что использовал Sage's Ring и всё что можно. И, в результате, рыцарь всё равно наносил больше урона за меньшую цену.
Играю повторно и мой рыцарь носит меч Diamond Sword и щит. Он 47ур. Черный маг 45ур. Это я еще в том месте, где только-только иду в Архадию. (Город еще не открыт) Рыцарь наносит от 1800 до 2700 урона. Черный маг (бьет по слабости монстра) от 6500 до 11500. Поэтому повторюсь, не знаю как ты играл.
После 3+ часов планирования своей будущей партии, пришел к такому выбору:
Что скажите? Не пересоздам через 60 часов по причине негодности команды для высокоуровневых данжей/квестов/секретов?
Contents
Читайте также: