
Ark survival evolved жила элемента
Обновлено: 05.07.2024
The Element Node is a temporary harvestable structure that is added to the game in the Extinction DLC. It functions in a similar manner to Orbital Supply Drops in that it must be defended from Corrupted Creatures for a total of 5 waves while all the nodes are maturing. The difference is that instead of random loot, the Element Node will yield commonly Element Dust, sometimes Element Shard and rarely Element after being defended based on how many of them remains standing.
As of v288.113 when PvE is activated only the tribe that "claims" the Node can harvest it once it is successfully defended. The claiming is optional.
Combat [ ]
Strategies [ ]
The strategy required to defend the element nodes can greatly vary depending on the actual difficulty. Difficulty can be measured both by the size of the main vein itself or by simply using a spyglass to check the health of the main node. See below for details. While it isn't really possible to over-prepare for such a defense since the quality of your defense matters, you can most certainly under-prepare by mistake and lose valuable dinos and resources in the process. Assess the threat and if you find yourself struggling on the initiation wave or first wave, you may be better to cut your losses and abandon the defense. It's advised to keep non-ridden dinos on the outside parts of the defense to cull the incoming numbers. They can damage the nodes just as easily as the corrupted dinos can.
Tek weapons and MEKs are ill-advised for element vein defenses; they easily destroy the nodes.
Easy: If the main element node has 10,000 HP, it is an easy node and is just a little more difficult than the blue drops. The dinos that spawn are typically between level 1-30 (except for the initiation wave which oddly has Dilos over level 100 on occasion.) A small tribe can easily defend against the waves with nothing much more than primitive crafted crossbows and average tames such as Trikes, Raptors, and perhaps Carnos. Those who have managed to tame a few Velonasaurs will have a much easier time thanks to their ability to shoot down the Corrupted Pteranodons without using ammunition.They also can't damage the element nodes with their ranged attacks.
Medium: If the main element node has 25,000 HP, it is a medium node and is on par with a yellow drop's difficulty. While larger threats such as Corrupted Spinos and Paracers start to make the main bulk of the threat, their levels are generally between 30-90 and can be managed surprisingly well. Some good-level Carnos and Velonasaurs are fine to handle many threats at this difficulty. If you have access to high-quality Enforcers, they can make quick work of the corrupted hordes while also doing minimal damage to the nodes you are defending. Be careful of their fragility and consider using cryopods on those near death in order to preserve them! Quality-level fabricated weapons and flak armor is preferred for those who prefer to be on foot and handing threats that breach the outer defenses such as the pesky Corrupted Pteranodons.
Hard: If the main element node has 50,000 HP, it is a hard node and while the levels of the corrupted horde are lower than they are for the red OSDs (roughly level 100-180 compared to the 200-300 from red OSDs), the difficulty lies in the ability to weave through all of the element nodes to address threats that may get past your outer defenses. Corrupted Wyverns are also a serious threat and can easily flame breath survivors to kill them and make a mess of dinosaur-based defenses. Keep your main defenses outside the nodes and have someone keeping watch of the main vein to handle stragglers that get through or to assist with corrupted wyverns or Giganotosaurus sounds appealing due to their sheer power and this is not as a bad idea if you're riding it. However do NOT let them wander on aggressive as they will outright obliterate the element nodes and greatly reduce your rewards. Don't rely on a Dino Leash to contain the Giga either as they are easily destroyed. A strong Giga that is ridden can handle a choke point by itself but is abysmal for core defense.)
Опасности [ ]
The main danger of these element node defenses is if you come underprepared. Since these events are optional and can be checked prior to setting up a defense, judge your power level compared to the threat; failure to respect the power of the corrupted horde will commonly result in the death of you and/or your tames. Know when to fight, know when to run.
Подпишитесь на нас в Telegram, Facebook, Instagram, Twitter и так вы будете в курсе лучших гидов! Кроме того, если вы хотите поддержать нас, просто ознакомьтесь с этими игровыми предложениями. здесь!
To view this video please enable JavaScript, and consider upgrading to a web browser that supports HTML5 video
Краткое руководство о том, как добраться до уровня Тек как в Vanilla Arks, так и на карте DLC Extinction.
Достигните уровня тек в ARK: Survival Evolved
Уровень Vanilla Tek
Тек-уровень считается завершающим этапом для Арка, однако многое из этого не может быть достигнуто без DLC. Если вы безумно увлечены игрой, купите DLC Extinction или Genesis (или оба сразу) и сэкономьте сотни часов, фармя боссов и убивая тек младенцев.
Вы переходите на Тек уровень, создав свой первый Тек Репликатор, который используется для крафта с Элементом в любом качестве и требует изучения Текграммов. Помимо прочего, требуется построить 100 предметов, которые сложно получить за пределами карт Extinction и Genesis DLC, но все же очень возможно.
Вариант первый: боссы
Независимо от того, являетесь ли вы фермером или нет, вам, несомненно, придется сражаться со всеми четырьмя в какой-то момент вашей жизни в Арке, если вы намерены достичь уровня Тек. Чтобы разблокировать возможность даже создать Репликатор, вы должны сначала убить любого Босса любой сложности на любом Ковчеге. Сражение с боссом любого уровня на любой из базовых / бесплатных карт даст вам приличное количество предметов, обычно пропорциональных сложности босса, а также Текграммы, связанные с боссом.* Сложность в порядке убывания; По мере прокрутки вниз боссы становятся сложнее. Этот список является моим мнением и, как таковой, субъективен, ваш опыт может отличаться. *
Broodmother Lysrix - Остров
Самым простым боссом из четырех боссов острова, безусловно, является Broodmother, которого можно убить на уровне сложности Gamma с помощью одного приличного мегатерия и достаточно хорошего стула, усиливая насекомых животного, достаточных для того, чтобы танковать что угодно . чтобы быть брошенным в него. Это также относится к Бете, однако было бы разумно принести вегетарианские пирожные и очень хорошее седло. Любой из боссов уровня Альфа получает усиление Альфа, подобное обычным альфа-динозаврам, сражающимся на Ковчеге, и, вероятно, убьет одного прирученного даже с помощью следа и божественного верхового животного. Для Alpha Broodmother неплохо было бы развести и напечатать около дюжины Megas с помощью Yutyr.annиспользуйте рев храбрости, чтобы увеличить вашу атаку и защиту. Тем не менее, даже с альфа-баффом, Паук по-прежнему очень легкий и простой бой с боссом, единственное реальное осложнение - его тяжелые удары. это решается хорошими седлами и овощными лепешками для лечения. Наденьте хорошую броню на случай, если вы случайно слезете с лошади.
Мегапитикус - Остров
Немного более сложный бой, чем Broodmother, единственный настоящий пик сложности Monkey - это стойкость Джулиора. Он работает очень похоже на Broodmother, поражая вас рукопашными и дальними атаками и иногда порождая мобов, однако мегатериумов, вероятно, будет недостаточно, чтобы победить его на сложности Alpha. Шкала сложности для островных боссов довольно проста: Гамма = Очень Легко, Бета = Легко, Альфа = Тяжело, поэтому при борьбе с Альфа-Обезьяной я бы предложил использовать более дюжины ручных рексов, напечатанных с 80
маунтами или расположением динозавров, эквивалентным этому. . Методы борьбы с боссами, не являющимися пауками, сильно различаются, и вы можете использовать широкий спектр существ, некоторые методы включают шерстистых носорогов, некоторые включают Терису, я советую вам попробовать динозавров, с которыми вы хотите сражаться.
Дракон– Остров
С Юлием боссов можно сражаться на других картах, а Дракон - отличный пример того, с кем не стоит сражаться на острове, если вы можете ему помочь. Мало того, что это невероятно сложнее, чем два других босса, у него есть дополнительная сложность, заключающаяся в том, что он может летать, наносить больший урон хищникам, воспламенять себя и существ, которых вы приводите, вызывать диморфодонов (которые могут атаковать вашего персонажа напрямую, даже если вы верхом), а также наличие лавы на арене, на которой вы сражаетесь, и вокруг нее. Если вы не хотите сразиться с надзирателем, я предлагаю вам сразиться с Драконом в Рагнароке или Вальгеро, где это намного, намного проще. Образования динозавров обычно быть Высокоуровневые рексы и юты, некоторые люди приносят даэдонов для лечения, некоторые используют отряд Теризино, поскольку они не страдают от дебаффа плотоядных животных против них, однако их обычно недостаточно, чтобы убить Альфа-дракона, если они не умеренные мутировал. или очень хорошо образованный.
Супервайзер - Эксклюзив на острове
Смотритель - это босс, который сражался в пещере Тек внутри вулкана на острове.Он требует, чтобы вы сражались с боссами того же уровня и собирали их трофеи, прежде чем встретиться с ним. Естественно, с ним сложнее сразиться, чем с Джулианом из других боссов в Арке (не считая Короля Титана), и он предлагает некоторые из самых важных Текграмов в качестве награды, но не более того. Если вы строго сражаетесь с боссами для Элемента, вы не получите их, сражаясь с Смотрителем. (если вы не поднимете что-то с земли или не соберете немного пыли от силовиков и дронов, которых вызывает Смотритель). Кривая сложности аналогична кривой любого другого босса, она становится пропорционально сложнее, когда вы сражаетесь с Гаммой, Бета и Альфа, поэтому, если вам интересно, насколько сложен босс, попробуйте сразиться с Гаммой, прежде чем выполнять любую другую трудность.Другие гиды Как легко развести костер в ARK: Survival Evolved
Советы босса
Когда вы победили босса, обязательно нанесите смертельный удар своим динозавром, так как есть проблемы с получением вашего предмета и наград за добычу, если боссы убиты снарядом или оружием ближнего боя. Вы не можете собирать тела боссов, поэтому не волнуйтесь, если добычу съест случайный динозавр. , вы должны не забывать собирать добычу с тела босса, она не будет перенесена в ваш инвентарь автоматически. Вы также должны бежать и собирать мешки смерти у любого убитого укротителя, так как седла, необходимые для борьбы с высокоуровневыми боссами, обычно довольно дороги в изготовлении и не вернут их после того, как вас телепортируют с арены. Вы не сможете забрать сумки после возвращения на главный остров, а ваше время песка падает до 30 секунд после смерти босса, так что не задерживайтесь.
Вариант второй: Tek Farms
Называйте их как хотите, но единственный другой математически жизнеспособный способ получить Element, не заходя на карту DLC, - это убить Tek-динозавров и собрать пыль с их тел.Основная идея состоит в том, чтобы иметь приличное количество выводка Тек Дино и просто собирать детенышей, когда они вылупляются. (Все Тек Дино яйцекладущие). Вы также можете позволить динозавру вырасти до зрелого возраста, а затем собрать его бензопилой с высоким процентом, это даст выход порошка Джулиора, но если вам действительно нужно больше, вы можете выровнять динозавров HP перед смертью, чтобы получить немного больше. Я предпочитаю разводить тек-рексов для этого, поскольку они могут быть вдвойне полезны в качестве бойцов с боссами, но тек-стеги тоже чрезвычайно полезны, особенно если вы играете в PvP или планируете сразиться с Роквеллом в любой момент, они также производят немного больше пыли, чем Тек Рекс.
Используя этот метод, вы также получите большое количество металла, электроники и масла, очень полезных материалов для вашего выживания. Этот метод на сегодняшний день является самым медленным и трудоемким, однако выплата разумна, если вы не в той точке, где вы можете неоднократно сражаться с боссами или просто не хотите постоянно фармить артефакты и трофеи Apex. У вас также есть возможность просто охотиться на диких динозавров Тек, хотя это никогда не создавало для меня значительного количества пыли, соизмеримого с временем, которое я потратил на их поиск.


ARK: Survival Evolved
6 июл. 2020 в 2:07камрады, бегаю сольно на карте Энстинкшен. вопрос (наверно вообще ко всем картам) - а как добывать элементальную пыль? тут можно из фонарей-скамеек-стражников-тек-существ добывать. понемножку. а как можно добыть помногу? на этой и на других картах?
6 июл. 2020 в 10:24камрады, бегаю сольно на карте Энстинкшен. вопрос (наверно вообще ко всем картам) - а как добывать элементальную пыль? тут можно из фонарей-скамеек-стражников-тек-существ добывать. понемножку. а как можно добыть помногу? на этой и на других картах?
Enemy Spawn Rates [ ]
These Corrupted Creatures can spawn in each wave with varying number. (Keep in mind that this list has yet to be separated based on node difficulty.)
The Element Node is a temporary harvestable structure that is added to the game in the Extinction DLC. It functions in a similar manner to Orbital Supply Drops in that it must be defended from , sometimes 288.113 when PvE is activated only the tribe that "claims" the Node can harvest it once it is successfully defended. The claiming is optional.
Contents
Overview [ ]
Element Nodes follow a similar setup compared to Orbital Supply Drops in that there are varied difficulties based on the actual size of the Element Node in question. Of course, the larger the Element Node, the larger the rewards and the larger the threat. There are two other differences aside from the loot of acquiring Element over items. The first is that there is no shield to protect the node. The second is that the survivor's performance on defending the main Element Node and the smaller Element Nodes does matter. The more Element Nodes that have been kept alive at the end of the defense, the larger the Element harvest will be. After a successful defense, it's important that the lesser, outer Element Nodes are harvested before the main Element Node; failure to do so will result in the loss of precious additional Element. It's also important to note that only metal tools such as the Pick or Hatchet can be used to harvest the Element, as using Creatures to harvest them will only result in the destruction of the Element Nodes without any Element harvested (but the Mantis can be used with a Metal Pick or Metal Hatchet for harvesting larger quantities).

When fighting King Titan, after a while it will stop, causing a nearby Corrupt Element Node to spawn with only two waves. Unlike the ones found around the wastelands, these do not yield any element once defended, but rather, deter it from restoring a portion of its health.
Difficulty [ ]
The strategy required to defend the element nodes can greatly vary depending on the actual difficulty. Difficulty can be measured both by the size of the main vein itself or by simply using a spyglass to check the health of the main node. See below for details. While it isn't really possible to over-prepare for such a defense since the quality of your defense matters, you can most certainly under-prepare by mistake and lose valuable dinos and resources in the process. Assess the threat and if you find yourself struggling on the initiation wave or first wave, you may be better to cut your losses and abandon the defense. It's advised to keep non-ridden dinos on the outside parts of the defense to cull the incoming numbers. They can damage the nodes just as easily as the corrupted dinos can.
Tek weapons and MEKs are ill-advised for element vein defenses; they easily destroy the nodes.
- Easy: If the main element node has 10,000 HP, it is an easy node and is just a little more difficult than the blue drops. The dinos that spawn are typically between level 1-30 (except for the initiation wave which oddly has Dilos over level 100 on occasion.) A small tribe can easily defend against the waves with nothing much more than primitive crafted crossbows and average tames such as Trikes, Raptors, and perhaps Carnos. Those who have managed to tame a few Velonasaurs will have a much easier time thanks to their ability to shoot down the Corrupted Pteranodons without using ammunition.They also can't damage the element nodes with their ranged attacks.
- Medium: If the main element node has 25,000 HP, it is a medium node and is on par with a yellow drop's difficulty. While larger threats such as Corrupted Spinos and Paracers start to make the main bulk of the threat, their levels are generally between 30-90 and can be managed surprisingly well. Some good-level Carnos and Velonasaurs are fine to handle many threats at this difficulty. If you have access to high-quality Enforcers, they can make quick work of the corrupted hordes while also doing minimal damage to the nodes you are defending. Be careful of their fragility and consider using cryopods on those near death in order to preserve them! Quality-level fabricated weapons and flak armor is preferred for those who prefer to be on foot and handing threats that breach the outer defenses such as the pesky Corrupted Pteranodons.
- Hard: If the main element node has 50,000 HP, it is a hard node and while the levels of the corrupted horde are lower than they are for the red OSDs (roughly level 100-180 compared to the 200-300 from red OSDs), the difficulty lies in the ability to weave through all of the element nodes to address threats that may get past your outer defenses. Corrupted Wyverns are also a serious threat and can easily flame breath survivors to kill them and make a mess of dinosaur-based defenses. Keep your main defenses outside the nodes and have someone keeping watch of the main vein to handle stragglers that get through or to assist with corrupted wyverns or Enraged Trikes.
- Corrupt: This special element node has 150,000 HP and spawns at certain points of the battle against the King Titan. The levels of the corrupted horde matches that of the red OSD (approximate 200-300). Because these spawn in the middle of a fight, you have to make use of whatever you have brought to fight against the King Titan. Corrupted Hordes spawn from both the spawn point for the node and from constant shadow spawns generated by the presence of the King Titan, but the ones that spawns from the node are your main priority. If the main node is destroyed, it will restore a portion of the King Titan's health, prolonging the fight. Thankfully, there are only 3 waves involved in this defense (the preliminary "wave 0" and then 2 main waves.)
The main danger of these element node defenses is if you come underprepared. Since these events are optional and can be checked prior to setting up a defense, judge your power level compared to the threat; failure to respect the power of the corrupted horde will commonly result in the death of you and/or your tames. Know when to fight, know when to run.
(Note for any element vein: Using a tamed Giganotosaurus sounds appealing due to their sheer power and this is not as a bad idea if you're riding it. However do NOT let them wander on aggressive as they will outright obliterate the element nodes and greatly reduce your rewards. Don't rely on a Dino Leash to contain the Giga either as they are easily destroyed. A strong Giga that is ridden can handle a choke point by itself but is abysmal for core defense.)
Team Builds [ ]
This section addresses various tames that would be useful in the defense of harvestable Element Nodes (section work in progress).
- Offense: Giganatosaurus > Enforcer > Reaper > Rex / Spinosaurus
- Offense Support: Thylacoleo > Allosaurus > Carnotaurus > Deinonychus
- Defense: Wyvern > Managarmr > Velonasaur
- Defense Support: Yutyrannus > Daeodon > Snow Owl > Mammoth
- Crowd Control: Magmasaur > Pachyrhinosaurus
- Harvester: Mantis (Note only players with metal tools or mantis with metal tools can harvest.)
- Reward Transport: Gasbags > Basilisk > Quetzal
Overview [ ]
Element Node follow a similar setup compared to Orbital Supply Drops in that there are varied difficulties based on the actual size of the Element Node in question. Of course, the larger the Element Node, the larger the rewards and the larger the threat. There are two other differences aside from the loot of acquiring Locations [ ]
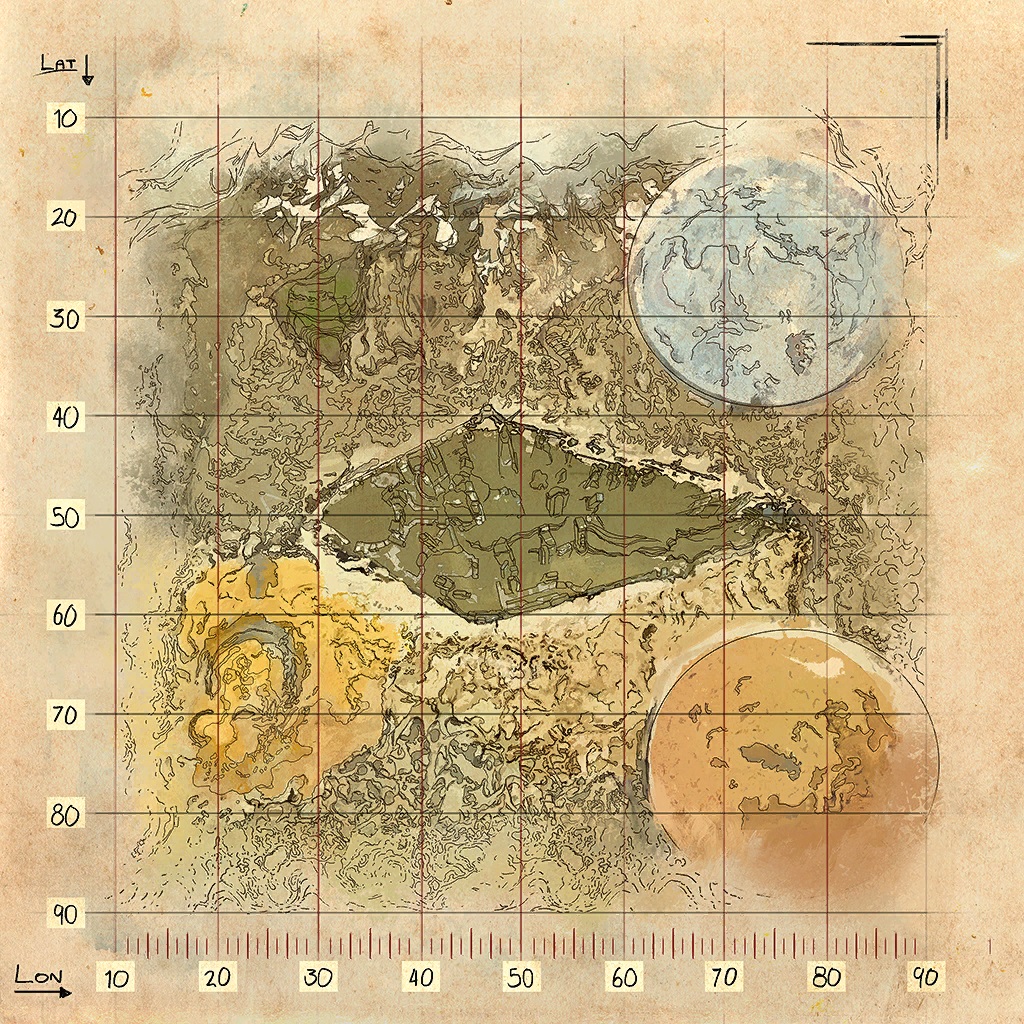
| Номер | UE4 Координаты | GPS Координаты | Качество | Тип | |||
|---|---|---|---|---|---|---|---|
| x | y | z | lat | lon | |||
| 36 | 39948 | -218508 | -13341 | 22.7 | 54.9 | Лёгкий | Оба |
| 10 | -13600 | -190230 | -18471 | 26.2 | 48.3 | Тяжёлый | Оба |
| 31 | -71338 | -183338 | -9988 | 27.1 | 41.1 | Лёгкий | Оба |
| 32 | -81725 | -164800 | -7620 | 29.4 | 39.8 | Лёгкий | Оба |
| 23 | -114745 | -254692 | 8218 | 18.2 | 35.7 | Легендарный | Орбитальный Грузовой Модуль |
| 30 | -173416 | -244821 | -10130 | 19.4 | 28.3 | Легендарный | Орбитальный Грузовой Модуль |
| 29 | -250785 | -269614 | -929 | 16.3 | 18.7 | Средний | Орбитальный Грузовой Модуль |
| 28 | -298297 | -263829 | -6865 | 17.0 | 12.7 | Тяжёлый | Узел Элемента |
| 27 | -301167 | -219611 | -14048 | 22.5 | 12.4 | Тяжёлый | Оба |
| 16 | -289630 | -121120 | -19710 | 34.9 | 13.8 | Тяжёлый | Оба |
| 19 | -293939 | -52003 | -25691 | 43.5 | 13.3 | Легендарный | Орбитальный Грузовой Модуль |
| 20 | -278813 | 33744 | -23907 | 54.2 | 15.1 | Тяжёлый | Оба |
| 21 | -248277 | 8958 | -25871 | 51.1 | 18.9 | Тяжёлый | Оба |
| 35 | -183570 | -80381 | -21634 | 39.9 | 27.1 | Лёгкий | Орбитальный Грузовой Модуль |
| 34 | -138625 | -84001 | -17506 | 39.5 | 32.7 | Лёгкий | Оба |
| 4 | -102943 | -124199 | -18400 | 34.5 | 37.1 | Тяжёлый | Узел Элемента |
| 33 | -77101 | -124032 | -13110 | 34.5 | 40.4 | Лёгкий | Оба |
| 39 | -23028 | -116731 | -14712 | 35.4 | 47.1 | Лёгкий | Оба |
| 3 | 18289 | -131414 | -18760 | 33.6 | 52.3 | Средний | Оба |
| 11 | 22080 | -157490 | -18540 | 30.3 | 52.7 | Средний | Оба |
| 37 | 64890 | -168223 | -9438 | 28.9 | 58.1 | Легендарный | Орбитальный Грузовой Модуль |
| 38 | 63073 | -112684 | -15808 | 35.9 | 57.9 | Легендарный | Орбитальный Грузовой Модуль |
| 2 | 157900 | -85700 | -18900 | 39.3 | 69.7 | Легендарный | Орбитальный Грузовой Модуль |
| 17 | 220166 | -53831 | -11577 | 43.3 | 77.5 | Лёгкий | Оба |
| 6 | 284336 | -31796 | 8915 | 46.0 | 85.5 | Легендарный | Орбитальный Грузовой Модуль |
| 15 | 272780 | 28700 | -19620 | 53.6 | 84.1 | Средний | Оба |
| 22 | 323824 | 68314 | 933 | 58.5 | 90.5 | Лёгкий | Оба |
| 0 | 170960 | 85925 | -24271 | 60.7 | 71.4 | Тяжёлый | Оба |
| 14 | 78900 | 125910 | -30882 | 65.7 | 59.9 | Средний | Оба |
| 12 | 58090 | 229810 | -39186 | 78.7 | 57.3 | Лёгкий | Орбитальный Грузовой Модуль |
| 40 | 50376 | 149102 | -30882 | 68.6 | 56.3 | Средний | Орбитальный Грузовой Модуль |
| 8 | -4950 | 133220 | -33687 | 66.7 | 49.4 | Лёгкий | Орбитальный Грузовой Модуль |
| 7 | -55910 | 135020 | -33760 | 66.9 | 43.0 | Лёгкий | Оба |
| 41 | -51651 | 175821 | -27644 | 71.9 | 43.5 | Средний | Оба |
| 25 | -74607 | 255055 | -41675 | 81.9 | 40.7 | Легендарный | Орбитальный Грузовой Модуль |
| 26 | -96957 | 166875 | -27734 | 70.6 | 37.9 | Средний | Оба |
| 9 | -99390 | 124510 | -32684 | 65.6 | 37.6 | Средний | Оба |
| 18 | -151068 | 142736 | -32687 | 67.8 | 31.1 | Тяжёлый | Оба |
| 24 | -174446 | 281271 | -43337 | 85.2 | 28.2 | Средний | Орбитальный Грузовой Модуль |
| 5 | -256000 | 162500 | -32900 | 70.3 | 18.0 | Лёгкий | Узел Элемента |
Содержание
Читайте также: