
Max payne 2 как поменять скин
Обновлено: 28.04.2024
His life in ruins, Max Payne finds himself back in the NYPD. During a routine murder investigation he runs into Mona Sax, a woman he thought dead, a femme fatale murder suspect. She holds the keys to the questions that haunt him. But nothing is simple in the dark and tragic night of New York City. An army of underworld thugs stands between Max and the answers he seeks. His journey deep into his own personal hell continues.
Freeze Time - Bullet Time
Freeze Time (But you have to kill 1 person first).
popee playermodel v1
mi segundo playermodel de popee para max payne 2 xd
popee playermodel mp2
popee in max payne 2 replaces to max payne 2 player model
Max Payne: The Last Nightmare Of Max Payne
The first demo of Max Payne: The Last Nightmare of Max Payne
Silent Hill Story T.C Mod ( Demo )
'Silent Hill Story' is an abandon-ware T.C Mod (Demo), for 'Max Payne 2', that's based on the popular 'Silent Hill' horror video game franchise.
Cubed T.C mod
A surrealistic mod for 'Max Payne 2' that is set in a world made entirely of cubes which includes a 1/2 hour single-player map, and 4 small DMW style.
Realistic Weapon Sounds V2.1
This mod changes all weapon sounds - that means: gunshots and reloads (the original ones were bugged) are completely new and they sound more realistic.
Shoot Through Mod
Does what it says. Lets you shoot through light obstacles.
Max Caulfield
Replaces Mona Sax and some enemies on Nathan and Jefferson's model.
Haus's Max Payne 2 Sounds
Replaces weapon sounds with semi-realistic, stylish ones. Also replaces some enemy NPC barks with Deus Ex stuff.
MrUniq Prefabs Collection
A collection of prefabs for Max Payne 2 by MrUniq
HL2/CS:S Sound Effects for Max Payne 2 (WIP)
A small mod that replaces the vanilla weapon, melee, throwing, ammo, and HUD sounds with those from Half-Life 2 and Counter-Strike: Source.
Tommy Vercetti player model
Tommy Vercetti player model from Grand Theft Auto: Vice City game. Rigged by AntiEvil
Max Payne 2: Juicy
Added a few cool blood effects. tweaked bullet time: removed color filter, adjusted fov, added a .05 blur, tweaked reload effect, added timestop (no.
Uniform Shots Fired
Original Content: 3 new skins for Max - Max in NYPD Uniform - Max in Leather jacket, jeans, bulletproof vest - Max in NYPD SWAT uniform Mona Re-skinned.
Payned Action v.1.41
Payned Action improves the effects and the gameplay of Max Payne 2. New muzzleflash, tracerround and blood animations, new weaponsounds, some Bullettime.
EASCYA - Maiden Level
The first (Beta) map of an unfinished mod, short but action packed. Enjoy!
Max Payne 2 Alcatraz Map by eckoFake
Thank you very much for downloading my Max Payne 2 Alcatraz level. As you know, my last production was the Aesir Building, but it was not released as.
Hellsing skins pack by AntiEvil
Alucard and Hellsing security models It's free to use,just dont forget crediting.
AntiEvil's model pack
-----------Weapons--------------- Colt 1911 Flame Thrower (AvP 2010) P90 Silenced (GTA Episodes from Liberty City) Pistol (AvP 2010) Pulse Rifle (AvP.
Resident Evil skins pack
Pack of skins from re series. includes some models from resident evil5 and Resident Evil-operation racoon city ---- RE5 models Wesker (Without coat) Chris.
AntiEvil's player models pack
Player models from randome games. Rigged by AntiEvil Alan Wake (Alan Wake) Beltway (Resident Evil; ORC) Deathstroke (Batman; Archam Origins) EDF Trooper.
Marcus Fenix player model
Marcus Fenix player model from Gears of War game. Rigged by AntiEvil To use it, put Marcus Fenix player model.mp2m to game folder, select it in "Customized.
Leon Asia player model
Leon Asia player model from Resident Evil 6 game. Rigged by AntiEvil To use it, put Leon Asia player model.mp2m to game folder, select it in "Customized.
BloodRayne model
Rayne Mona-player model from BloodRayne game. Rigged by AntiEvil To use it, put BloodRayne model.mp2m to game folder, select it in "Customized game" menu.
ALIIIIIIIIVE. (Raiden player model)
Raiden player model from Metal Gear Rising; Revengeance game. Rigged by AntiEvil To use it, put Raiden player model.mp2m to game folder, select it in.
Predator player model
Predator player model from AvP2010 game. Rigged by AntiEvil To use it, put Predator player model.mp2m to game folder, select it in "Customized game" menu.
Billy player model
Billy player model from Resident Evil 0 game. Rigged by AntiEvil To use it, put Billy player model.mp2m to game folder, select it in "Customized game.
Star Wars model pack
Some models from Star Wars games. Rigged by AntiEvil To use it, put Star Wars model pack.mp2m to game folder, select it in "Customized game" menu, and.
Terminator Salvation Weapons
Some weapon models from Terminator Salvation game. Rigged by AntiEvil To use it, put Terminator Salvation Weapons.mp2m to game folder, select it in "Customized.
No addons were found matching the criteria specified. We suggest you try the addon list with no filter applied, to browse all available. Add addon and help us achieve our mission of showcasing the best content from all developers. Join now to share your own content, we welcome creators and consumers alike and look forward to your comments.
clear - oчиcтить кoнcoль
clr - oчиcтить кoнcoль
coder - нeyязвимocть, вce opyжиe, здopoвьe, бecкoнeчныe пaтpoны
god - нeyязвимocть
mortal - oтключить нeyязвимocть
getallweapons - пoлyчить вce opyжиe
quit - выxoд из игpы
showfps - пoкaзaть fps
showextendedfps - пoкaзaть дoпoлнитeльныe пapaмeтpы fps
getberetta - пoлyчить пиcтoлeт Beretta и 1000 пyль
getbullettime - peжим bullettime
getcoltcommando - пoлyчить coltcommando и 1000 пyль
getdeserteagle - пoлyчить Desert Eagle и 1000 пyль
getdragunov - пoлyчить cнaйпepcкyю винтoвкy Dragunov и 1000 пyль
getgraphicsnovelpart1 - пoкaзaть чacть иcтopичecкoгo cюжeтa 1
getgraphicsnovelpart2 - пoкaзaть чacть иcтopичecкoгo cюжeтa 2
getgraphicsnovelpart3 - пoкaзaть чacть иcтopичecкoгo cюжeтa 3
gethealth - пoлyчить 1000 eдиниц здopoвья
getingram - пoлyчить Ingram и 1000 пyль
getkalashnikov - пoлyчить aвтoмaт Kaлaшникoвa и 1000 пyль
getmolotov - пoлyчить кoктeйль Moлoтoвa и 1000 пyль
getmp5 - пoлyчить винтoвкy MP5 и 1000 пyль
getpainkillers - пoлyчить 1000 eдиниц cpeдcтвa для cнятия бoли
getpumpshotgun - пoлyчить пoмпoвый шoтгaн и 1000 пyль
getsawedshotgun - пoлyчить oбpeз и 1000 пyль
getsniper - пoлyчить cнaйпepcкyю винтoвкy и 1000 пyль
getstriker - пoлyчить винтoвкy типa "cтpaйкep" и 1000 пyль
jump10 - пoдпpыгнyть нa 10 eдиниц
jump20 - пoдпpыгнyть нa 20 eдиниц
jump30 - пoдпpыгнyть нa 30 eдиниц
showhud - включить HUD
help - пoкaзaть cпиcoк вcex кoмaнд
Игpaть кaк гoлaя жeнщинa:
Зaпycтитe игpy c пapaмeтpoм -developerkeys
Cтpoкa дoлжнa выглядeть пpимepнo тaк:
"C:\Program Files\Max Payne\MaxPayne.exe" -developerkeys
или тaк:
C:\Program Files\Max Payne\MaxPayne.exe -developerkeys
Teпepь зaпycтитe игpy, тeпepь нaживaйтe клaвиши
[page up] и [page down] чтoбы пepeключитcя мeждy
мoдeлями пepcoнaжeй. B caмoм вepxy дoлжнa быть мoдeль
пoлнocтью пpopиcoвaннoй гoлoй жeнщины.
Kлaвиши paзpaбoтчикoв (Developer Keys) :
Зaпycтитe игpy c пapaмeтpoм -developerkeys
Cтpoкa дoлжнa выглядeть пpимepнo тaк:
"C:\Program Files\Max Payne\MaxPayne.exe" -developerkeys
или тaк:
C:\Program Files\Max Payne\MaxPayne.exe -developerkeys
Teпepь вo вpeмя игpы иcпoльзyйтe cлeдyющиe клaвиши:
[C] - пepeключaть peжим кaмepы
[PgUp] - измeнить мoдeль игpoкa (ввepx пo cпиcкy)
[PgDn] - измeнить мoдeль игpoкa (ввниз пo cпиcкy)
[Ctrl] + [PgUp] - измeнить тeкcтypy мoдeли игpoкa (ввepx пo cпиcкy)
[Ctrl] + [PgDn] - измeнить тeкcтypy мoдeли игpoкa (ввниз пo cпиcкy)
[Home] - yвeличить cкopocть игpы
[End] - yмeньшить cкopocть игpы
[Home] + [End] - ycтaнoвить cтaндapтнyю cкopocть игpы
[Insert] - тeлeпopтaция нa cлeдyющyю нaчaльнyю тoчкy в игpe
[Delete] - тeлeпopтaция нa пpeдыдyщyю нaчaльнyю тoчкy в игpe
[F7] - пoкaзывaть пepeдвижeниe пpoтивникa вкл. /выкл.
(Switches AI Movement Network Conn. Visualization)
[F8] - пoкaзывaть пepeдвижeниe пpoтивникa вкл. /выкл.
(Switches AI movement Network Node Visualization)
[F11] - пoкaзывaть cтaтиcтикy вкл. /выкл.
[F12] - oткpыть кoнcoль
[влeвo] - внeшняя кaмepa влeвo
[впpaвo] - внeшняя кaмepa впpaвo
[ввepx] - внeшняя кaмepa впepeд
[вниз] - внeшняя кaмepa нaзaд
Cкpиншoты:
Чтoбы имeть вoзмoжнocть дeлaть cкpиншoты вo вpeмя игpы,
зaпycтит
По сюжету игры никак не поменять, если играете эпизод за Мону, то за неё только и будете играть. А потом за Макса.
Но есть чит-код, с помощью которого можно играть практически любым персонажем данной игры, там даже есть модель полностью голой Моны, и Моны в полотенце.
Запустите игру с параметром -developerkeys
Строка должна выглядеть примерно так:
"C:\Program Files\Max Payne\MaxPayne.exe" -developerkeys
или так:
C:\Program Files\Max Payne\MaxPayne.exe -developerkeys
Теперь запустите игру, теперь наживайте клавиши
[page up] и [page down] чтобы переключится между
моделями персонажей. В самом верху должна быть модель
полностью прорисованной голой женщины
Самое простое- это добавить параметр -developerkeys в свойства ярлыка, открыв их правой кнопкой на ярлыке игры Макс Пейн 2, там добавить этот параметр в путь.
His life in ruins, Max Payne finds himself back in the NYPD. During a routine murder investigation he runs into Mona Sax, a woman he thought dead, a femme fatale murder suspect. She holds the keys to the questions that haunt him. But nothing is simple in the dark and tragic night of New York City. An army of underworld thugs stands between Max and the answers he seeks. His journey deep into his own personal hell continues.
This is an archive of the official Skin tutorial created by Remedy.
Posted by LithTechGuru on Feb 22nd, 2021 - Advanced Skinning
This is an archive of the official skin tutorial for Max Payne 2. Created by Remedy. It has been archived here due to Rockstar taking down the official Max Payne 2 website recently. I've taken the liberty of fixing all of the links here to ones that work.
Vertex Weighting
The vertex weighting is done the same way as any other character skinning in Character
Studio. The only limitations are that you can 1) only weight your vertices to a maximum
of four bones and 2) none of the vertices' weight values can go to zero. You can check
if your model meets these limitations by using the "Remedy Physique Tool".
NOTE: If you chose to use one of the skins we provided for the this tutorial, you can
load their weighting directly from the _weights.txt-files. Jump to the next chapter to
learn how to Load and Save vertex weights.
- Select Editable Mesh from your skin's modifier stack
- Click the "Remedy Physique Tool"-icon
A window opens, displaying the skin's vertex-to-bone influence distribution. In our
example picture we can see how MonaSax_B's 2399 vertices are weighted: 1824 vertices
are weighted to one bone, 521 to two bones, 53 to 3 bones and 1 vertex
to 4 bones. No vertices are weighted to more than 4 bones or are below the tolerance
weight or zero. If your skin has any of these problematic vertices do the following:
- Click the + button next to the ">4 Bones" to select and show the problem vertices.
- Click "Kill Lowest Influence Node" to remove the least affecting bone from the
vertices' weighting. - Click the + button next to the "Below Tolerance" to select and show the problem
vertices. - Click "Kill Nodes Below Tolerance" to remove any zero weights from the weighting.
- Click Refresh and check if any vertices have appeared that have "0 bone" weights.
Every vertex must be weighted to at least one bone.
Tip: Lock vertices before modifying the underlying skin. This way you avoid messing
up the vertex weights when making modifications.
Skin Tutorial
This tutorial explains you step by step how to create and export your own character skins
to the game by using 3D Studio Max 5.1, Character Studio 4 and Remedy 3D Studio Plugins.
The tutorial requires that you already have some working experience with both 3DS Max and
Character Studio.
NOTE: If you want to skip the skin-to-skeleton attachment process and just try out
the KF2-Exporter, there is a _ExportPose.max-file for every example skin included
in the tutorial. The files contain a pre-weighted skin attached to a skeleton that
is ready for export.
Skeleton Setup
Load the "Male" or "Female"-skeleton (Male_SkinModeling_Pose.max or
Female_SkinModeling_Pose.max)
- Select "Bip01"
- Under "Keyframing Tools" uncheck "Body Space Neck rotation"
- Turn on Figure Mode by clicking on the "FigureMode On/Off"-icon. The icon turns
yellow when Figure Mode is on.
Merging your Skin to the scene
From the File Menu click Merge. Browse to your character model and merge it.
- MaxPayne_Skin.max (male)
- Cleaner_A_Skin.max (male)
- MonaSax_B_Skin.max (female)
If you choose to use one of these skins, you can skip the following steps and go straight to
"Merging your Skin to the Skeleton".
- Collapse your skin into a single "Editable Mesh"-object
- Select all faces and assign them all to Smoothing Group 1
- Check that your character's joints conform to the skeleton joints as well as possible.
- Clean up your mesh: unify normals, remove double faces, edges and stray vertices.
Use "STL Check" and "Normal"-modifiers to do this. - Reset Xform. From the Utilities tab click on "Reset Xform" to reset the character
scale and transforms. Go to the modifier stack and collapse the stack again to Editable
Mesh. - Move the skin's Pivot to World origin. From Hierarchy/Pivot/Adjust Pivot click
"Affect Pivot Only" and move the pivot to World origin (0,0,0). Under Adjust
Pivot/Alignment click "Align to World".
Configuring 3D Studio Max
Before starting, set your 3DS Max units to Centimeters.
Merging your Skin to the Skeleton
- Select your skin
- Apply Physique modifier
- From the Physique Level of Detail/Skin Update choose Deformable and uncheck all
except Link Blending. From Stack Updates check "Reassign Globally"
- Click "Attach to Node" and from the rollout choose "Bip01"
- From the Physique Initialization/Link Settings uncheck Continuity and from
Vertex - Link Assignment/Blending Between Links choose "4 links" and uncheck Create
Envelopes. Click "Initialize".
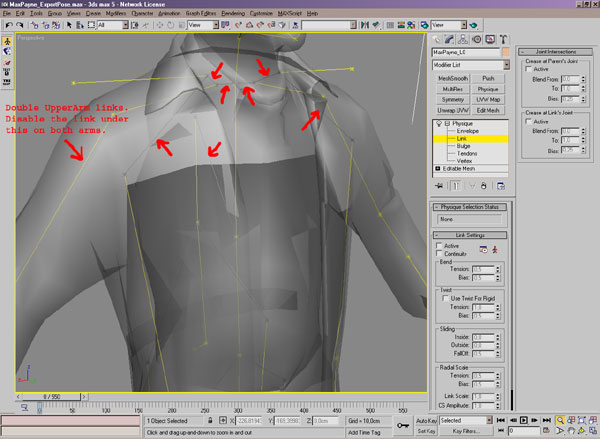
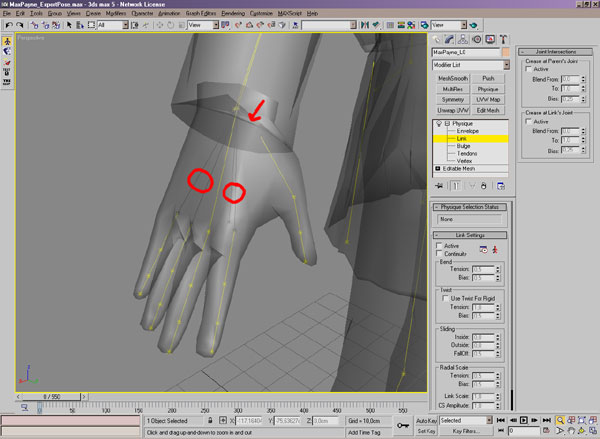
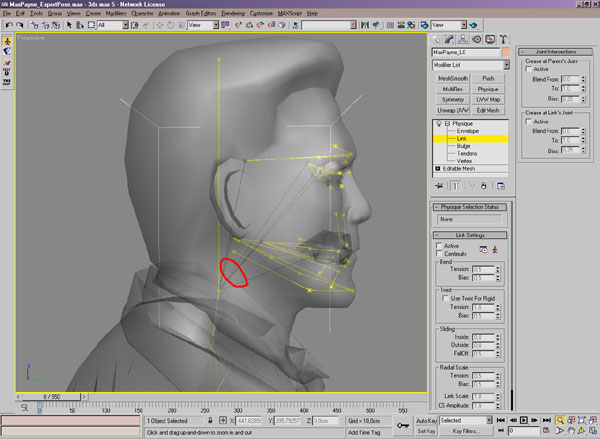
- Disable the unused links. This is done in order to avoid any problems while
loading/saving the skin's vertex weights. Under Physique/Link choose the unused links
and disable them by unchecking Active from the Link Settings. The deactivated links
will turn black.

Loading/Saving Vertex Weights
To Save and Load your skin's vertex weights click the "MP2_SaveLoad" icon.
In the bottom of the rollout there are three buttons. The Save/Load vertex weights are
self-explanatory. You can load old skin weights to any new model, but the results will
not be predictable if the new model varies greatly from the original.
"Load indexed weights" works only if the skin's vertex count hasn't been changed (no
vertices have been added or deleted).
Adding a new Skin to the game
If you want the skin to be a player controllable character (like Max Payne orMona Sax), you should begin by duplicating the "database\skins\MaxPayne.txt" toa new file name such as "database\skins\MySkin.txt". Then create a new foldercalled "MySkin" and copy your 3dsmax exported "MySkin.kf2" and "MySkin.skd"files there. Then edit (at the bottom of the file) the "MySkin.txt" to use yourown .kf2 and .skd files.
If you want to add a new enemy to the game, you should use the same process,
but begin with one of the Cleaner skins for example. This is as the player
skins require very different skeletal movement and other definitions to work
properly.
Materials
Open the Material Editor and choose "KF Material" as the material type. The
"KF Material" is the only material type supported by the game's skins.
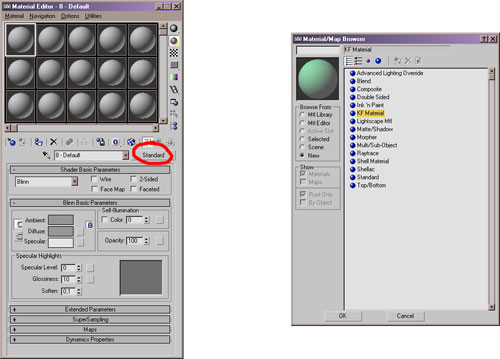
Check "Diffuse", click on the material slot next to it and choose "Bitmap" from
the list.
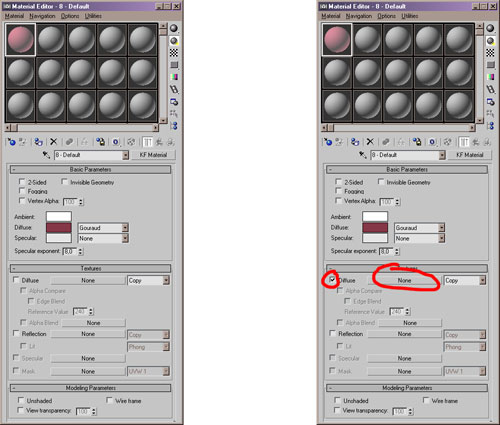
The only supported bitmap type is .DDS. Apply the material to the skin.
Use the "Multi/Sub-Object" material to apply multiple KF materials on one skin
The Multi/Sub-Object material slot numbers correspond to the "Material ID" numbers
under Editable Mesh. Open one of the included skin files for further reference.
Exporting .KF2
Before exporting, check that all the skin transforms are reset (Position [0,0,0], Rotation
[0,0,0] and Scale [100,100,100]). If not, choose Hierarchy->Adjust Transform and click
Reset: Transform and Scale. Check also that the pivot is still located at the origo
(0,0,0).
- Remove zero vertex weights and >4 bone weight assignments by using the "Remedy Physique
Tool" - Select "Bip01"
- Apply Figure Mode
- Load the Male or Female SkinExport_Pose.fig, depending on your base skeleton type.
The skin's fingers curl up to the export pose. You can revert your biped back to its
original modeling pose by loading Male or Female SkinModeling_Pose.fig. - From the File Menu choose "Export". Browse to your desired export directory.
Under "Save as Type" choose "KF2 Exporter". Use the following settings: - [KF2_Exporter.psd].
- Press OK.
Читайте также: