
Roblox studio что это за программа
Обновлено: 05.07.2024

Roblox Studio (рус. - Студия Роблокс) - программа, автоматически устанавливаемая при скачивании ROBLOX Launcher, нужна для создания плейсов.
Что такое Roblox Studio?

1 способ. После установки Roblox, можно обнаружить его на рабочем столе.

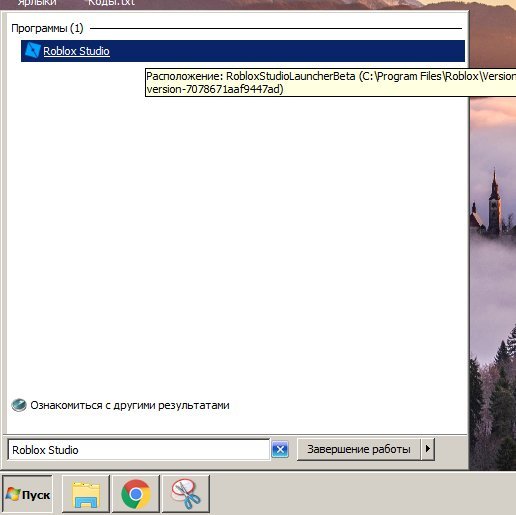
2 способ. Зайти в "Пуск" и в панели ввода вписать "Roblox Studio".
3 способ. Зайти на сайт Roblox, нажать слева сверху "Develop". Нажать на зелёную кнопку "Create New Game". Выбираем стартовый Place и нажимаем "Create New Game" Нас перекидывает на сайт с нашими играми. Ищем наш плэйс (он в самом верху) и нажимаем Edit.


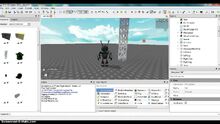
При ПЕРВОМ входе в редактор мы увидим 7 окон:
5. Окно Редактора
6. Окно Файла, Изменения размера и поворот предмета, изменеие terrain, и тест игры.
7. Окно выбора типа редактора.

Проблемы и их решения.
Roblox Studio завис. Что делать?
Меры - После каждого действия сохранять файл плейса
Решение - Потерпеть и ничего не нажимать.
Если завис больше 3 часов, перезагружаем компютер.
Roblox Studio можно запустить только на компьютерных устройствах, ОС Windows или Mac. Если вы хотите запустить Roblox Studio на мобильных устройствах, то у вас ничего не получится.
Для создания модели мы жмем кнопку PART, где она находиться смотрите выше, выбираем модель (например круг или обычный блок) и в центре Окна Редактора(5) появиться блок, для его редактирования нажимаем Move (Передвижение) Scale(Размер) и Transform (наклон). Чтобы изменить цвет или материал модели нам надо нажать Select, кликаем на модель, и нажимаем Material или Color. Выбираем цвет или материал, а можно и то и другое.
Конечно часто в играх траву строят из блоков, и Terrain мало кто использует, но все-же надо узнать как он работает. Смотрим на окно(7) и выбираем Terrain, тут видим много кнопок, вот что они обозначают: Generate- создание Terrain'а, ADD - тут мы можем добавлять целые кубы или круги земли, камней, воды, и много чего другого, Subtract - тоже что и ADD но только оно убирает все поставленное, Paint - покрасить.
Незаменимая вещь, но что такое Toolbox? Игрок создаёт модель, и выкладывает в Toolbox. получается в Toolbox есть куча моделей которые сделали разные игроки, и можно не трудится и просто взять модель из Toolbox. У некоторых моделей есть значок: круг, квадрат и треугольник. Значит данный продукт популярен или он многим нравится.
Как Toolbox испортил плейсы
Но несмотря на это Toolbox можно так сказать "испортил" плейсы. Как? Раньше, когда раньше в роблоксе было меньше моделей в Toolbox, игроки создавали свое, трудились, строили и у них получалось очень хорошо. Если и брали модель из Toolbox, то очень редко. А теперь? Взял модель/скрипт из Toolbox, взял ещё несколько, и воуля! Плейс готов! Так, некоторые игроки портят свои плейсы всякими моделями из Toolbox и не стараясь.
Исключение в том, что Toolbox поможет если вам ОЧЕНЬ нужна модель/скрипт и т.д., но вы не знаете как это сделать то Toolbox в помощь.
Самая главная часть строительства. С помощью скрипта можно сделать ВСЁ. С скриптом делаются Tycoon, поведение бота, и другое. Скрипты можно найти на некоторых сайтах или попытаться сделать самому.
Вы выбираете объект в Exploler и информация о нём показывается в Propeties. Например если вы добавили в модель скрипт, в Properties будет хранится информация о нём, а в Exploler вам надо лишь найти эту модель.
В Explorer надо выбрать о каком вы объекте хотите узнать, а в Properties уже показывается информация.
Это очень хороший инструмент, который поможет вам не начинать с нуля: например, вы можете установить плагин который делает на вашем плейсе смену для и ночи, реалистичную смерть, кровь при уроне и т.д..Плагины может установить каждый, так как они не стоят робуксов.
Смотрим на окно выбора редактора(7) и выбираем View. В View вы можете открыть Toolbox, Exploler, Properties, (и т.д.) или закрыть всё это если вам оно не нужно.
Бонусы Premium
После добавления Премиума в плейсе можно было добавить различные функции, доступные для пользователей с Премиум-подпиской.
Roblox Studio в 2013 году.
Содержание
Overview
This button will create a functional pre-established place. Said place will be accessed through a new Roblox Studio window that will originate. The new game will first off be named as "Place1" before being quickly renamed to "Baseplate" if a player chooses the game's template to be Baseplate, they can choose from many templates, after the game completely loads in the engine. Game settings cannot be altered until a developer publishes the game to Roblox.
It is impossible to save the game to Roblox because it was created without a pre-chosen setting. However, developers can save it as a file or publish it into Roblox by clicking the "Publish to Roblox" button in the File tab. By doing that, the program will orientate the developer to set a name for the game, a description, define who is developing the game, to what genre it applies, and to what devices the game will be playable, although defining the name of the game is the minimum required for this situation. After configuring all of the settings, the developer must click the "Create" button to publish the game. Developers can also overwrite an already existing game by clicking the "Publish to Roblox As" button in the File tab.
- Open Place - Opens an already existing place on an users computer. Browse to a place, click on it, then click "Open".
- Close Place - Closes the current open place.
- Save - Saves the current open place. If the place does not have a definite location on an users computer, it will request a location.
- Save As - Saves the current open place, but will always request for a location.
- Publish to Roblox - Clicking this, a user will receive an option to choose to update the place. A user's place on the Roblox site will then be identical to the area on another users workspace.
- Save Selection as Model - Allows a user to save the currently selected block(s) onto there computer. Requests for location.
- Publish Selection as Model - Allows a user to publish the currently selected blocks as a free model on the Roblox website, or replace an existing model with there selection.
- Print - Prints what is displayed on a users screen at a printer of there choice.
- Print Preview - previews what is displayed on a users screen.
- Print Setup - Adjust the settings for a users printing from Roblox.
- Recently accessed places - links to open a users recently opened places.
- Exit - exits Roblox Studio.
Model
- Select - Selects a part/model. Note that large parts cannot be moved with this tool.
- Moves a part/model, but can only move in 6 preset directions.
- Scale - Resizes parts only. Can only scale in 6 preset directions.
- Rotate - Rotates a part.
- Transform - Combines all tools above.
- Anchor - Disallows an object from being moved by an environmental force.
- Color - Changes a part to have the color chosen by a user.
- Material - Changes material of a part.
- Union - Fuses parts together to create a union part.
- Negate - Turns the selected part into a NegativePart. When unioned with another part it will subtract from that part and create a union.
- Separate - Separates union parts.
Surface
- Rocky - Applies the rocky surface to a facet of a block. The rocky surface does not secure a block to another block.
- Glue (Deprecated) - Applies the "glue" surface to a facet of a block. The glue surface joins a block to another but will break after a certain amount of stress is applied by a character or explosion unless anchored.
- Weld - Applies the "weld" surface to a facet of a block. The weld surface joins a block to another and can only be broken by explosions unless anchored.
- Stud - Applies the "stud" surface to a facet of a block. The stud surface only joins to inlet surfaces. Joints can only be broken by explosions unless anchored.
- Inlet - Applies the "inlet" surface to a facet of a block. The inlet surface only joins to stud surfaces. Joints can only be broken by explosions unless anchored.
- Universal - Applies the "universal" surface to a facet of a block. The universal surface joins to both studs and inlets alike. Joints can only be broken by explosions unless anchored.
- Hinge - Applies the "hinge" surface to a facet of a block. Anything on a hinged surface, except for glued or welded blocks, can rotate freely on the hinge until the joints are broken. Joints can only be broken by explosions unless anchored.
- Motor - Applies the "motor" surface to a facet of a block. Anything on a motor surface, except for glued or welded blocks, will constantly rotate on the motor until the joints are broken. Joints can only be broken by explosions unless anchored.
Terrain
- Generate - Generates random terrain. A 'seed' value can be set to generate random terrain.
- Add - Adds terrain using the brush. While clicking, it adds terrain.
- Subtract - The same thing with Add, but it deletes terrain when clicking.
- Paint - Paints terrain into materials.
- Grow - Like the Add tool, but makes it much smoother.
- Erode - The same thing with Grow, but it deletes it much smoother.
- Smooth - Smoothens hard edges. This will create "ridges,' which you can get rid of by using the erode tool.
- Regions - An easy option to add, copy, paste, delete, select, move, resize, rotate and fill terrain.
Plugins
Plugins are applications that add functions to Roblox Studio.
Toolbox
The toolbox is one of the assets to Roblox Studio. The toolbox contains everything you need. From a block to a jet airplane, the toolbox contains everything that users have uploaded to Roblox. In order to use the toolbox, click the toolbox option, then click on the drop-down menu at the top of the toolbox. A user can browse to which category, then which object a user would like to select, then click on the object. The object will then appear in the workspace. In addition, clicking "Inventory" will have categories for publicly made models and decals, as well as models that you have made on your own.
Explorer
The Explorer is an important tool in Roblox Studio when a users place contains complex Hierarchy and multiple models. Upon opening the Explorer, some will find a toolbar that lists the hierarchy of the place. All objects in the place are usually stored within the Workspace.
Properties
Opening the menu will allow a user to view/edit the properties of the object they have selected, for example, if a user select a brick, the menu will display the color, material, reflectance value, and transparency value of the brick as well as other properties.
Output
The output menu is where script errors and print messages will show. It will always display the location of the error and what the error is.
Shortcuts
Here are some basic keyboard shortcuts to make your experience quicker and easier.
Keyboard shortcuts can be viewed and changed at any time by going into File > Advanced > Customize Shortcuts.
Whether a user has no scripts or there entire place is scripted, they will want to test it within in the Studio so that players are able to catch and eliminate existing bugs in there game before they actually release there game to the public. There are three options for testing, located in the 'Test' column:
- Play - Spawns a users character to a spawn location. If there are no spawn locations in the map, the character is spawned in the center of the map.
- Play Here - Spawns a users character where there camera currently is.
- Run - The place (scripts, animations, etc.) runs but without the character spawning.
Publishing
Once a user is finished editing and testing there place, they will upload it to Roblox so other users can play it. Go to File > Publish place to Roblox, then follow the steps to get it published. Or if your game is already published, click "Publish to Roblox" here, Depending on the size of a users place and there Internet upload speed, it may take about 5 - 30 seconds or longer for it to get published.
Contents
Строительство
.jpg/revision/latest/scale-to-width-down/220?cb=20200627123155&path-prefix=ru)
Новый вид кирпича.
.jpg/revision/latest/scale-to-width-down/220?cb=20200627123039&path-prefix=ru)
Старый вид кирпича.
Кирпич
Для начала строительства модели нужно создать кирпич. Кирпич можно
растягивать, менять позицию, переворачивать, менять цвет или материал.
Terrain
Terrain обычно используется для создания ландшафта (горы, поля и т.д) имеется несколько инструментов для работы с Terrain:
- Generate - Автоматически создаёт ландшафт
- Add - Создаёт шары/кубы из различных материалов
- Subtract - Удаляет ландшафт который находится внутри шара/куба
- Paint - Меняет материал поверхности.
- Grow - "Вытягивает" ландшафт.
- Erode - "Втягивает" ландшафт.
- Smooth - Делает ландшафт ровнее.
- Flatten - Делает ландшафт плоским.
Материалы
Материалы можно переключать как и у Terrain, так и у Кирпичей.
Ниже представлен список материалов:
Материалы кирпича
- Brick - текстура строительных кирпичей.
- Cobblestone - текстура булыжника.
- Concrete - текстура бетона.
- Corroded Metal - текстура ржавого металла.
- Diamond Plate - текстура металлической пластины протектора.
- Fabric - текстура ткани.
- Foil - текстура фольги.
- Forcefield - текстура силового поля.
- Glass - текстура стекла.
- Granite - текстура гранита
- Grass - текстура травы.
- Ice - текстура льда.
- Marble - текстура мрамора.
- Metal - текстура металла.
- Neon - текстура неона.
- Pebble - текстура гальки.
- Plastic - текстура пластика.
- Sand - текстура песка.
- Slate - текстура камня.
- Smooth Plastic - текстура гладкого пластика.
- Wood - текстура дерева.
- Wood Planks - текстура деревянных досок.
Текстуры Terrain
- Asphalt - текстура асфальта.
- Basalt - текстура базальта.
- Brick - текстура строительных кирпичей.
- Cobblestone - текстура булыжника.
- Concrete - текстура бетона.
- Cracked Lava - текстура застывшей лавы.
- Glacier - текстура ледника.
- Grass - текстура травы.
- Ground - текстура тропы.
- Leafy Grass - текстура травы с листьями.
- Ice - текстура льда.
- Limestone - текстура известняка.
- Mud - текстура грязи.
- Pavement - текстура тротуара.
- Rock - текстура камня.
- Salt - текстура соли.
- Sand - текстура песка.
- Sandstone - текстура песчаника.
- Slate - текстура камня (гладкий)
- Snow - текстура снега.
- Water - текстура воды.
- Wood Planks - текстура деревянных досок.
Toolbox
Toolbox является библиотекой моделей в Roblox Studio. Некоторые модели могут иметь знак, что были проверены и не имеют вирусов. Использование моделей из Toolbox очень критикуется игроками.
Исключение
Исключение в том, что Toolbox поможет, если вам ОЧЕНЬ нужна модель/скрипт и т.д., но вы не знаете, как это сделать.
Скрипт
Скрипт используется для создания различных вещей для плейса и является основой для создания плейса. Пример скрипта:
Explorer
Вы выбираете объект в Exploler и информация о нём показывается в Propeties. Например, если вы добавили в модель скрипт, в Properties будет храниться информация о нём, а в Exploler вам надо лишь найти эту модель.
Properties
В Explorer надо выбрать, о какой модели вы хотите узнать, а в Properties уже показывается информация: Прозрачность, имя, цвет и т.д. Также с помощью Properties вы можете изменять всё это.
Плагины
Это очень хороший инструмент, который поможет вам не начинать с нуля: например, вы можете установить плагин, который делает на вашем плейсе смену дня и ночи, реалистичную смерть, кровь при уроне и т.д. Плагины может установить каждый, так как они не стоят робуксов.
Во вкладке View можно открыть другие различные вкладки (такие как Game Explorer, Chat)
Roblox Studio
![]()
Roblox Studio is a development program developed by Roblox offering an assortment of coding and building tools for developing games for Roblox via Lua.
Roblox Studio was released in 2005 as Roblox Developer's Environment. Roblox staff can download preview releases of the suite. It is currently available for Windows and MacOS for free, but mobile operating systems such as Android and iOS are not supported.
Примечание

Roblox Studio в 2006 году
Roblox Studio можно запустить только на компьютерных устройствах, ОС Windows или Mac. Если вы хотите запустить Roblox Studio на мобильных устройствах, у вас ничего не получится.

Окно ошибки, всплывающее при попытке запуска Roblox Studio без интернет-соединения
Разделы
Открыв приложение Roblox Studio

При входе в Редактор можно увидеть 7 основных окон:
5. Окно Редактора
6. Окно Файла, Изменения размера и Поворот предмета, изменение Terrain'a, тест игры.
7. Окно выбора типа редактора.
Roblox Studio на русском
И сегодня я вам расскажу о своём плейсe: Roblox Studio на русском + возможность использования на практически всех девайсах.
Многие видели то, как я делал модельки и публиковал их. Так вот. Некоторые не знают язык американцев, а ведь он присутствует в Roblox Studio.
✓ Почти всё переведено на русский язык.
✓ На плейсе может находиться только 1 игрок.
✓ Есть такой же отдельный плейс только с возможностью играть со своим другом.
Team Create
Team Create is a feature on Roblox that allows a user to build on Roblox Studio if added to the list by the owner of the game. Team Create is the feature which replaced personal servers. It was released on April 13, 2016. There are colors that change in different personal computers a user uses. But this is not changed in the original computer they use. If a team member selects an object, a colored circle appears in the left side of the object in the Explorer tab. The circle colour depends on the colour of the user.
How to use
To use Team Create, go to the View tab in Roblox Studio, and then click on the Team Create button. If the feature is turned off, click on the green Turn On button. The game must be published in order for team create to be used. When clicked, it will restart Roblox Studio and enable Team Create. Next, type in a username in the box on top of the panel. Once a user invite someone, have them go to the place's page and click on the Edit button. They will then be added to the editing session. A coloured transparent sphere indicates that a user is building in that area.
Group games
Group games have the ability to be used by team create. To enable group games to have team create on, simply turn it on/off. Then, anyone with the Create and edit group games permission can go into team create, regardless if invited or not.
Бонусы BC
Без клуба строителей вы можете сделать только один активный плейс. То есть на нём можно будет играть, а на неактивных нельзя. Если вы купите клуб строителей за реальные деньги (доллары США), вы можете сделать активными плейсами больше, например 5 или 10*.
С сентября 2017 года, все игроки, включая NBC, могут сделать 200 открытых плейсов.
Читайте также: