Как создать ресурс пак для minecraft bedrock
Обновлено: 06.07.2024
The Minecraft Wiki is no longer considered as official by Microsoft and therefore several changes are required to be made, including to the wiki's logo. Please read this announcement for more information.
Exporting and Sharing [ ]
Now that you've created a resource pack, you probably want to share it with others! To do this, perform the following:
- Navigate into your development_resource_packs folder
- Select all of the files and folders
- Right click on the highlighted files and select Send to -> Compressed (zipped) folder
- Name the file tutorial_resource_pack.mcpack
- Make sure to change the file extension to .mcpack
- When the popup asks you if you are sure you want to change the file extension, click Yes.
You can now give others that file! When they open it, Minecraft will launch if it isn't running yet, and then it will import your resource pack for them to use!
Summary [ ]
- How to create a Resource pack
- How to change textures for:
- Entities
- Blocks
- Items
Time Required [ ]
This tutorial should take around 1.5 to 2 hours to complete, if you are new to the concept.
Required Tools [ ]
You will need the following programs to follow along with this tutorial:
A text editor [ ]
Any text editor should work, but using some sort of programming IDE is recommended. Visual Studio Code is an excellent choice, and is a free text editor with syntax highlighting for lots of programming languages. You can download Visual Studio Code from here. Atom is also recommended, which you can download here.
ES File Explorer can be used on mobile devices, you can get it here. iOS devices can use the pre-installed Files app, or if your iOS is jailbroken, you can also use iFile. Android devices can also use MT Manager.
An image editing program [ ]
Microsoft Paint will work for modifying most textures, but will not work for saving out textures that have transparency (like most entities). GIMP (GNU Image Manipulation Program) is a free image editing program that will allow you to save out transparent images. You can download GIMP from here. You can also use Paint 3D, as it allows for transparency.
Шаг 4 – запуск и отладка, исправление багов
Этот шаг позволит Вам узнать, правильно ли работают все текстуры. Просто откройте Вашу игру и посмотрите, какие текстуры работают, а какие нет. Благодаря этой проверке Вы сможете определить конкретные файлы, с которыми наблюдаются проблемы. Как мы уже говорили выше, есть несколько файлов, которые требуют особого внимания. Большинство из них мы указали ниже и прикрепили информацию о том, что с ними нужно делать. Этот шаг актуален только для случаев портирования текстур.
textures/blocks/fire.jpg (все файлы с наличием слова «огонь»). Переименуйте все названия так, как в версии Vanilla.
textures/blocks/lava.jpg (все файлы с наличием слова «лава»). Переименуйте все названия так, как в версии Vanilla.
textures/blocks/water.jpg (все файлы с наличием слова «вода»). Переименуйте все названия так, как в версии Vanilla.
textures/blocks/portal.jpg. Переименуйте все названия так, как в версии Vanilla.
textures/items/splash potions – Нужно создать Ваши собственные текстуры. PC версия использует другой формат.
textures/blocks/piston (все файлы с наличием слова «поршень»)- Нужно создать Ваши собственные текстуры. PC версия использует другой формат.
Это все проблематичные файлы. По крайней мере те, с которыми чаще всего возникают проблемы. Теперь можно переходить к последнему шагу.
Contents
The Deeper Understanding [ ]
Soon, with practice, you'll be able to make resource packs and upload them to various sites. Link to Vanilla Textures Pack (1.8) Tips:
- To rename something, go into the Text file, and find en_us (for English), it is separated into stuff like items and tiles to achievements or warnings
- Some mob textures are TGAs, You can get a converter such as Pixillion.
- Some other textures (Such as the Sea Lantern,) are animated and are separated into 4 frames vertically.
- If some textures like zombified piglin are complicated, try imagining it as a papercraft, or a net, but some parts are in the wrong place (e.g. Top, bottom next to each other)
You can test to see if your exported resource pack works by deleting your copy in your development_resource_packs folder (make a backup first!), then opening your mcpack to import it. If it doesn't work, make sure you selected the contents of your resource pack and not the folder itself when making the .mcpack to .zip .
Tutorials/Creating resource pack add-ons
Note: The resulting texture pack will still work, but a newer tutorial from NVIDIA with ray tracing support is available, and the resulting texture pack following NVIDIA will also support devices incapable of ray tracing. But, if you're a beginner, start here first, explore and learn, then go to ray tracing.
Модификация стандартного пакета текстур [ ]
Стандартные текстуры находятся в файлах игры и легко могут быть найдены.
Для просмотра и изменения стандартных текстур откройте архив .minecraft/bin/minecraft.jar любым архиватором, желательно, с поддержкой перепаковки «на лету» (например WinRAR).
Текстуры хранятся в разных папках, об их местоположении можно догадаться по названием директорий. В корне архива находятся текстуры блоков ( terrain.jpg ), различные иконки интерфейса ( particles.jpg ), картинка ( pack.jpg ) и описание ( pack.txt ) текстур-пака, отображаемые в меню выбора.
Congratulations! [ ]
You've completed this tutorial and should now know how to create your own resource pack add-ons!
Как создать и портировать набор текстур для Pocket Edition
![как создать текстуры для minecraft pe]()
В последнее время появляется все больше вопросов о том, как создавать или портировать контент для игры Minecraft Pocket Edition. Вот вам небольшой гайд по основным пунктам, которые помогут начать работу с контентом.
В целом, вам понадобится пройти всего 5 простых процессов:
- Поиск шаблона для будущего набора;
- Создание или поиск текстур, с которыми вы хотите работать;
- Работа с текстурами;
- Запуск игры и отладка, поиск багов;
- Повторение 2-4 пунктов до тех пор, пока все не будет готово.
Это ключевые шаги, которые позволят вам активно работать с контентом для Pocket Edition. А теперь давайте углубимся в каждый из этих шагов, чтобы понять все детали процессов.
Установка [ ]
На клиент [ ]
Поместите архив в:
- Windows XP/Vista/7/8: %AppData%\.minecraft\texturepacks
- Linux:
Эту папку можно найти, нажав кнопку Open Texture Pack Folder (Открыть папку для пакетов текстур) на экране выбора текстур Mods and Texture Packs главного меню.
Шаг 3 – копирование текстур и файлов
Этот шаг периодически может запутать людей. Папки PC нужно скопировать, и иногда переименовывать. ВАЖНО: Есть несколько текстур, которые требуют особого внимания при портировании. Мы вернемся к ним позже.
Портирование файлов внутри папок или копирование созданных файлов:
PC Папка -> PE Папка:Просто продолжайте всегда следовать этому шаблону для всех текстур.
Вам будет интересно: Как дюпать вещи в Minecaft PE 0.9.5Создание собственного набора текстур [ ]
Если Вы хотите использовать стандартную технологию подключения пакетов текстур, следует создать ZIP архив с Вашими текстурами. В архиве файлы текстур должны быть расположены и называться так же, как и в minecraft.jar , то есть texturepack.zip и minecraft.jar должны иметь идентичную структуру.
Например, если Вы хотите, чтобы в Вашем пакете текстур облака выглядели по-другому, расположите в архиве пакета текстур файл с текстурой под именем clouds.jpg в подпапке environment/ .
Если в примененном пакете текстур отсутствуют любые файлы, то последние будут заменены на стандартный аналог (что удобно для облегчения создания пакета текстур).
Шаг 5 – повторение шагов 2-4
В процессе работы с текстурами Вам может понадобиться повторение процедур, которые указаны в шагах со 2 по 4. То есть, Вам нужно будет портировать или создавать новые текстуры, копировать их, проверять на работоспособность. И так до тех пор, пока абсолютно весь набор не будет работать идеально. Но и после этого есть дополнительные заметки, о которых хотелось бы сказать.
Текстур паки бедрок
Текстуры для Minecraft PE![]()
Ищите классные и красивые текстур паки в майнкрафт бедрок? Данная статья для вас! Мы подобрали для вас ТОП 3 текстур пака на наш выбор которые вам стоит установить. С остальными же текстурами вы сможете ознакомится в нашем разделе с самыми крутыми текстурами в Minecraft Bedrock Edition.
1. Minecraft Retextured
Наверняка каждый из вас хотел чтобы тот или же иной предмет выглядел красивее, не так ли? Данный мод изменит множество текстуры, в особенности брони и слитков, и придаст вашей игре красоту и реалистичность. Данные текстуры ретекстуририруют некоторые блоки изменив их, при этом, данные текстуры оставят ванильный стиль и грубых отличий не будет.
![Текстур паки бедрок]()
Minecraft Retextured 1.17 СКАЧАТЬ 2. Spring 2021
Любите весну, не успели насладится ею? Тогда перенесите этот стиль в вашу игру, данный текстур пак направлен на изменения некоторых предметов, а также HUD бара. С данными текстурами вы получите новую шкалу брони, шкалу голода, шкалу здоровья и новую шкалу опыта. Окно новое и придает Minecraft новый облик. Minecraft будет больше похож стиль весны 2021 года.
![Текстур паки бедрок]()
Spring 2021 1.17 СКАЧАТЬ 3. Vanilla PVP
Вы фанат PVP и хотите соответствующие текстуры? Данный текстур пак Vanilla PVP 16x как раз для вас, он изменит некоторые предметы и играть станет куда приятнее. Много о данном текстур паке рассказать нельзя, он заменит основные предметы для PVP, при этом ванильный стиль текстур останется как и был.
Шаг 1 – поиск шаблона для будущего набора
Существует несколько мест, где вы можете найти шаблон. К этой статье мы не будем прикреплять ссылки на загрузку, так как ссылка меняется с каждой версией. Вместо этого мы подскажем вам где можно найти и скачать их. Одним из вариантов является загрузка через файл APK. Чтобы найти его, необходимо открыть файл minecraft.apk как zip-архив и найти в нем папку resourse_packs. В данной папке выберите vanilla/client. Это и есть папка шаблона, который вам нужен.
Еще одним способом получения шаблона является банальный поиск в Google. Данный метод сам говорит за себя. Ну и последним местом, где вы можете найти шаблон, является сама игра. Вы можете просто использовать ее набор текстур (Например, Faithful PE как шаблон). Вы можете изменить эти файлы позже. Фактически, это три места, где можно найти шаблон для будущего набора.
Вам будет интересно: Устанавливаем скин на Майнкрафт ПЕ с помощью ZarchiverДополнительно:
Чтобы играть со своим окончательным набором, можно оставить его в папке. Но если Вы хотите распространять его, необходимо поместить все в .zip файл или преобразовать в .mcpack. Мы рекомендуем использовать архивирование в .zip файл, так как его загрузка в игре происходит гораздо быстрее в самой игре.
Однако стоит отметить, что пользователи iOS могут получить больше преимуществ от .mcpack, так как папка в .zip архиве может повредиться. Чтобы создать .mcpack файл, нужно создать файл pack.zip (можете заархивировать что-либо). Затем перенесите файлы набора текстур в этот архив. Когда все будет готово, переименуйте формат архива из .zip в .mcpack. Все готово.
Это все основы работы с созданием и портированием наборов текстур для Pocket Edition.
Пакет текстур
Все современные версии Minecraft поддерживают сторонние текстуры, хотя для старых версий требовалось изменение архива minecraft.jar.
В версии 12w18a была добавлена возможность установить пакеты текстур на сервер. При входе на сервер, игроку предложат скачать и автоматически установить пакет текстур (если такое разрешено в настройках).
![]()
Стандартные текстуры в сравнении с Painterly pack
С 13w24a (1.6.1) пакеты текстур заменены на пакеты ресурсов.
Шаг 2 – получение или создание нужных текстур
На самом деле, именно этот шаг является самым длительным из всех 5. В зависимости от того, переносите ли вы текстуры или создаете самостоятельно, эта процедура может занять какое-то время. Всего существует 4 основных типа текстур:
- Предметы;
- Блоки;
- Сущности;
- Графический интерфейс.
Все они находятся в папке текстур шаблона и все размещены в соответствующих папках.
Если вы портируете текстуры: получите разрешение у автора для портирования набора. Как правило, авторы всегда указывают правила использования набора, тем самым изначально указывая, можете Вы или не можете портировать их. Если Вы не уверены в том, что указано в правилах или их попросту нет – свяжитесь с автором. Как только у Вас будет разрешение, можете загружать набор.Если Вы создаете текстуры самостоятельно: вероятно, этот вариант будет наиболее длительным. Вам нужно будет создать текстуры для всех файлов, которые Вы хотите изменить. Просмотрите весь объем шаблона и определите, какие из текстур Вы хотели бы изменить.
ВАЖНО: для создания текстур лучше всего использовать Photoshop или GIMP. Пожалуйста, не используйте Microsoft Paint. Как только нужные текстуры будут портированы или созданы, можно передвигаться к следующему шагу.
Creating a resource pack [ ]
Start off by navigating to your resource_packs folder. Your file path should look something like this:
/files/on my iphone/minecraft/games/com.mojang/resource_packs
Once you are in the resource pack folder, create a new folder and name it: "Tutorial_Resource_Pack". Then, open that folder.
The first thing we need to do is create a manifest.json file. This file is going to contain data about our resource pack such as the name of our pack, the description of our resource pack that shows up in game, and a universally unique identifier (UUID).
A quick note about UUIDs [ ]
A UUID is an identifier that we will use to differentiate between our various add-ons. For this reason, UUIDs must be unique! If you don't change the UUID from pack to pack, your pack may not show up in game! But UUIDs are easy to generate! An online generator can be found here. Refresh the page when you need a new one.
Creating a JSON file [ ]
To create a JSON file, right click in the 'Tutorial_Resource_Pack' folder and create a new text document. Name this file manifest.json .
Make sure the file extension is .json and not .txt when you rename it. You may be warned that changing a file name extension could make the file unusable. This is okay!
If you can't see file extensions, you can turn them on by going to the View menu of the file explorer and checking the check box for file name extensions.
![FileExtensions.jpg]()
manifest.json [ ]
Open manifest.json in a text editor of your choice and copy or type the following:
Alternatively, you can copy the included file called "Resource_pack_manifest.json" into your Tutorial_Resource_Pack folder and rename it to "manifest.json".
Make sure that the two uuid 's in the modules section are two different UUIDs, as mentioned above, you can generate UUIDs online here. The name and first description field can be filled in with whatever text you'd like to display in game. Make sure to use a Version 1 UUID in your manifest.
The second part named "modules" tells the game what kind of pack it is. Because you are making a resource pack, leave the type to "resources".
Testing our Pack [ ]
Now we are ready to test it out in-game! Launch Minecraft and create a new world. On the left side of the screen scroll down and click on Resource Packs. On the right side of the screen scroll until you see "Tutorial Resource Pack". Your game should look something like this if you used the above code:
![]()
Troubleshooting [ ]
If you don't see your pack in-game, make sure your manifest.json is correct. Look for any missing curly braces < >, commas, colons :, quotation marks " ", or square brackets [ ]. Remember for each open brace, quotation, or square bracket, you must have a closing brace, quotation, or square bracket. You can also use a JSON validator like JSONLint to validate (and correct) your JSON-file.Creating an Icon [ ]
As you may have noticed, our pack does not have an icon. If you do not specify an icon, a missing texture block will show up next to your pack.
In the image editor of your choice, create a new image with a size of 128 by 128 pixels.
Do this with MS Paint:
- Click resize
- Change from percentage to pixels in the resize dialog that pops up
- Uncheck maintain aspect ratio
- Type in 128 in both horizontal and vertical text entry boxes
- Click OK
Once you have the correct canvas size, draw whatever you want your icon to be. For this tutorial, we've created a smiley face:
Save your icon with the name "pack_icon" and make sure that it is saved as a .jpg file. Save it into the same folder that we put our manifest.json file. For reference, our folder should look like this now:
![Pack Icon.jpg]()
Now if we launch the game and go to the resource packs section in "create world" it should look something like this:
![Resourcepackssection.jpg]()
Click on the tutorial resource pack to add it to the world you are making!
Modifying an Entity's texture [ ]
Now that we have our resource pack set up, let's modify the creeper's texture!
However, before we can do some painting, we need to set up the folder structure that Minecraft expects resource packs to be in. To do this, do the following:
- Create a folder named "textures" in our Tutorial_resource_pack folder
- Inside "textures", create a folder called "entity"
- Inside "entity", create a folder called "creeper"
- Copy the creeper texture from the Vanilla Minecraft resource pack into our newly created creeper folder. After downloading the example pack, the texture can be found on this file path: \Vanilla_Resource_Pack\textures\entity\creeper
Your folder should now look like:
![CreeperFileFolder.jpg]()
Now that we have the normal creeper texture, open it up in the image editor of your choice. It should look something like this:
![CreeperTexture1.jpg]()
You might notice your texture looking small, make sure to zoom in on the texture. In MS Paint you can control magnification in the bottom right-hand corner of the window with the slider.
![CreeperTexture2.jpg]()
A quick note on textures [ ]
If you've never seen a texture before, the above image might surprise you. The best way to think about it is like wrapping a gift with wrapping paper, but instead, our wrapping paper is our texture. Here is how the creeper's texture is laid out:
![TextureLayoutMap.jpg]()
Image Key Top Top of cube Bot Bottom of cube Left Left side Frnt Front side Rt Right side Bck Back side Areas with matching colors face the same direction (i.e. Red areas are always the front of a cube).
How this looks in game:
![Howthislooksingame.jpg]()
Not every texture is laid out in the same way, you will need to experiment and find out how each entity’s texture is laid out. Advanced users can look at the mobs.json file in the model folder to find where the textures' UVs are for each body part.
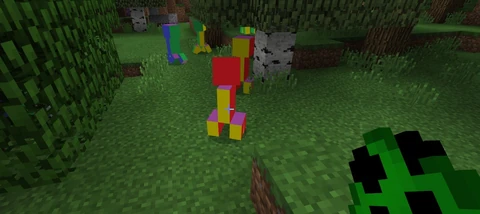
Now it’s time to be creative! Edit the creeper however you want. We are just going to add a headband for the sake of simplicity.
![Creeperheadband.jpg]()
Once you are happy with your texture, save out the file as a .jpg and make sure that the file name is "creeper". The game will only look for files with the correct name. When in doubt, check the Vanilla Minecraft Resource Pack to see file names.
A note on texture file formats [ ]
Minecraft supports .tga s, .jpg s and .jpg s. However, it will first try to load the TGA version, then the png, then the jpg. This means if you have 2 creeper textures, one as a png, and one as a TGA, the game will see the TGA one first and load that as your creeper’s texture.
Testing our Resource Pack [ ]
- Launch the game
- Create a new world
- Set world to creative
- Click on Resource Packs
- Find "Tutorial Resource Pack" in the list on the right and click it
- Click Play
- Spawn a creeper using the creeper egg from the creative inventory
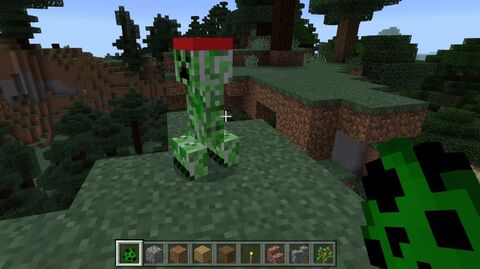
Results [ ]
![CreeperFinishedHeadband.jpg]()
Challenge 1 [ ]
Using what you know now, create a new texture for pigs and for chickens.
- Chickens don't have a folder for their textures like creepers, their texture just goes in the textures/entity folder.
- Chickens have transparency, so remember to use an image editing program that can save transparency
Block Textures [ ]
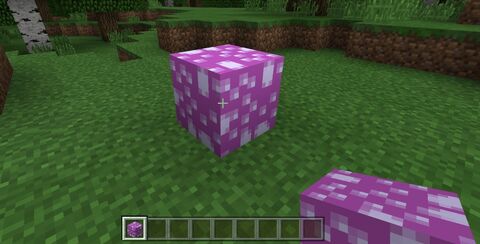
Now that we've gone through the process for an entity, changing textures for a block should seem straightforward. Let's create a new texture for our stone block.
and how it looks in game:
![NewStoneTexture.jpg]()
Challenge 2 [ ]
Congratulations! Now that you can create your own block textures, try making a new texture for the furnace.
HINT: furnaces use different textures for the front, side, top, and front when turned on, make sure to edit all of them.
Item Textures – Challenge 3 [ ]
Creating a new item texture is like making a new block texture. Follow the same steps as above but make sure to make a folder called "items" in your textures folder and place your item textures there. Remember, you can always look at the Vanilla Minecraft resource pack as an example (/Vanilla_Resource_Pack/textures/items).
Environment Textures [ ]
You can also change the textures for clouds, the moon, the rain, the snow, the sun, and the cracking animation that plays when you break blocks. These textures should be put into a folder called "environment" in the textures folder.
Troubleshooting textures [ ]
If your texture is not showing up in-game, check the following things:
- Make sure it has the same name as the asset you are trying to replace
- Example: Creeper texture should be called "creeper", the stone texture is called "stone"
- Ensure that the image files have been saved as the right extension, e.g. don't just change the extension. If using GIMP, use the "Export As" function (under "File").
Getting Started [ ]
We are going to start off small and teach you how to make a resource pack. Resource packs are add-ons that can modify textures, models, animations, music, sounds, user interfaces, and languages. This tutorial will be focusing specifically on modifying textures.
Содержание
Во время Minecon 2012 разработчики анонсировали поддержку HD- и анимированных текстур уже в Redstone Update.
Текстуры блоков и предметов в 1.5 [ ]
Начиная с 1.5 или с тестовой 13w02a, файлы «terrain.jpg» и «gui/items.jpg» заменены индивидуальными для каждого блока и предмета. Эти одиночные файлы скрепляются игрой во время запуска, к тому же подставляя стандартные, если нужные отсутствуют.
Папки в 1.5 [ ]
Папка Описание Заметки textures/blocks/ Все блоки Изображения всех блоков в игре textures/items/ Все предметы Изображения всех предметов в игре Анимированные текстуры в 1.5 [ ]
Как уже было сказано выше, любое изображение в игре может быть анимировано. Если не указан особый порядок, после последнего кадра анимация начнется заново. Она проигрывается со скоростью 10 кадров в секунду, или 100 миллисекунд на 1 кадр. Создается анимация посредством складывания кадров в 1 изображение, «приклеивая» каждый следующий кадр снизу предыдущего.
Также есть возможность воспроизводить анимацию в особом порядке, учитывая тот факт, что кадры начинаются с нуля, например:
Если нужно увеличить количество тактов, на которое задерживается один или несколько кадров, то можно применить такую конструкцию:
Первое соответственно отвечает за номер кадра, второе за количество тактов.
Специальные изображения в 1.5 [ ]
Читайте также:
- Make sure to change the file extension to .mcpack