
Code vein активатор mj 310 где найти
Обновлено: 05.07.2024
В Code Vein доступен широкий спектр боевых приемов и механик, которые игроки должны изучить, и хорошо владеть ими, чтобы максимально эффективно сражаться с противниками и боссами. Это руководство рассказывает обо всех основных аспектах Code Vein, а также дает различные советы.
Советы по сражениям
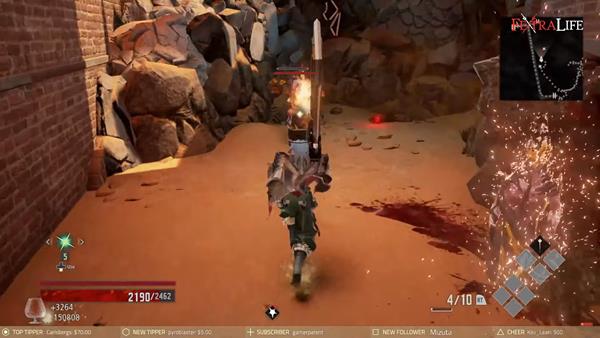
У вашего персонажа есть шкала выносливости, которая используется, когда вы атакуете, уклоняетесь или блокируете. Вы можете использовать различные приемы и наборы навыков, которые подходят вашему стилю игры. Существует механика, при которой тяжелое оружие (heavy weapon) или внезапный удар (sudden blow) могут ошеломить героя или противника. В игре есть особые баффы, под названием «Дары» (Gifts). Существует также сосредоточение (Focus Meter), которое поможет вам выиграть бой.
Омела
Омелы — это чекпоинты в игре. Когда вы впервые пройдете исследуемую область, активировав Омелу, вы сможете увидеть карту этой области, а также сохранить весь предыдущий прогресс. Также они будут действовать как контрольные точки.
Здесь также можно тратить очки на прокачку персонажа, подарки, использовать быстрое перемещение и управлять предметами. Отдых у Омелы также восстановит все здоровье и сбросит Ихор.
Crown of Sand | Code Vein Wiki
Area O-11 Crown of Sand is a Location in Code Vein. Area O-11 Crown of Sand is a location found under the Ridge of Frozen Souls, what was once a ruined-area was now turned into a desert by the successor that lies deep within.

Регенерация
Регенерация работает как положительный эффект для вашего здоровья. Вы можете использовать ее в любое время, нажимая соответствующие кнопки и просматривая список возможных способов восстановления здоровья. Нажимаем кнопку и используем предмет, который вы хотите. Это восстановит ваше здоровье в любое время. Вы можете увеличить запас регенерации за счет апгрейда.

Можно улучшить регенерацию. В дополнение к увеличению эффекта регенерации, который вы получите за один раз, вы также можете увеличить количество своих регенераций. Есть два улучшения, которые вы можете найти по мере прохождения Code Vein:
- Сыворотка регенерации (Regen Extension Factor): он может увеличить количество регенераций, которое вы можете использовать;
- Ускоритель регенерации (Regen Activation Factor): он постоянно увеличивает силу регенерации.
Виды атак
Когда дело доходит до битвы в Code Vein, то есть несколько вариантов атак. Есть быстрые атаки, которые потребуют меньше времени, но также нанесут меньший урон. Сильные атаки, как правило, медленнее, но сильнее и имеют расширенный радиус действия. Заряженные атаки (Charged Attacks) — это атаки, которые могут выполняться наряду с сильными атаками, но они могут сбить врага с ног при правильном использовании.

Атаки с рывками и уворотами — это быстрые атаки, когда вы уклоняетесь и делаете бросок вперед. Специальная атака (Special Attack) — это атака, назначаемая каждому оружию, которая работает только при использовании этого оружия.
Парирование в Code Vein — это специальная боевая механика, которую можно использовать и активировать с помощью экипированного оружия. Парирование позволит вам противостоять атаке врага сильной контратакой, которая, скорее всего, убьет его или нанесет значительный урон. Она также позволит вам получить Ихор.
Full Area O-11 Crown of Sand Walkthrough
After the fiery battle between the Successor of the Claw, the party successfully restores Emily's memory. The party encounters Juzo Mido and learns from him that Eva is in danger and sets out to rescue her.
Finding the Crown of Sand
The journey continues after the battle with the Successor of the Claw and encounter with Juzo Mido and the objective is to head towards Eva's location which is the Crown of Sand.

To reach the Crown of Sand, teleport to the Iceless Falls Mistle at Ridge of Frozen Souls then make a left towards a caved path. Kill the Mutated Urchin that's along the path and go right that will take you to the inner section of the caved path - eventually, you'll reach a couple of ladders that you'll need to climb down until you reach the path that leads to the entrance of the Crown of Sand.
Crown of Sand Entrance Mistle

At the Crown of Sand Entrance Mistle, you'll find Jack and a cutscene will trigger - activate the Mislte once you've regained control of your player.

From the Mislte, head down and make a right. You'll encounter your first enemy for this location, a Parched Executioner. Their attacks inflict Leak if you are hit multiple times which causes your Ichor to drain quickly without using it - there's a couple of these executioner's along the way, so kill them and just head straight towards the dead-end.
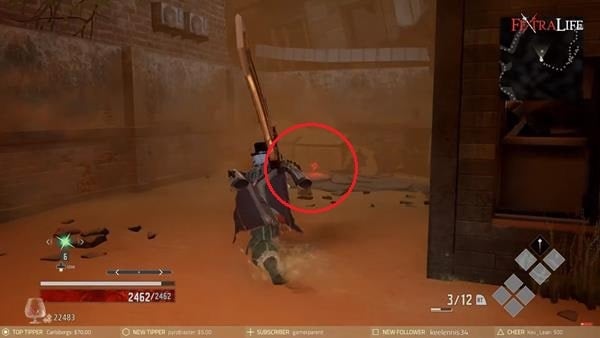
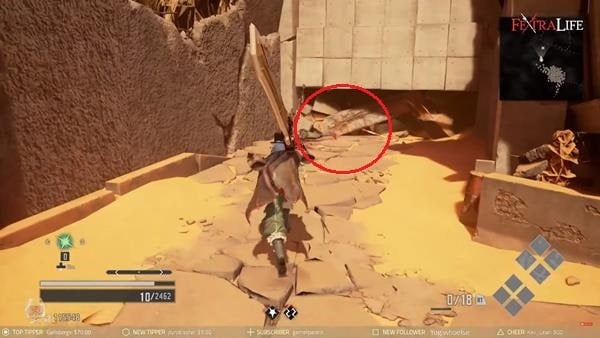
When you reach the end, go right, through the sand, and you'll find a Vestige, Harmonia Vestige Part A - another Parched Executioner will appear from behind when you pick up the vestige. Be warned, the sand here (and found throughout this map) will not only slow down your movements, but also slowly drain your Ichor as if you were inflicted with Leak (currently there is no known way to prevent this, if there is any).

Next, head back and go towards the path that's on your right. You'll encounter 2x Mutated Lost and a Monk Mutated Lost that's sitting by the boxes
After killing the enemies, go straight through the sandpit and you'll find a ladder at the end. Climb up and you'll find another vestige, Harmonia Vestige Part C - now, go back to where you fought the Mutated Lost and a Monk Mutated Lost then go around the corner that's on the left side where you'll find another ladder that you can climb up.
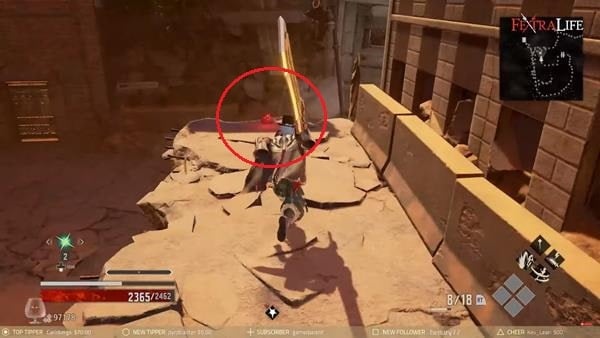
You'll find yourself in a section that has a sandpit below you and 2x Parched Executioners patrolling the area. Fight your way through the executioners, head down the sandpit and pick up 1x Regen Extension Factor that's on the middle of the pit - as soon as you pick up the item, a group of Parched Blob will emerge from the sand to ambush you. (Similar to the executioners, they're attacks cause Leak once the gauge becomes full from taking multiple hits.)

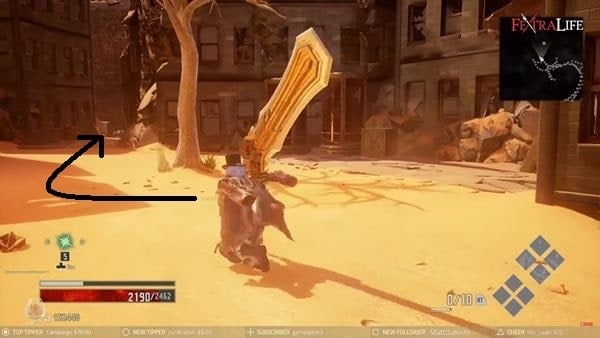
After acquiring the upgrade, head back to where the ladder is and jump down to the path as indicated on the image above. There's 2x Mutated Lost ahead and another Parched Executioner below you, so use the opportunity to ambush it by attacking from above.
Once you've cleared the section, go straight, then make a left through the sandpit. You'll notice a Sword-wielding Lost and an Axe-wielding Lost are standing around an item, kill them and pick up 5x Leak Vaccine - the path to your left will take you back to the entrance, so go back through the sandpit and take the path that's on the left.

You'll encounter an Elite Parched Executioner with red spikes on its back. This enemy has agile attacks which cause leak and paralysis if you are hit multiple times, so be cautious when facing this enemy.
After killing the elite enemy, you'll find the vestige it was guarding around the corner which is Harmonia Vestige Part B.
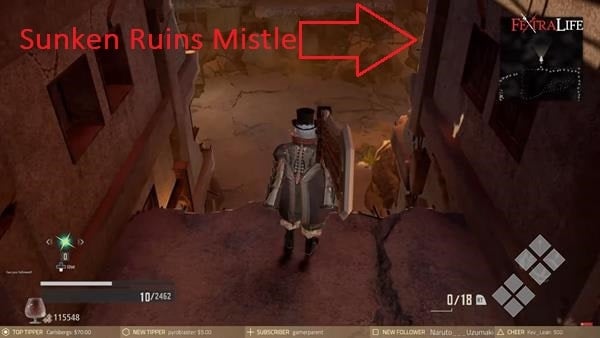
Once you've obtained the vestige, head back to the section that has a large sandpit where you acquired the Regen Extension Factor and jump down the path as indicated on the image above, you'll find the Sunken Ruins Mistle there.
Sunken Ruins
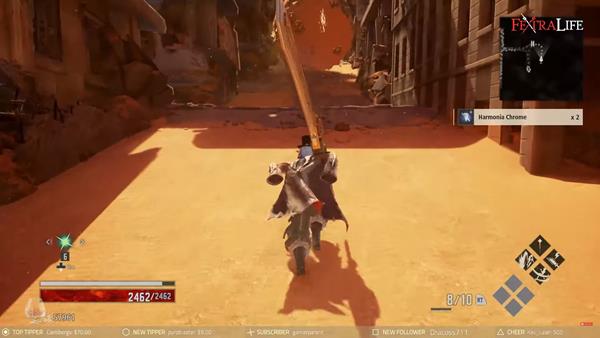
After activating the Mistle, climb up the ladder to reach the next section, there's 2x Harmonia Chrome that you can pick up on the right side but be cautious since huge boulders will start to be thrown at you by the Parched Executioner at the top once you pick up the item or try to head up the path. You can avoid this by running towards each corner but there are enemies waiting on each side waiting to ambush you, the executioner will stop throwing the boulders and will fight you once you reach the top - make sure to check every corner since you can pick up a few items.
You should find yourself at the top of the desert-filled ruins. As you approach the ledge, a Mutated Lost and Monk Mutated Lost will climb up to ambush you alongside an Axe-wielding Lost. Kill the enemies, then go around the left side where you'll find 1x Queen Titanium.
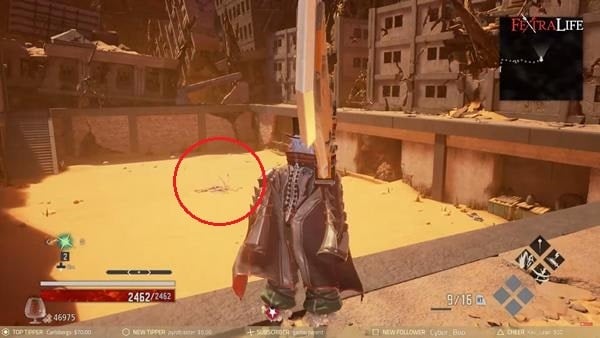
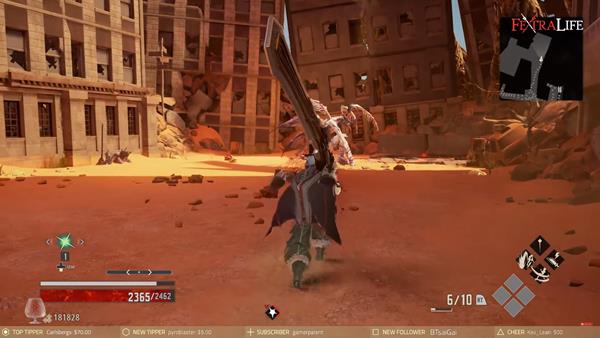
Next, head to the middle of the sandpit. You'll find a Rooted Lost and a Parched Blob will emerge from the sand to ambush you - as indicated on the image above, you can find Stamp: Icon 04 next to the corpse of a Lost.


Once you've cleared the section, go back to the sandpit and take the path to your right where you'll encounter more Rooted Lost - there's a ladder to your left, so go down it first to open up a shortcut leading to the Crown of Sand Entrance Mistle.

The path below is pretty straightforward, so just go straight until you reach a lift. Ride it all the way down and you'll find yourself at the other side of the locked gate near the Crown of Sand Entrance Mistle - pick up the 1x Board Game near the ladder that's on top of the supplies, purify the Rotten Mistle, pick up 1x Queen Titanium near the gate, and then unlock the gate to open up the shortcut.
After that's done, head back up to the top of the ruins then make a left. You'll encounter 3x Rooted Lost and another vestige at the end, Harmonia Vestige Part D.
Next, head back to the pit and take the other path that's also on the left. You should find yourself in another open area that has a dried-up tree in the middle of the pit and glass capsules by the side. Go straight and go right around the corner towards the stack of boxes - break it and you'll find 1x Antique LP Record behind the boxes.

Now, at the same spot, walk up to the ledge and drop down onto the path below. You'll find another Rotten Mistle and a Suicide Lost guarding it, kill the enemy and purify the Mistle to map the surrounding area.

Once you've purified the Mistle, climb up the ladder ahead and you'll find 1x Bottled Jam on the ground as indicated on the image above.
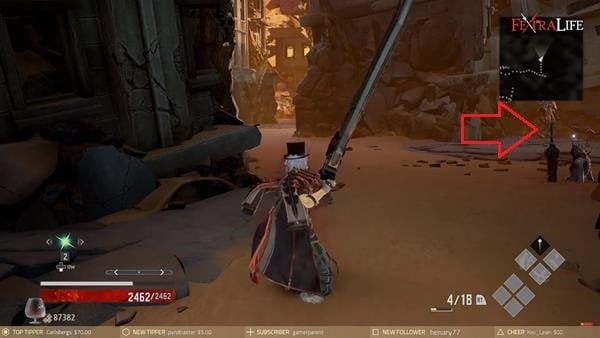
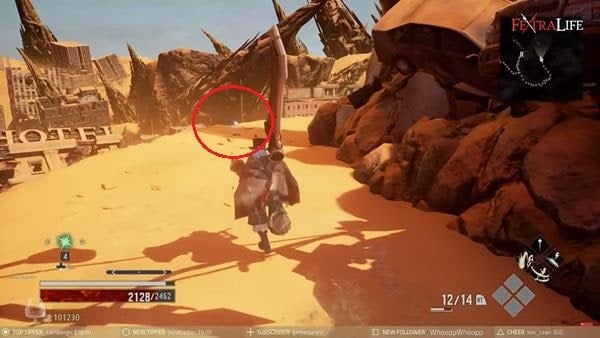
From here, go around the corner where you'll encounter more Parched Blob and a Parched Executioner. Fight your way through until you reach the section that's indicated on the image above - you'll notice another executioner that's sitting next to a vestige, kill it then pick up the Harmonia Vestige Part E.

Next, from the vestige's location, take the path on the right, and go around it where you'll encounter an executioner sitting by the edge as indicated on the image above. (there's a ladder that you can find before approaching the enemy, make sure you kick it down to open up another shortcut to the Crowd of Sand Enterance Mistle; with a route that can lead you to the lift from before, which takes you to the gate near the entrance) - the path ahead is pretty much straightforward until you arrive inside a caved path leading to the crypt of the next successor.

Along the way, you'll find a rotten mistle and Themisto by the entrance. Purify the mistle then speak to Themisto to restore the Harmonia Vestiges - make sure you've restored all of the Harmonia Vestiges that you can repair before fighting the boss. Revisiting the area after the boss fight, Eos Vestige Part C can be found here.
Successor of the Throat

Once you've restored the vestiges, proceed further into the crypt and a cutscene will trigger before facing the Successor of the Throat

To learn about the strategies on how to defeat this boss, you can click here. Defeating the boss rewards you with 102,060 Haze.

Another cutscene will then follow and you'll teleport into Eva's memories to find her. As mentioned, if you were able to restore all Harmonia vestiges, you can restore her memory and save her. Eventually, Jack will take you to a Mistle that will teleport you to the next location: Crypt Spire - you'll also acquire the Harmonia Vestige IV which will allow you to use Eva's Blood Code, Harmonia, and Jack, as well as Eva, will be added to the companion list.
Awake MJ212 | Code Vein Wiki
An activator used to awaken dormant abilities in a blood code.
Awake MJ212 is an Item in Code Vein. Items are used for a variety of purposes, such as consumable buffs, key items, and as upgrade materials. Items can be looted from Enemies and/or Bosses, chests, given by NPCs, and are sold by Merchants.
Awake MJ212 Usage
- An activator used to awaken dormant abilities in a blood code.
Awake MJ212 Locations
You may find Awake MJ212 in the following Locations:
-
: In the part of the walkthrough named The Cathedral, from the Mistle you'll find a path that you can drop down to - you'll find 1x Awake MJ212 on the ground. : In the part of the walkthrough named Gated Room, eventually you will encounter a room where you'll see a lever to your right that unlocks the door below you. Before you head down, turn around and climb up the ladder that's ahead of you. You can find 1x Awake MJ212 at the top. Revisited: In the part of the walkthrough named Inner Tower, in that part of the level you will encounter path below where a Lost Assassin will try to ambush you. Then jump down again onto the path below where you can pick up 1x Awake MJ212 next to a Lost corpse.
- Memories of Player : In the part of the walkthrough named Research Facility Area, upon reaching the top, make a right and go inside the storeroom where you'll find a Spiked Executioner sitting next to a ladder. Kill it with a back-stab attack and 3 more Sword-wielding Lost will jump from above to ambush you. After killing the enemies, continue your exploration and climb up the ladder - you'll find 1x Awake MJ212 at the right-hand corner of the 2nd platform.
- Ashen Cavern: In the part of the walkthrough named Ashen Cavern Entrance, where you'll encounter more Spiked Lost and a couple of Purple Blob that's hanging from the ceiling - before reaching the spot indicated above, you should be able to pick up a Queen Steel, 1x Awake MJ212, and another Loss Shard (L) on the ground.
- Ashen Cavern: In the part of the walkthrough named Ashen Cavern Entrance, there will be more Purple Blob that will fall from the ceiling to ambush you and a Spiked Executioner that's patrolling the area. You should be able to acquire a few Loss Shard (L) and a Queen Steel that are dropped by the enemy, as well as 2x Dagger and 1x Awake MJ212 that's on the ground near the flowing water - there are more enemies patrolling the area, so be cautious if you're exploring the area alone.
- City of Failing Flame: In the part of the walkthrough named A Fallen City, you'll find 2x Volcanic Lost guarding an item and a Bayonet-wielding Lost patrolling the section. Kill it then pick up 1x Awake MJ212 that's indicated on the image
- City of Failing Flame: In the part of the walkthrough named A Fallen City, Just about midway, you'll want to drop down to a section that's indicated on the image below. You'll notice that there's an item which is 1x Awake MJ212 - there's also 2x Volcanic Lost around that section.
- City of Failing Flame: In the part of the walkthrough named Razed City Scape, you'll encounter a Sword-Wielding Executioner patrolling the area. Once you've killed the enemy, there are a few items that you may want to get. After crossing the lava, there's a nearby ladder to your left that you can climb where you'll find 1x Condensed Loss Shard (M) at the top. Then back at the bottom, before heading towards the path to the left that has more lava, make a right and you'll find 1x Awake MJ212 at the top of the scaffolding - after collecting the items, continue through the path covered with lava.
- City of Failing Flame: In the part of the walkthrough named Razed City Scape, Make your way through the lava until you reach the next section that has a couple of Mutated Urchins - there's another Awake MJ212 that you can pick up as indicated on the image below.
- Depths: Archanid Grotto Boss rewards after defeating Gilded Hunter
Фокус и сосредоточение
Еще один индикатор, который появляется на панели выносливости. Этот режим активируется, когда вы уклоняетесь от атак или получаете урон. Вы увидите, что сосредоточение (focus bar) становится синим.
Когда этот режим активируется, то вы оказываетесь в сфокусированном состоянии (focused state). Вашим врагам будет трудно ошеломить (stagger) вас, ваша выносливость будет пополнена, и вы также сможете выполнить подбрасывающую атаку, давая вам возможность совершать серию ударов.
Следует иметь в виду, что ваши враги могут получить такое же состояние фокуса, вы сможете увидеть его на своих индикаторах здоровья, они получат те же возможности, что и вы.
Дары — это специальные бафы в Code Vein, которые дают вам особые способности, такие как умения дальнего боя, уклонение, поддержку, защитные способности и многое другое. Эти дары в Code Vein очень помогают в формировании общего стиля игры, а ключом к этому является правильное их использование.

Ихор (Ichor) — это специальный материал в Code Vein, вы можете увидеть его в правом нижнем углу экрана. Его можно пополнять разными способами, одним из которых является получение даров, которые добавляют различные баффы персонажу. Ихор можно получить следующими способами: отдых, удары атаками ближнего боя по врагам, успешно выполненные парирования, выполнение ударов в спину врагу, удары врага Кровавой вуалью.
Вы также должны помнить, что когда вы отдыхаете у омелы, все предыдущие боссы и враги будут восстановлены. А когда вы наносите удар врагу в спину, то он одновременно поглощает ихор и увеличивает емкость хранилища ихора.
Есть несколько предметов, которые могут повысить ваш ихор в течение определенного времени. Свертыватель ихора (Ichor Coagulant) — это лекарство для лечения утечек, которое может хранить истощенный ихор внутри тела. Ихоровый препарат Коко (Coco’s Ichor blend) — это препарат, который производится из крови Коко, смешанной с потерянным ихором. Этот предмет увеличит максимальный объем хранимого ихора. Концентрат Ихора (Ichor Concentrate) — это флакон с ихором, который дает небольшое количество ихора при использовании. Ихоровый препарат Марасамэ (Murasame’s Ichor blend) — это препарат, приготовленный из крови Мурасамэ, смешанной с ихором. Он увеличивает максимальное количество хранимого ихора.
Здоровье и выносливость
Здоровье и выносливость работают довольно просто, особенно если вы знакомы с другими играми подобного жанра. Здоровье — это жизни вашего персонажа, которые вы видите в левой части экрана, в виде красной полосы. А шкала выносливости находится прямо над полосой здоровья, она белого цвета.

Выносливость — это то, что вы будете расходовать при выполнении атак, парировании, уклонении, выполнении активных даров и так далее. Когда оно полностью израсходовано, вы не сможете выполнить ни одно из упомянутых действий, поэтому следите за шкалой выносливости и не выполняйте большое число атак подряд. Старайтесь делать паузы между сериями.
General Information
- Previous: City of Falling Flame
- Next: Crypt Spire
- Bosses: Successor of the Throat
- Mistles: Crown of Sand Entrance, Sunken Ruins, Crypt of the Throat
Video Walkthrough

NPCs in the area
Bosses
Items
Consumables and Trade Items
- Key Item 1
- Key Item 2
- Key Item 3
Enemies
Code vein активатор mj 310 где найти


CODE VEIN
7 окт. 2019 в 7:41 7 окт. 2019 в 7:42Depths: Misty Ruins - Drops them from the Boss.
Crypt Spire trash mobs drop them too, but that would be based on drop chances.
Атаки Кровавой вуалью
Вы можете использовать Кровавую вуаль (Blood Veil) для выполнения двух типов атак в Code Vein:
Читайте также: