Hotel of mask прохождение
Обновлено: 02.07.2024
After taking a nap, you wake up and find darkness surrounding you. Tapping the lamp may help you lit up the scene. After that, you must follow the steps mentioned in the Hotel of Mask Escape Room Game Walkthrough to complete the first day.

- Find the table containing food and eat all things to reveal a code that you need to open the food drawer. The security code is “WUMA.”
- Tap the first drawer, enter the code to open it, and collect a key.
- Use the key to open the main door and visit the second room.
- Before entering the room, a joker will appear with the intention of revealing secrets in exchange for an orange. It would help if you dealt with him to reveal that you have only seven days to escape.
Secrets
- You have seven days to leave the Hotel from now on.
- After seven days, you will be sent to the trial.
- Seven badges can prove your innocence, but they are scattered across the Hotel.
- You must get these seven badges back at any cost to escape; otherwise, you will stay here forever.
- The person who has badges doesn’t want to give you back.
- Therefore, you should give seven badges to seven guests of the Hotel and then find a way to get those badges back.
- Following the said method may help you prove your innocence at the final judgment.
- Today is your first day, so hurry up!
Enter Room 002
Once again, you are ready to enter Room 002, but first, don’t forget to tap the door. Here your objective is to cook a delicious meal and offer the person sitting on the sofa and learning how to cook. Some ingredients are kept near the frying pan, but you didn’t know what order you should follow to make the meal per the customer’s request. So, follow the steps mentioned in a guide:
- Head to the refrigerator to see the Wi-Fi code and tap on the phone the man sitting on the sofa is holding on.
- Enter the code (20180225) to the phone to see the recipe. Open the refrigerator to pick up a fly from there and put it down on the frying pan. Use the spices in the following order: Green, Red, Red, Yellow, and Blue. Offer the dish to the person and get clues regarding what to do next.

Enter Room 003
Open the door and get into the third room, where you may discover a trampoline under the light while the rest of the area is in the dark. Click the trampoline to play the music and lit up the surrounding area. Another character appears ahead of you to discuss what’s going on in the Hotel.

Hotel of Mask (PapaBox) Collection Walkthrough: Achievements, Diary, Photos and Endings
Yay, here is the list to complete the archive!
Achievements
Diary
- [Day 2] Room 1: under the blanket on the sofa
- [Day 1] Room 1: in the right drawer of the table; code is AMUW
- [Day 3] Room 2: in the refrigerator
- [Day 4] Room 1: under the door
- [Day 5] Room 1: in the second folder on the pc/laptop
- [Day 6] Room 1: in the cabinet
- [Day 7] Room 8: on the bed on the rightside of the backroom
Photos
- [Day 2] Room 1: in the left drawer of the table
- [Day 3] Room 1: behind vase/trash bin
- [Day 5] Room 1: in the right drawer of the table
- [Day 6] Room 1: under pillow on the sofa
- [Day 7] Room 1: You can only get this if you hit/kill Fen. Uncover the right side of the bed sheet
Endings
So far, I only know of two endings: kill at least one and kill no one.

Teaser/Intro here (I forgot that I mentioned somewhat important stuff there)
Collection guide here
Game review here
Outline:
- Get the chair. Place the chair over the wardrobe.
- Click the water bottle to break it. Get the key.
- Use the key on the door.
- Go to room 2.
- Click bed to sleep
Friendly note that to leave the room, you have to click the doorknob first then click the door again. This is honestly such a hassle, why not just make it a single press. Smh.
Leaving the Room
Friendly note that whenever you wake up, the first scene is always inside room 1 with the lights turned off. To turn on the lights, click the lamp. The magical tiny table lamp which can light up the whole room. Wow.Items 1-3 could be done in any order, followed by item 4 which could be done in between items 1-3.
Leaving the Room
Selling wine
Back to The Geisha
Leaving the Room
Time Machine
- Go to room 5 to get the diode from The Scientist.
- Return to room 4, and select the clock on the scale. Use the diode on it. (Man, I wish making a time machine was that easy).
- Choice: Left/Right
The Final Touch
Apparently the perpetual motion machine still lacks a core. The Scientist will ask you to get the core from the person in room 2.Leaving the Room
- Click on the upper part of the tree coat rack, solve the puzzle by fixing the face. Swapping can only be done on adjacent rows. Get the key.
- Use the key on the toolbox under the bed. Get the crowbar.
- Select the safe on the sofa. Press the left fingerprint to turn the knob counterclockwise, and the right fingerprint to turn it clockwise. Release when the light above turns green.
- Use the crowbar to pry open the safe, and get the battery.
- Check the telephone, check the paper behind the telephone. Dial this number. (Soln: 2458)
- Select the laptop. The password is on the telephone. Hint: clockwise. (Soln: 359486271)
- Select the first folder. This is a Caesar cipher puzzle. Once you solve the puzzle, enter the answer on the toolbox on the table. (Soln: 6-1-4-2)
- Get the screwdriver and use it on the peephole cover. Get the wire. Note that the wire will only appear after calling.
- Check the box under the wardrobe and get the iron block.
- Combine the battery, wire, and iron block to get an electromagnet. Use the electromagnet on the gap under the door then get the red iron piece.
- Use the red iron piece on the maze puzzle on the door. A hint can be seen when you check the peephole. (Soln: get the red piece to the red block then go to the hinted location)
- Get the ladder behind the drums.
- Go to room 3. Get the knife on the left window. (Aww, the cow and the sheep are gone 😞).
- Go to room 2, place the ladder bellow the dangling sheep skins. Use the knife to get the sheepskin. Remember to get the ladder again.
- Go back to room 6. Use the sheepskin to repair the drum. Press the screen when the needle is pointing to a hole.
- Use the ladder behind The Xiqu Artist to get the key behind the signage.
- Use the key on the box on the table. Get the diqu.
- Get the empty wine jar on the table.
- Cook the diqu on the stove. To do so, you have to turn the knob and press the corresponding button (or the tassel) when it hits the red bar. Fill the empty wine jar with the newly cooked wine.
- Return the wine jar where you got it.
Leaving the Room
But yo, wtf. I want to call child services, her mom just locked her up in the room to study.
- Go to room 6 and get the hammer handle above the suitcase.
- Move to room 4. Open the box on table using the wrench. Get the variable metal and screws. Go to room 5 and put the screws to fix the 3D printer.
- Put the print icon on the blue thingy (lol). Then put the variable metal inside. Press the switch/button (the IEC 60417-5009 symbol).
- Get the big screw and hammer head. Combine them with the hammer handle.
- Go back to room 7. Use hammer to break the lock on the fence (and set the girl free then report to child services. Smh.)
- Select the TV and get the paper above it.
- Go to room 5 again, use the 3D printer similar to before.
- Get the weights and use it to replace the remote control back in room 7.
Unlocking the Phone
This time, a mobile phone appears. And guess what? The password was changed. Gdi, her mom is fricking strict and harsh. A phone is private property, you know?Opening the Back Door
- Get the cleaning cloth on the chair. Use this to clean E-chart (the E version of the Landolt C chart, heh).
- Check the laptop. Charge it (simply tap the charger plug). The password is on the E-chart. Hint: ↑↓←→ (Soln: 824468)
- The resulting code (white space) is for the door. (Soln: 9324)
Turning on the Power
![]()
Turn on the lamp’s light and start exploring the bedroom to discover hidden objects. This time, it doesn’t seem that the game has placed too many lockers to the door. Still, if you feel any difficulty finding a way to go out of the room, you can see our Hotel of Mask Walkthrough Guide for help.
![]()
- Move toward the left side and stop when you see a cloth stand. Tap on it to play a mini-game where you have to complete the devil image to get a key.
- Open both drawers of the table to discover something new. The 2 nd drawer holds some new photos for you to find.
- Click on the laptop and enter the password (3598627) to run the PC. For the password, you can see the dial of the classic phone available next to the laptop.
- Open the files to reveal the passcode you need to open the toolbox. The passcode is (6142) that you can use to open the toolbox to collect the screwdriver.
- Click on the classic phone, collect a paper from below the receiver, and dial the number written on the document (2458).
- Did you notice a small box in the door? Open the box using the screwdrivers to discover a wire and add it to your inventory.
- See below the cupboard to discover a box and tap to remove extra items you don’t need. The item you need is the following: Iron Block.
- Search out the sofa and head to the locker available above it. Hold the left fingerprint for a while and leave as the light turns green. In the 2 nd attempt, hold the left button for a bit until the 2 nd light turns green. Once again, hold the same control and wait to leave as the light turns to green. However, the vault cannot open because it gets stuck.
- There is a box under your bed, so you should tap on it to reveal what it holds for you to discover.
- Use the key to open the box you found below the bed and discover a crowbar.
- You can use the crowbar to open the locker that got stuck to collect a battery.
- Tap on the battery and the other two items available in your inventory to combine and get an electromagnet.
- Tap the lower part of the door and use an electromagnet to collect a red iron piece.
- Click on a small portion on the door’s lower part to play a mini-game. Place the red iron piece and lead it to the targeted place to win.
Come out from your bedroom and fall into the discussion with the joker. Another achievement (Qu Yi) and a new room are unlocked as the debate ends. As you get into Room 6, a Chinese character named Wangjiao welcomes you. Furthermore, you have to follow the given steps to survive day 5.
- Collect ta headdress available forth the table and add it to your inventory.
- Pick up a flag from the left-side of the Room and include it in your inventory.
- Discover the ladder from behind the massive drum.
- Place a ladder a few steps to the left side where you collected it to discover a key.
- There is a box on the table that you must unlock using a key from your inventory.
- Once the box gets unlocked, collect a Diqu from inside it.
Move to Room 003
After that, you should move to room 003 and head to the stove available on the table. Put Diqu down to the pot and burn the fire. Pull the rope hanging near the pot as the moving needle reaches the targeted area and start hitting the button whenever you find the same color ball moving above, but only when it comes to the targeted area.
- On the left side, there is a window wherefrom you may discover a knife.
- Next to that, you should leave the room to reach room 006 and collect an empty wine jar from the table.
- Back to Room no 3 to fill the empty pot with Wine and keep it back in your inventory.
Move to Room 004 and 005
Open the door and get into Room no four, where you may discover a cupboard behind the table. Tap the first section to collect three Gold Coins and keep them in your inventory. There is a shield on the left wall above a wooden piece. Tap the shield and add three pieces you collected recently intending to play a mini-game. If you know multiplications, then you don’t need any hint. If you aren’t familiar with it, you should rotate the number so that together they display the answer on the lower ring.
- The game rewards you with Gold Line once you complete the multiplication mini-game.
![]()
Move to Room 006
Leave the room you are in now to get into the sixth Room. Tap the audio speaker available on the right side and fix the broken cable using the Gold Line.
- Tap the ladder to add it into your inventory, and leave the 6 th Room to visit the 2 nd Room.
- Keep the ladder with the right wall and collect sheepskin using a knife.
- Click on the drum and choose sheepskin from your inventory to repair it.
- After that, tap the briefcase near the table and collect a blank card.
![]()
Move to Room 003
For the completion of puzzles, you have to move to the third Room. Once you reach over there, tap above the geyser to discover a place with the alphabet “I.”
- Use the blank card to reveal the number below (I)
- Go to the sixth Room, head to the briefcase, and enter the code to open it. The briefcase reveals a heart key upon getting opened.
- Visit the right area of the third Room to discover the stack of drums. Tap the basement door fixed on the floor and unlock it using a heart key to collect pipelines.
![]()
Enter Room 005
After collecting pipes, you must visit room five and tap above the geyser where you revealed a code using a blank card.
- Place all pipes and connect them in a way that the water continues to flow.
- Once done, you must tap the bulb to add it to your inventory.
Bring the Bulb to Room 006
Above the drum, you may discover a bulb holder. Fix the bulb over there to light up the Room. Offer the drum full of win to the man sitting on the chair and place a headdress on the head. Apart from that, let him hold the flag available in your inventory. After getting too many rewards from you, the person unlocks the next Room.
![]()
Room 007
Leave room 006, visit the 007 that seems like a library because there are many books available. The librarian may give you a camera that you can offer to the person sitting in Room 006 to collect information. Once again, move to the next Room to interact with the librarian and then move back to Room 006 to discuss with the traditional Chinese man. This time, you are supposed to play a mini-game wherein your goal is to tap the drum as the red moving ball takes place in the empty ring.
![]()
Moreover, the game isn’t easy to play as it seems because, over time, the speed of the ball increases to enhance the difficulty level. Making a wrong move may restart the game, but if you complete it without making any mistake, the badge will be yours by merely pulling a rope. In the end, you should move to your bedroom and sleep to restore your energy for the next day.
![]()
Your first day has completed successfully, and you collected a badge. Following the rules and Walkthrough, you will obtain all rest of the badges soon. On the 2 nd day, the environment is almost the same, but the puzzles you have to solve are entirely different. Therefore, you should hone your detective skills and embark on a journey to accomplish the second day.
![]()
Room 001
- The second day starts on the bed, and the first goal is to turn on the lamp.
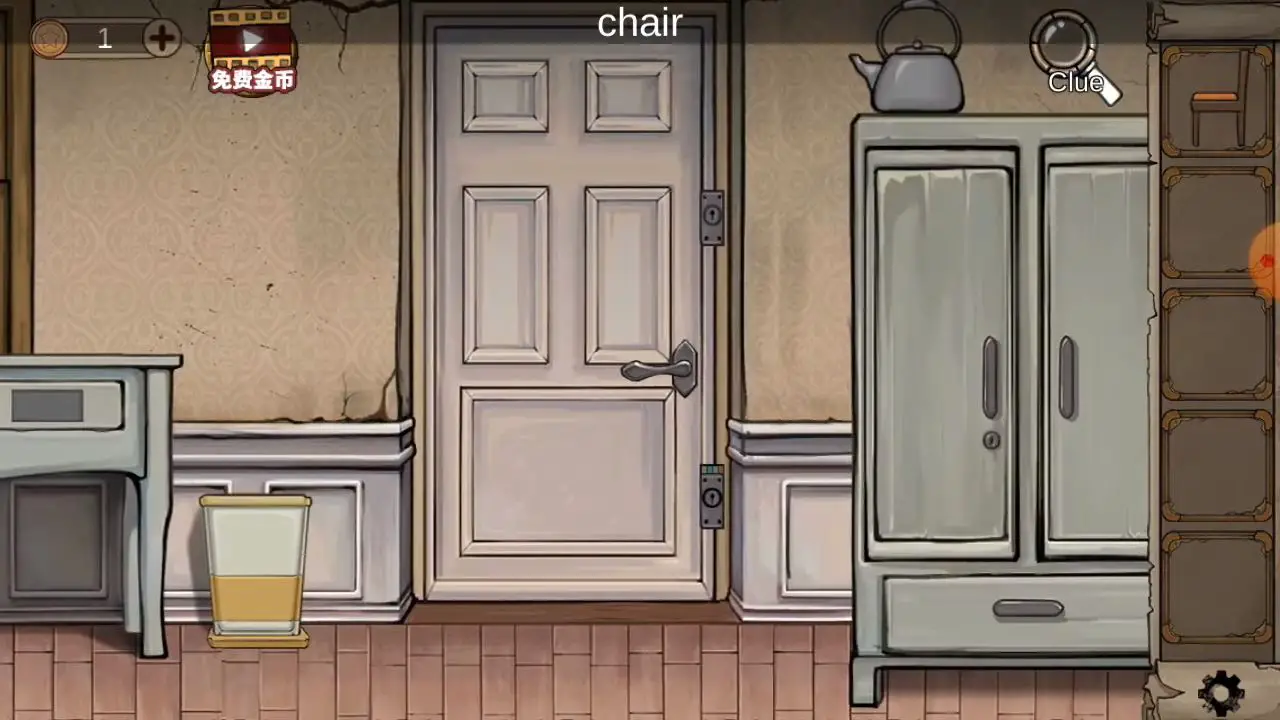
- Collect a chair and bring it close to the cupboard. Climb on the chair and collect the kettle.
- This time, the game has placed two locks on the door so no one can open it easily.
- Select the kettle from the inventory, give the water to the plan available near the table, and wait until the plant’s petals of different colors come out.
- Count the petals keeping their colors in mind, and head to the sofa where you may discover a locker.
- Head to the locker, enter the code (5272), and collect a key.
- You don’t need any key to open the 2 nd locker, but you have to set the colors to open it. Set the color to the locker accordingly: Red,Blue, Yellow, and Green.
- Open the second drawer to discover photos.
Visit Room 003
As you get into the third room, a woman will welcome you by offering two choices to select from, such as “I Just Passed By” and “I’m here to get my things back.” Go with the 2 nd choice and continue unfolding the dialogues. She will again give you two choices to select from, and you must choose the 2 nd option. After that, follow the steps given in the Hotel of Mask Escape Room Game Walkthrough:
![]()
- Tap the bull’s head coming out of the wall holding a gear. Collect the gear and add it to your inventory.
- There’s a goat’s head; upon tapping its mouth, a gear will come out.
- Behind the girl, there is a wheat machine. Add both gears to the machine to bring it in a working position.
- Head to the main door to collect a paper and then move to the right side of the room, where you may discover a stack of drums. Reveal the pattern of drums using the map and unravel the code.
- The code you need to open the door available on the left side is 9286.
- Open the door and explore a newly unlocked room where you may discover several hidden objects, such as a wrench and more.
![]()
Enter Code (9286) to Open a New Room
There is a stack of dry grass where you can collect a wrench. Open the green-colored box to collect a box and add it to your inventory.
- Tap the ceiling to investigate the Astrological Chart and click on the machine placed above the table.
- Set the needles of machines following the Astrological Chart and collect gear.
- Collect hay from the room and escape to the primary side.
- Use the wrench to untie the gear fixed on the trampoline.
- Head to the wheat machine and add both gears into it to run the machine. Add the hay and collect feed.
- Tap on the bull to feed him and use the cup to collect the blood coming out of the nose.
- Hit the mixer machine available next to the wheat machine and adjust the glass to suck the liquid.
- Now, you must feed the sheep and collect the tears to the cup.
- Repeat the process you did with the nose blood.
- Now, keep the cup below the machine nose and hit the button to fill it with Wine. Add the glass to your inventory and walk away to the 4 th
Visit Room 004
The 4th is a Jewelry Shop where you find a person sitting there to deal with customers. Most of the time you spend reading dialogues, you may use the rest of the time to find hidden objects and solve mysteries.
Читайте также: