
Don t escape 2 прохождение
Обновлено: 02.07.2024
Story: The usual zombie apocalypse has occurred, and you and your friend have managed to get to an abandoned building. You are perfectly ok, but your friend has been bitten. Survive the night, and you'll be able to make your escape the next day (somehow).
Unlike the first game, the different endings are actually worth getting, so they're included below.
THE SAVIOR
1. Go left twice and get the Shovel.
2. Go right thrice and get a Key and a pair of Wires from the dumpster.
3. Click on the left wall, get a Bullet from the hole in the wall and a Metal Cutter.
4. Go right twice and exit the place.
5. Travel to the bottom right unknown destination (the Church).
6. Get a Bullet near the bottom of the second stick and the Axe.
7. Travel to the top right unknown destination (the Gas Station).
8. Get a Bullet on the floor and the empty Fuel Can.
9. Enter the shop and take the Batteries and the Water on the shelf.
10. Take the Painkillers from the first aid box.
11. Use the Axe on the door and enter.
12. Get a Bullet near the bottom of the sofa, and take the Rubber Hose.
13. Leave the place. Take the Coin from the Cash Register if you want, it doesn't make a difference.
14. Travel to the top left unknown destination (the Store).
15. Use the Metal Cutter on the Trolley.
16. Use the Trolley on the Fence Wire.
17. Enter the Store and take the Camera and the Alcohol.
18. Combine the Batteries and the Camera.
19. Exit the Store.
20. Look at the picture on the side of the Store.
21. Use the Camera on the picture to take a Photo of it.
22. Travel to the final unknown destination (the Car Crash).
23. Pick up the Gun and load the Bullets into it.
24. Use the Rubber Hose and the Fuel Can on the police car.
25. Travel to the Church.
26. Go inside the Church and use the Photo on the man (Father Bernard).
27. Exit the Church, and use the Trolley on the Bricks and the Cement.
28. Travel back to base and enter the building.
29. Give Bill (your friend) the Painkillers.
30. Use Water and Cement on the box of sand.
31. Use the Shovel on the box of sand to create mortar.
32. Go right twice and use the Shovel on the space outside the building. Dig the pit.
33. Go right and use the Fuel Can and the Wires on the Generator.
34. Travel to the Store and enter it.
35. Look into the hole in the floor.
36. Use the Shovel on the zombie.
37. Pick up the glasses and exit the Store.
38. Use the glasses on the survivor (Jeremy) standing near the trolleys.
39. Travel to the Car Crash.
40. Use the Axe on the woods behind the cars to get Sticks.
41. Travel back to base.
42. Use the Fence Wire on the broken gate.
43. Turn the generator on by clicking on it.
44. Go left and use the Sticks on the hole.
45. Go left and close the door. Lock it by using the Key on the door.
46. Go left and use the Bricks on the window.
47. Use the Alcohol and the Axe on Bill.
48. Go left and use the Metal Cutter on the padlock.
49. Open the trapdoor and enter the basement.
50. Close the hatch and click the Clock (The End).
THE GOVERNOR
1. Go left twice and get the Shovel.
2. Go right thrice and get a Key and a pair of Wires from the dumpster.
3. Click on the left wall, get a Bullet from the hole in the wall and a Metal Cutter.
4. Go right twice and exit the place.
5. Travel to the bottom right unknown destination (the Church).
6. Get a Bullet near the bottom of the second stick and the Axe.
7. Travel to the top right unknown destination (the Gas Station).
8. Get a Bullet on the floor and the empty Fuel Can.
9. Enter the shop and take the Batteries and the Water on the shelf.
10. Take the Painkillers from the first aid box.
11. Use the Axe on the door and enter.
12. Get a Bullet near the bottom of the sofa, and take the Rubber Hose.
13. Leave the place. Take the Coin from the Cash Register if you want, it doesn't make a difference.
14. Travel to the top left unknown destination (the Store).
15. Use the Metal Cutter on the Trolley.
16. Use the Trolley on the Fence Wire.
17. Enter the Store and take the Camera and the Alcohol.
18. Combine the Batteries and the Camera.
19. Exit the Store.
20. Look at the picture on the side of the Store.
21. Use the Camera on the picture to take a Photo of it.
22. Travel to the final unknown destination (the Car Crash).
23. Pick up the Gun and load the Bullets into it.
24. Use the Rubber Hose and the Fuel Can on the police car.
25. Travel to the Church.
26. Go inside the Church and use the Photo on the man (Father Bernard).
27. Exit the Church, and use the Trolley on the Bricks and the Cement.
28. Travel back to base and enter the building.
29. Give Bill (your friend) the Painkillers.
30. Use Water and Cement on the box of sand.
31. Use the Shovel on the box of sand to create mortar.
32. Go right twice and use the Shovel on the space outside the building. Dig the pit.
33. Go right and use the Fuel Can and the Wires on the Generator.
34. Travel to the Store and enter it.
35. Look into the hole in the floor.
36. Use the Shovel on the zombie.
37. Pick up the glasses and exit the Store.
38. Use the glasses on the survivor (Jeremy) standing near the trolleys.
39. Travel back to base.
40. Use the Fence Wire on the broken gate.
41. Turn the generator on by clicking on it.
42. Go left thrice and use the Bricks on the window.
43. Go right twice to the pit.
44. Use the Gun on Jeremy. Shoot Father Bernard too.
45. Use the Alcohol and the Gun (or Axe) on Bill.
46. Go left and use the Metal Cutter on the padlock.
47. Open the trapdoor and enter the basement.
48. Close the trapdoor and click the Clock (The End).
THE LONE WOLF
1. Go left twice and get the Shovel.
2. Go right thrice and get a Key and a pair of Wires from the dumpster.
3. Click on the left wall, get a Bullet from the hole in the wall and a Metal Cutter.
4. Go right twice and exit the place.
5. Travel to the bottom right unknown destination (the Church).
6. Get a Bullet near the bottom of the second stick and the Axe.
7. Travel to the top right unknown destination (the Gas Station).
8. Get a Bullet on the floor and the empty Fuel Can.
9. Enter the shop and take the Water on the shelf.
10. Take the Painkillers from the first aid box.
11. Use the Axe on the door and enter.
12. Get a Bullet near the bottom of the sofa, and take the Rubber Hose.
13. Leave the place. Take the Coin from the Cash Register if you want, it doesn't make a difference.
14. Travel to the top left unknown destination (the Store).
15. Use the Metal Cutter on the Trolley.
16. Use the Trolley on the Fence Wire.
17. Enter the Store and take the Alcohol.
18. Exit the Store.
19. Travel to the final unknown destination (the Car Crash).
20. Pick up the Gun and load the Bullets into it.
21. Use the Rubber Hose and the Fuel Can on the police car.
22. Travel to the Church.
23. Use the Trolley on the Bricks and the Cement.
24. Travel back to base and enter the building.
25. Use Water and Cement on the box of sand.
26. Use the Shovel on the box of sand to create mortar.
27. Use the Bricks on the window.
28. Go right thrice and use the Fence Wire on the broken gate.
29. Use the Wires and the Fuel Can on the generator.
30. Turn the generator on by clicking it.
31. Go left thrice and use the Axe on Bill.
32. Go left and use the Metal Cutter on the padlock.
33. Open the trapdoor and enter the basement.
34. Close the trapdoor and click the Clock (The End).
THE MERCIFUL
Give Bill the Painkillers, the Alcohol and shoot him with the Gun.
THE SURVIVOR
Essentially, as long as you survive, you get this achievement.
THE SHADOW
Using the gun will attract an additional 5 zombies to the 50 zombies that will arrive each time you use it, so it is not advisable to use it (not to mention it'll waste bullets). The steps above ensure that the gun is never used, so this achievement will be obtained anyway.
Alternatively, the Fuel Can can also be used on the red car at the Car Crash. Getting the red car will reduce the travelling time from 10 minutes to 2 minutes, and makes having the Trolley obsolete. However, the generator cannot be turned on, so if you really want the car, it is possible to still survive, but there will be more zombies since the fence is no longer powered by electricity.
If this guide is incomplete, please leave a comment saying what was not included. I will add it in ASAP. Thanks.
If you see that somebody else has already given feedback about the same thing, don't comment. I understand that you would like to comment, but to avoid spamming, please don't comment. I understand that you are doing it for the people reading this, and I commend you for it.
If this guide has helped you out, you're welcome.
«Escape First 2» – это вторая игра в серии игр-головоломок, выполненных в стиле «Побег из комнаты», в которую можно играть как в многопользовательском режиме, так и в режиме одного игрока. Игра включает в себя три уровня, не зависящих друг от друга.
Управление в игре выполняется посредством взаимодействия с клавиатурой и мышью.
WASD – перемещение;
QE – поворот;
R – включить/выключить фонарик;
F – рассмотреть предмет, который находится в «руках» персонажа;
H – открыть режим подсказки;
ЛКМ (Левая клавиша мыши) – взаимодействие;
ПКМ (Правая клавиша мыши)– бросить предмет;
Колесо мыши – приблизить предмет.
Меню открывается клавишей Esc.
Инвентарь в игре не используется. Одновременно можем переносить только один предмет.
Сохранения в игре не предусмотрены.
Примечание. Для увеличения скриншота нажмите на него в тексте прохождения. Для просмотра дополнительных всплывающих скриншотов, нажимайте на активные ссылки, выделенные в тексте прохождения темно-красным цветом.
Psycho Circus 2. Начальная комната
Чтобы открыть дверь для выхода из комнаты, нужно ввести кодовое слово на панели слева от двери.
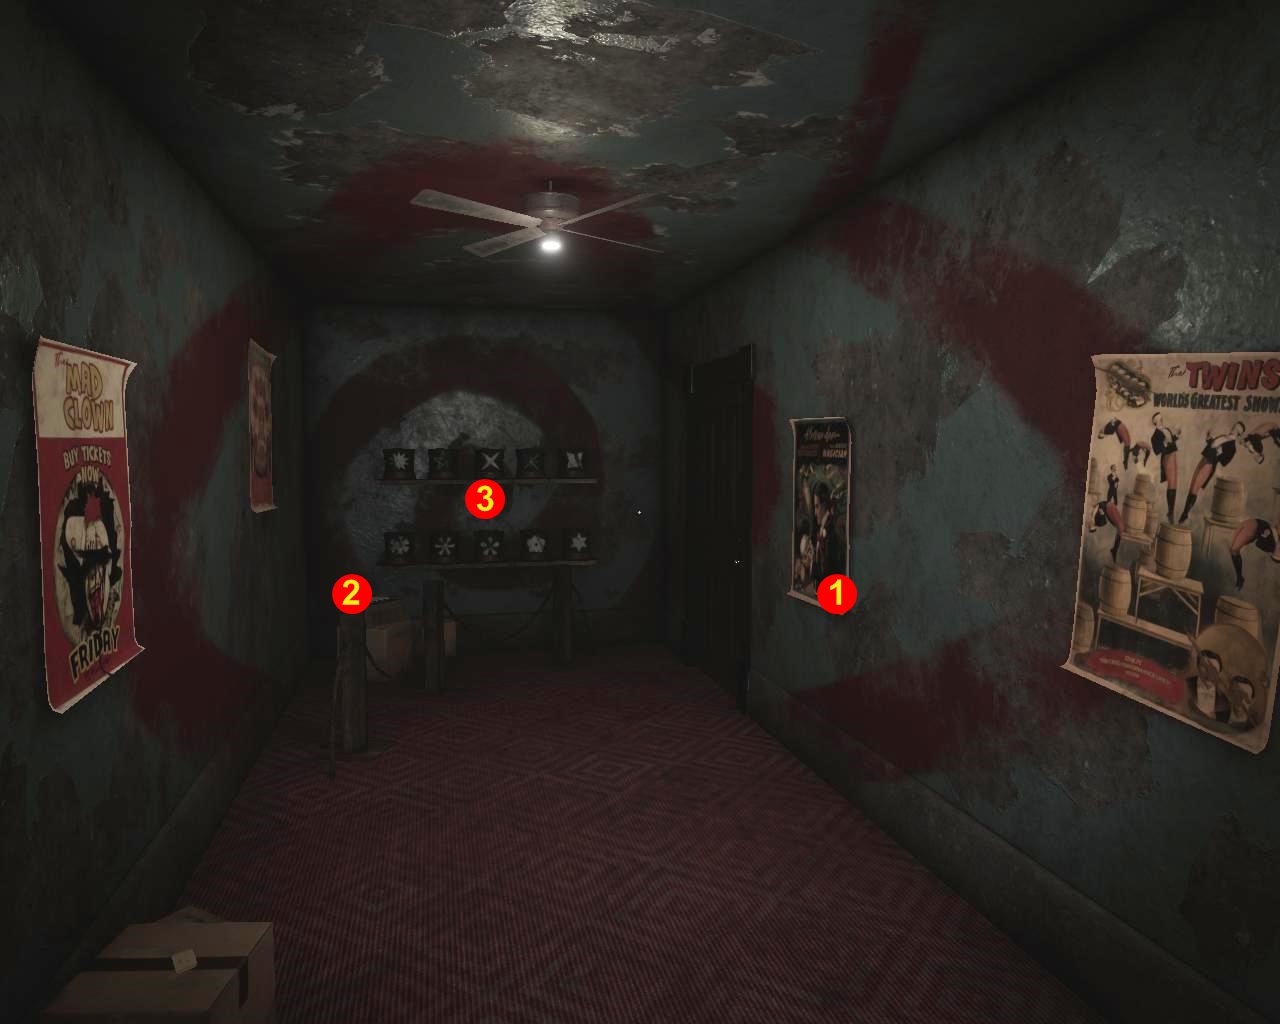
Обращаем внимание на надпись в правом нижнем углу афиши 1 на стене, 11 марта 1939 – эта дата является кодом. Набираем код 111939 на наборной панели коробки 2, лежащей перед полками 3 со шляпами. Достаем из нее страницу с рисунками и их буквенными обозначениями.
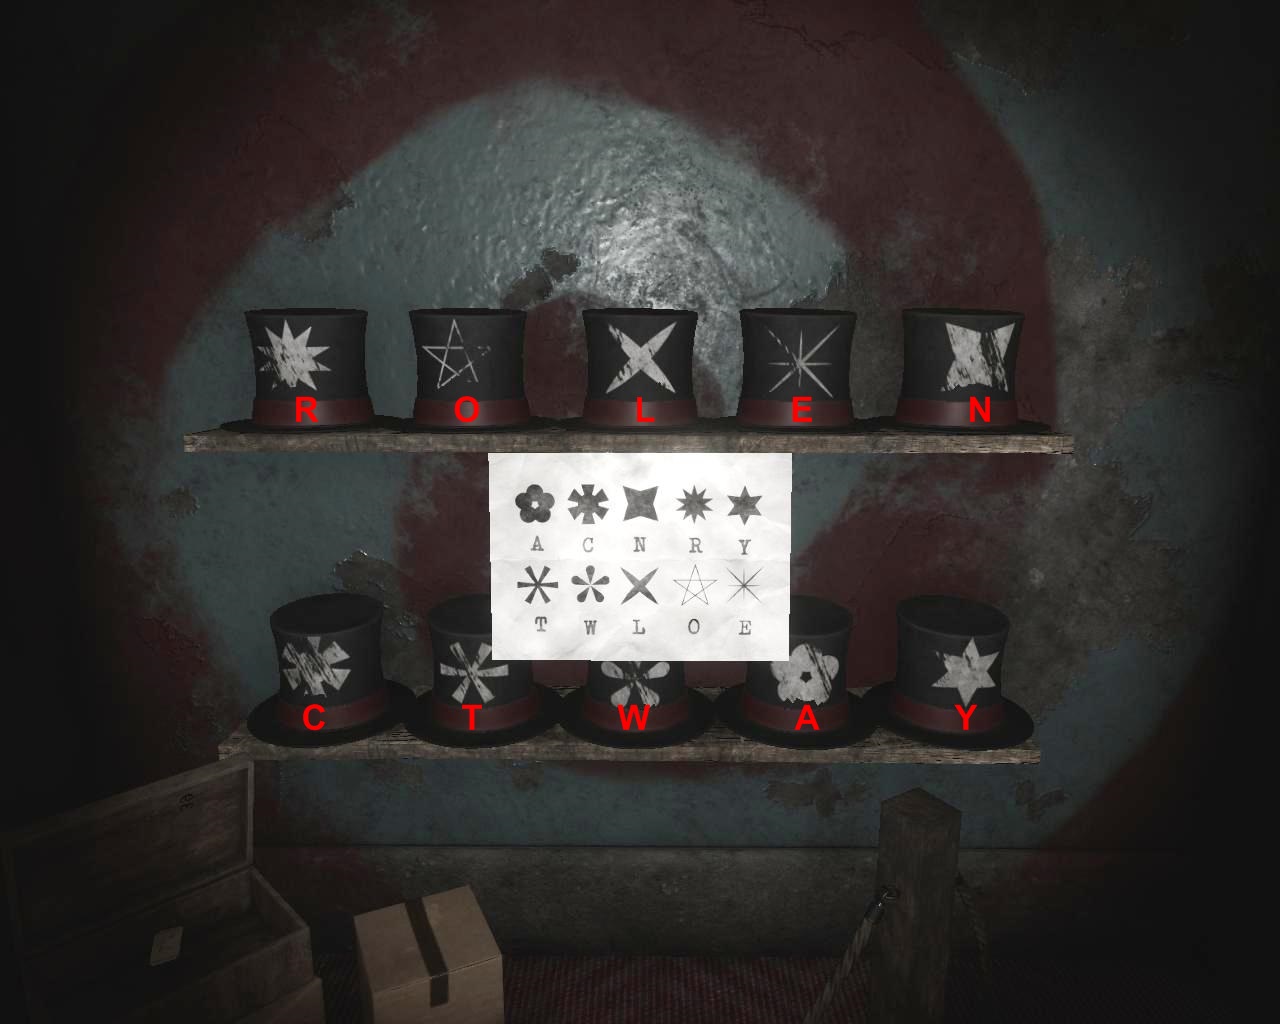
Сопоставляем буквенные обозначения рисунков на странице с рисунками на шляпах, лежащими на полках.

Обращаем внимание на схему 4, изображенную на стене.
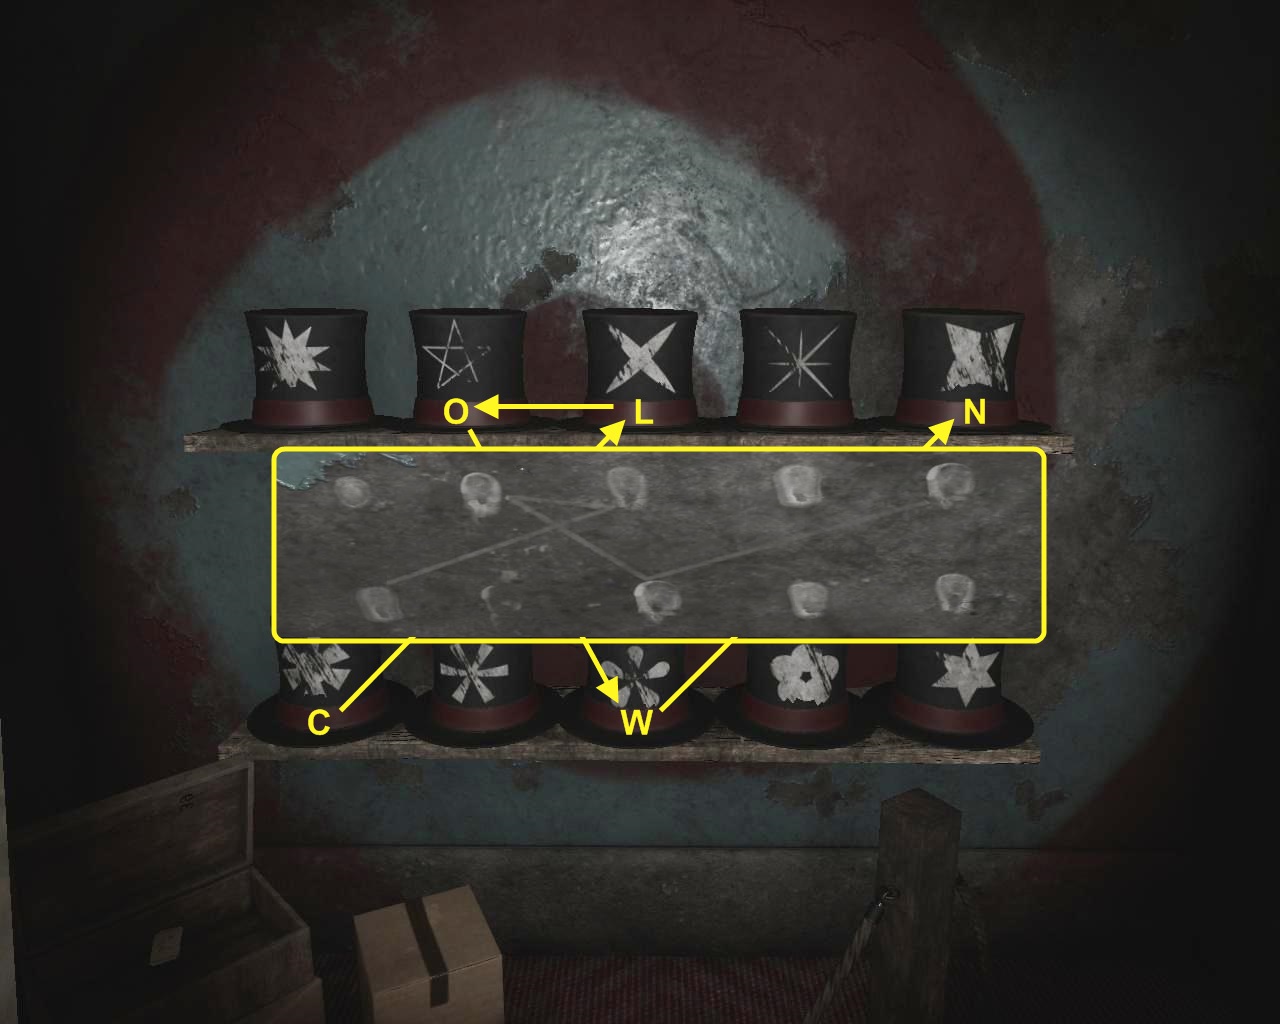
Сопоставляем ее с буквенными обозначениями рисунков на шляпах, получаем кодовое слово – CLOWN.
Набираем его на панели 5 у двери выхода 6.
Сценическая комната
Чтобы открыть вторую дверь в комнате, нужно нажать в определенном порядке на стрелки направлений на ручке двери.

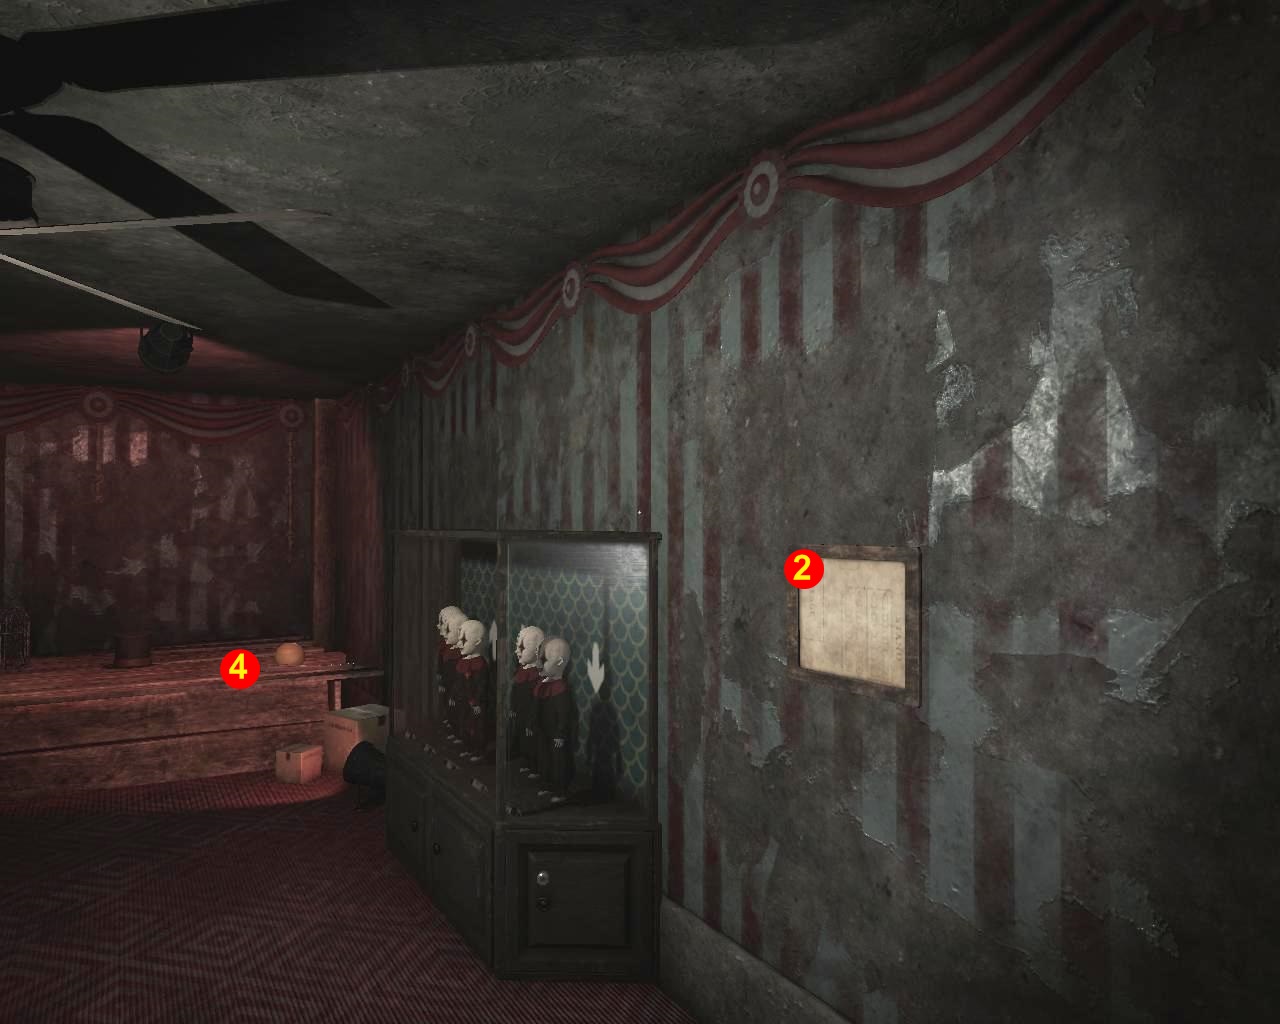
Обращаем внимание на запись в учетной книге билетов 1 на стойке конторки и на план расположения посадочных мест 2, висящий на стене.
Собираем разбросанные по комнатам билеты. 2 билета находятся в начальной комнате (один билет лежит в коробке с кодовой панелью, второй билет виден на картонной коробке), и 8 билетов находятся в зале (один билет лежит в стеклянной банке. 3 билета лежат рядом с учетной книгой, разбить которую можно разводным ключом. 4 билета обнаруживаем лежащими на сцене). Сопоставляем данные и видим, что по книге учета было предъявлено девять билетов, фактических билетов в наличии оказывается десять.
Производим условное размещение зрителей, согласно билетам:
Место: 1 2 3 4 5
Ряд: 4 Эдит Якоб Гарольд
2 Гилберт Максвелл Бекки
1 Оливия Виктор Неизвестный
Обращаем внимание на то, что Максвелл, не пришедший на представление, должен был сидеть на месте №2 во втором ряду.
Читаем текст записки, лежащей на полу. Обращаем внимание на расположение зрителей:
«В двух рядах позади меня, на том же месте, что и у меня, сидит человек в шляпе и с искусственной бородой.
Через два сидения слева от него сидит женщина, которую я знаю с моего представления.
На том же месте, на котором сидит она, но в первом ряду, сидит директор, а рядом с ним, слева, его жена».
Не составляет труда определить, что человек, оставивший записку, сидел в первом ряду на месте №5:
Гарольд – человек в шляпе и с бородой;
Эдит – женщина, сидящая через два сидения, слева от него;
Виктор – директор, сидящий на том же месте, что и Эдит, но в первом ряду;
Оливия – жена директора, сидящая слева от него.

Обращаем внимание на то, что все сидения отмечены стрелками направлений. Используя имеющуюся информацию, находим решение.
Примечание автора. Лично для меня осталась загадкой логика разработчиков игры, т.к. решение не поддается объяснению.
Нажимаем на стрелки на ручке двери: ↑ ← → ↓ ↑ → ← ↑ ↓
Комната масок
Чтобы открыть следующую дверь, нужно нажать на ручке кнопки со стрелками направлений в требуемом порядке.

Берем со шкафчика страницу с текстом 1.

Обращаем внимание на первую строку. Примечаем, что первое слово TEDD, составлено из букв, находящихся в центре слов. По такому же принципу выделяем буквы в центре слов второй строки, получаем кодовое слово TORA. Набираем код на кодовой панели на коробке 2, извлекаем из нее карты Таро и листок с текстом.

Сопоставляем карты с текстом, располагаем их в той последовательности, в какой они упоминаются в рассказе: Солнце Отшельник, Луна, Смерть, Повешенный.
Обращаем внимание на цифры, стоящие вверху каждой карты (19, 9, 18, 13, 12) и на зачеркнутую единицу на дне коробки. Убираем единицы в последовательности, состоящей из чисел на картах, и получаем код 99832.
Вводим код на панели сундука 3 на полу. Достаем из него страницу с записью. Обращаем внимание на запись: «Маски 0 Шляпы Костюмы».
Осматриваем комнату и находим, что в ней есть 4 маски, 3 шляпы (одна лежит открыто, еще две лежат в коробке) и 3 костюма. Подставляем числовые значения вместо слов на странице, получаем настройку волны приемника – 403,3.
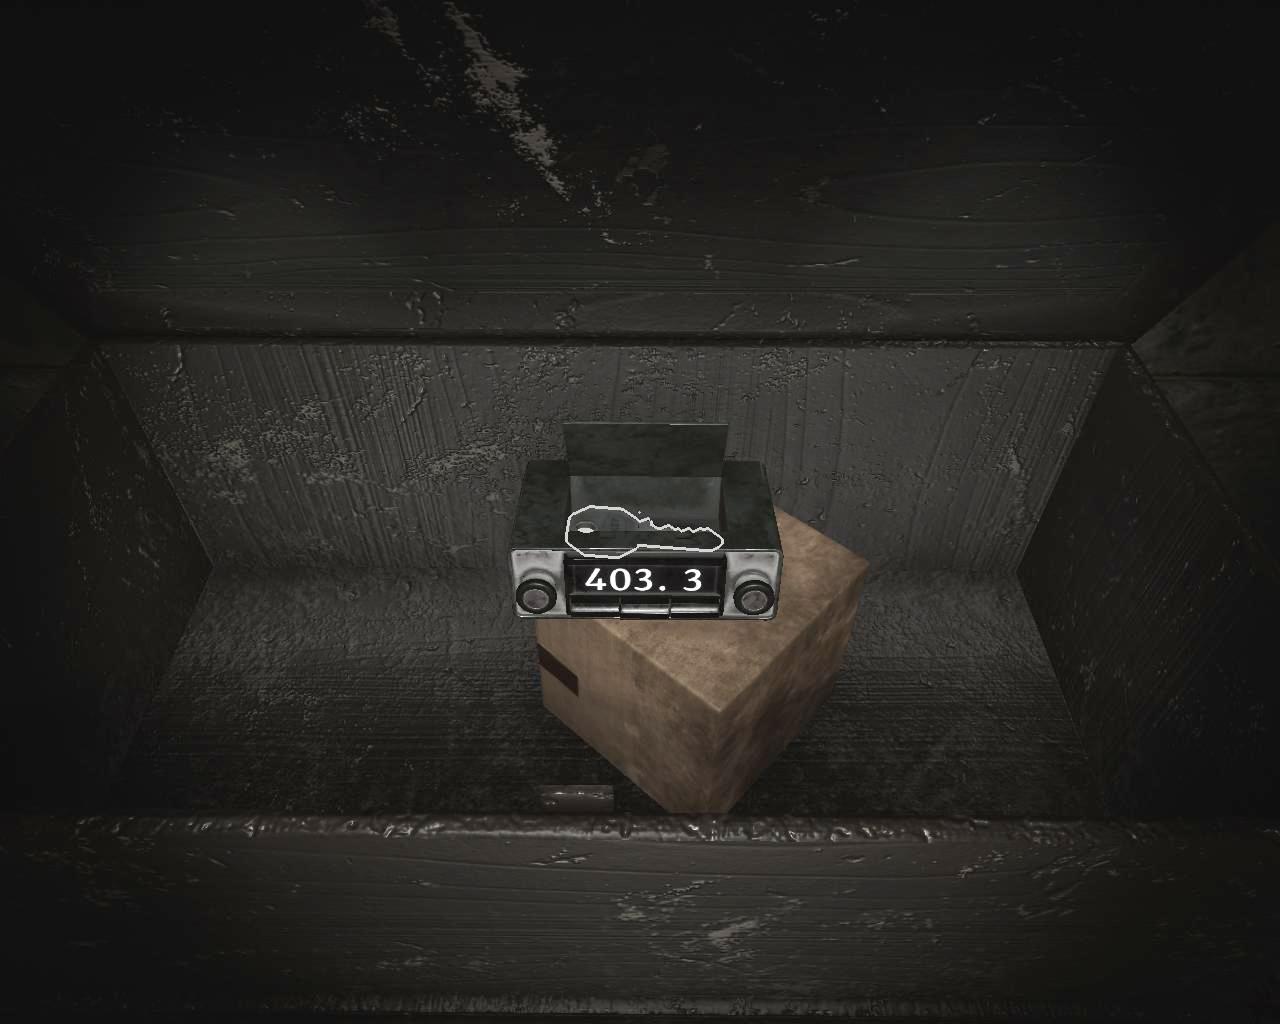
Настраиваем на нее приемник, открываем крышку, достаем ключ. Несем его в сценическую комнату, открываем дверцу шкафа с куклами. Нажимаем имеющийся внутри переключатель, и куклы начинают поворачивать головы.

Обращаем внимание на ту сторону, в которую повернуты головы кукол. Идем к двери, нажимаем на кнопки со стрелками: ← ↑ ← ↓ → ↑ → ↓ →.
Комната с проектором
Чтобы открыть дверь из комнаты с проектором, нужно ввести код, состоящий из 4 цифр.

Рассматриваем большую мишень для метания ножей. Обращаем внимание на знак вопроса в вершине одного из трех треугольников и на то, что сумма чисел в вершинах двух других треугольников составляет 25 единиц. Находим число, соответствующее знаку вопроса: 25 – (2+11) = 12. Рассматриваем меньшую мишень, находим второе число: 20 – (5 + 1) = 14. Набираем код 1214 на панели шкафчика стола, на котором стоит проектор. Обращаем внимание на цветные пятна, пронумерованные от 1 до 4. Достаем из шкафчика красное и желтое стекло, вставляем стёкла в проектор.

Смотрим на проецируемое изображение, видим цифру 4.
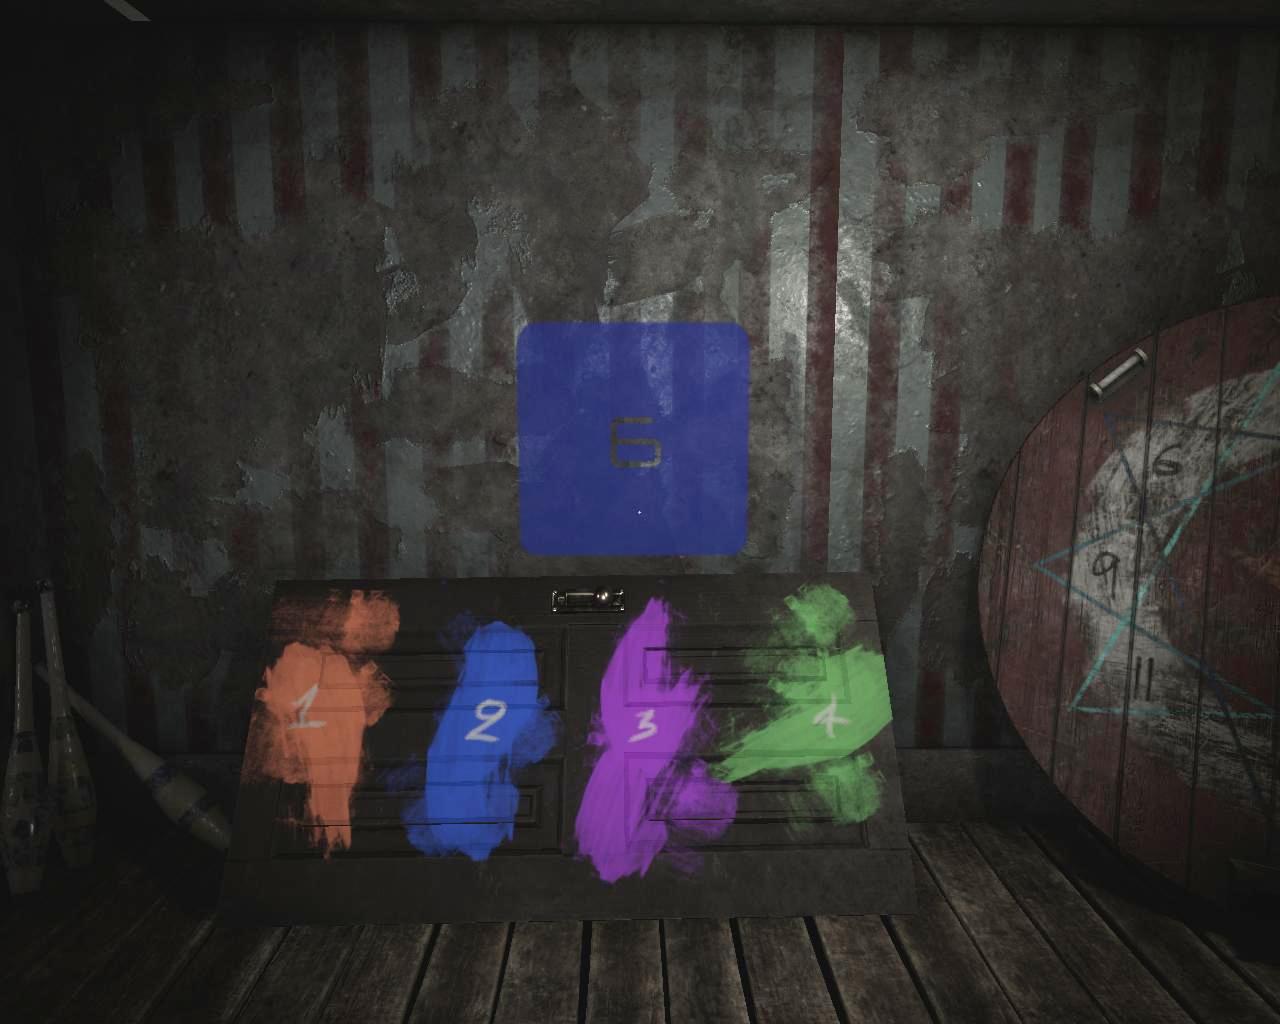
Убираем стекла из проектора, вставляем синее стекло. Видим цифру 6.
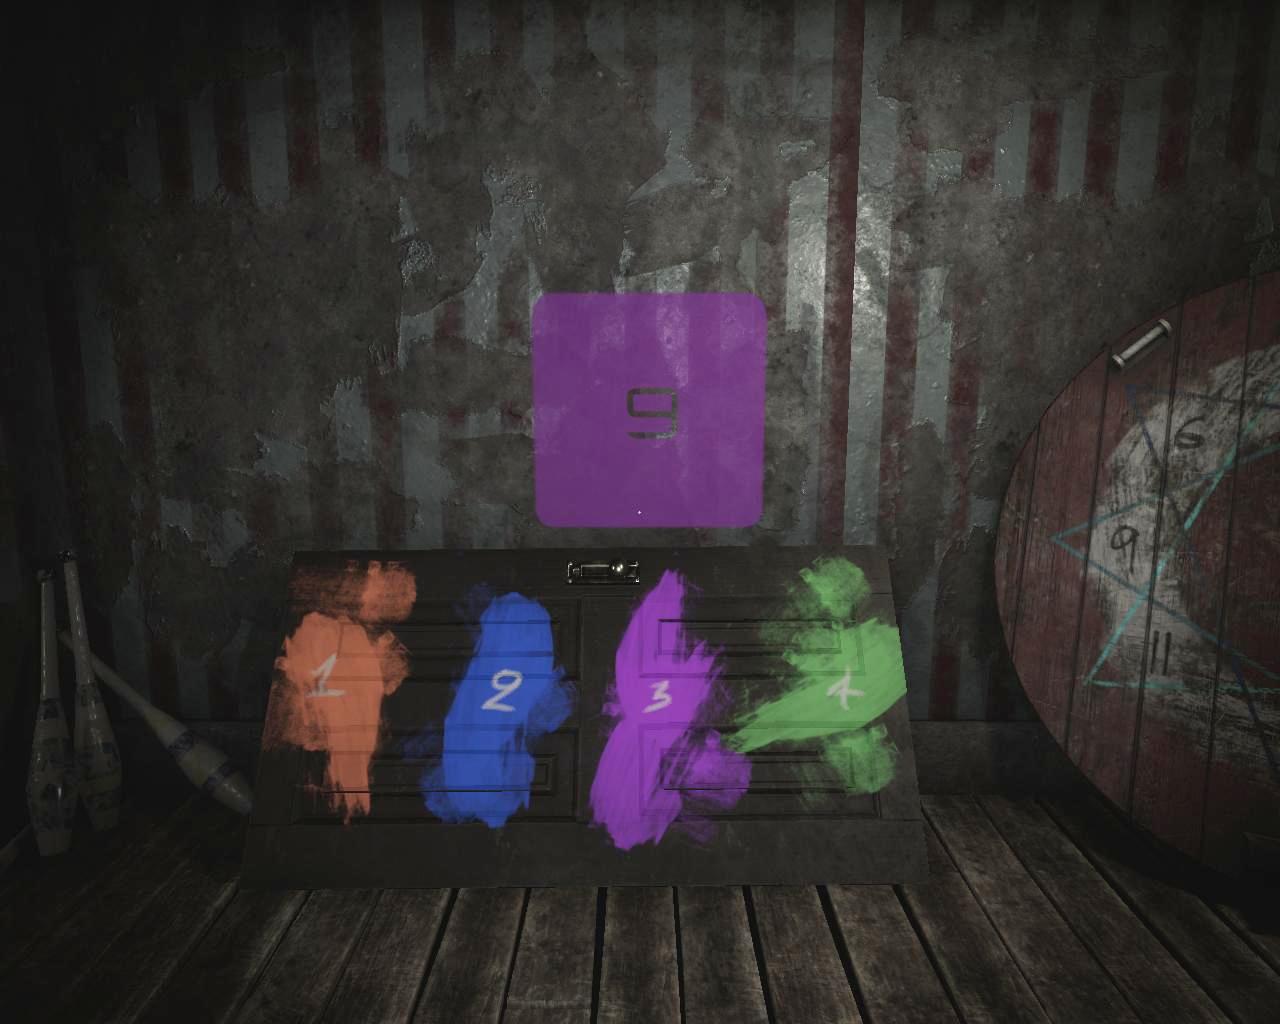
Вставляем в проектор синее и красное стекло, получаем цифру 9
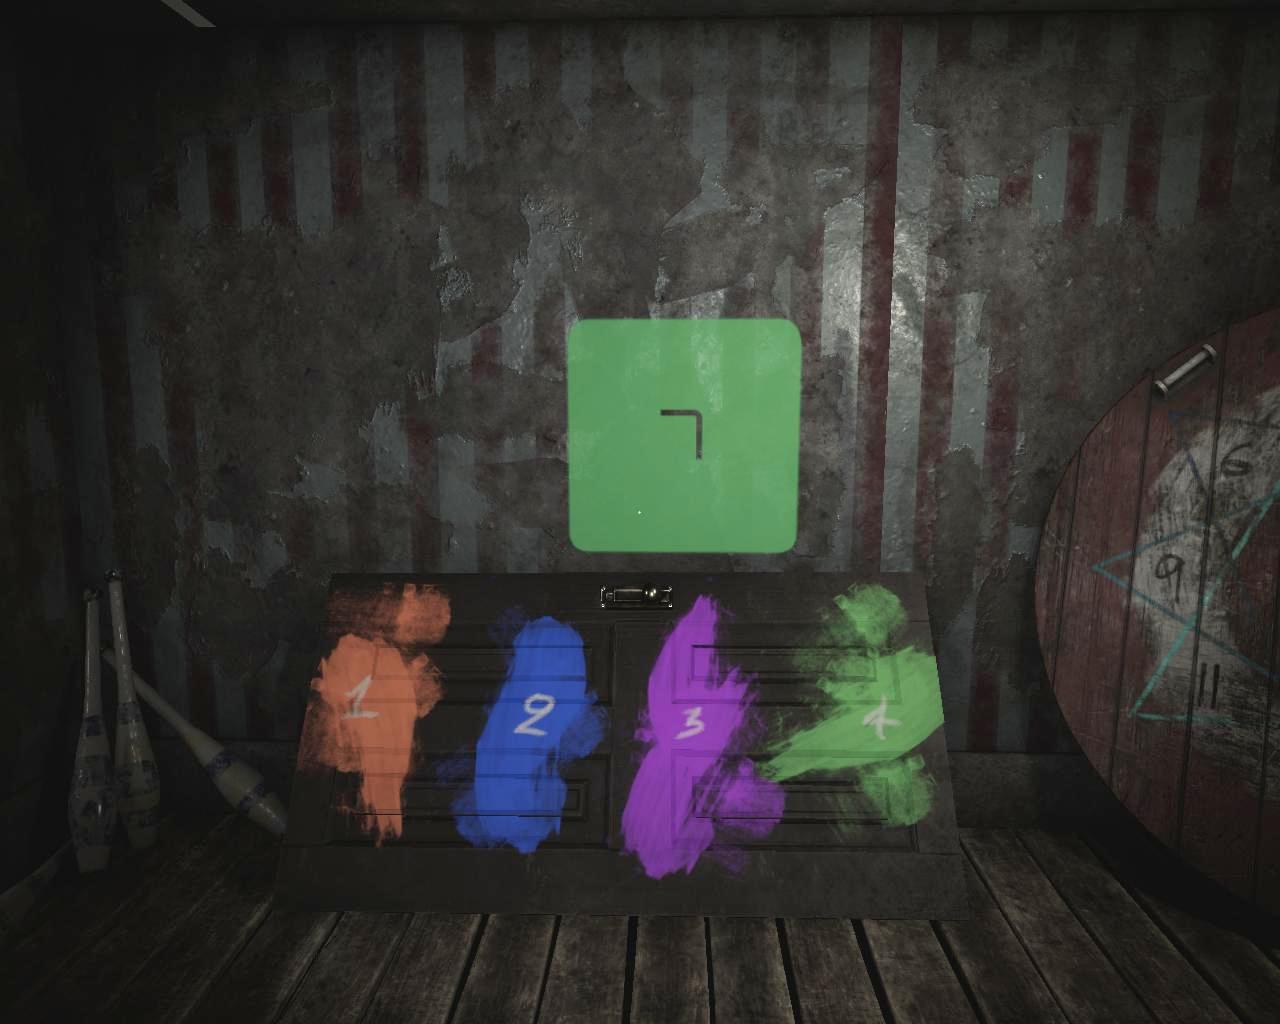
Вставляем в проектор синее и желтое стекло, получаем цифру 7. Набираем на панели код 4697.

When the undead attacked we weren’t ready. Thinking back, we were never fully ready for this. The whole outbreak started over two weeks ago and it’s been getting worse ever since. This time we’ve barely made it. We got away, but Bill got bitten. We both knew what that meant… We decided to stay in this abandoned building for a while. We needed to rest and sleep. A huge horde of the living dead is coming this way… They will reach us by the sunset. I have to lock this place up before that happens and maybe – just maybe – I will live to see another day.
Description [ ]
Much like in part one of Don’t Escape, you have to lock yourself in the room rather than trying to get out. But this time around, you are not alone – there are people around that might help you if you help them. Explore various locations and find things you will need to secure your hideout. Just be aware of the passing time; the undead horde is approaching and they won’t wait forever for you to be ready…
Controls [ ]
Use mouse to interact with the environment. The inventory is by the upper edge of the screen.
Click on the clock to finish the game when you think you’re ready.
Achievements [ ]
- The Survivor: Complete the game and survive.
- The Merciful: Make sure Bill passes away calmly.
- The Shadow: Complete the game without firing a single shot.
- The Savior: Survive and save two of your friends.
- The Governor: You are even worse than the undead.
- The Lone Wolf: Survive without getting any friends.
Walkthroughs [ ]
There are several different outcomes the game can end on, depending on your actions. Achieving any one of these outcomes will earn you the "The Survivor" achievement.

Don't Escape 2: The Outbreak is the second game in the Don't Escape Trilogy, followed by Don't Escape 3 and Don't Escape 4 Days in a Wasteland. The game was released in 2015, two years after the original Don't Escape was released.
Contents
When the Undead attacked we weren't ready. Thinking back, we were never fully read for this. The whole outbreak started over two weeks ago and it's been getting worse ever since. This time we've barely made it. We got away, but Bill got bitten. We both knew what that meant. We decided to stay in this abandoned building for a while. We needed to rest and sleep. A huge horde of the living dead is coming this way. They will reach us by sunset. I have to lock this place up before that happens and maybe - just maybe - I will live to see another day.
The game begins by introducing the player to the player character and his friend, Bill. In the opening lines of the player character's narration (shown above) it is quickly established there's an outbreak of the living dead. The player must now fortify their location, which seems to be a little stone house, to survive the night with whatever objects they can find from the four locations surrounding the abandoned building.
Gameplay [ ]
While in the previous game the player had to take precautions to keep himself from escaping, this game requires to take precautions to keep an external threat outside.
Achievements [ ]
Unlike its predecessor, Don't Escape 2 features Achievements, which can be earned by completing the game a certain way either by doing everything like alone or by killing your friends once they're of no value to your objective.
- The Survivor - Complete the game and survive.
- The Merciful - Make sure Bill passes away calmly.
- The Shadow - Complete the game without firing a single shot.
- The Savior - Survive and save two of your friends (Jeremy and Father Bernard)
- The Governor - You are even worse than the Undead. (sacrifice Jeremy and Bernard as bait for the zombies)
- The Lone Wolf - Survive without getting any friends.
The Survivor and Savior achievements are the easiest to complete while The Lone Wolf achievement is the hardest to achieve.
Time and Locations [ ]

Читайте также: