
Wet blending техника
Обновлено: 05.07.2024

Okay, so you want to wet blend. I hear this is the best way to achieve the smoothest paint blends on miniatures and other acrylic painting surfaces, e.g., canvas or rocks. If you’re looking for an example of how to wet blend, then read on below!
In this article, you will see the following:
- A nice rock
- A wet blended paint transition between a dark and light color
Finale Video: The Wet Blending Process
How to Wet Blend Paint on Miniatures, Models, and Other Surfaces with Acrylic Paint
(An example of my way of smoothing paint transitions on larger surfaces)
1. Prepare your surface
Make sure your working surface is clean of debris.
In my case, I made sure they were free of dust and sand.

A simple rinse in soap and water will be more than enough.

For the more thorough painter, you can try using an ultrasonic cleaner. I’ve started using more more lately because of the simplicity.

2. Apply primer in an even smooth coat
Primer is key! I should say that again: Primer is key.
You need an even and consistent primed surface to wet blend with best results.

My absolute favorite primer for anything (almost) is Vallejo Surface Primer (see the full-review).
I prefer starting with a gray color primer. It allows me to see gaps and imperfections because shadows in the model surface aren’t hidden.
If I need a darker color, I’ll prime a second coat with a black primer or simply paint the entire model with a darker-tone (as I’ve done below).
Speed painting tip: If you’re looking to paint faster, prime with a black primer (see how).
You can airbrush primer, which is the actually the best way to achieve a smooth even coat.
But, for this rock, I wanted to see how a brush would work (I’m always experimenting).

I used the Citadel Large Base Brush. To apply the primer, I thinned it first with a little water to help it flow off the brush. If your primer is thin enough, you may not need to add any thinner. The idea is to get the primer to cover the surface in a thin coat. See the photos for what it should look like when the primer is first applied to the surface.

Suffice it to say, brushing the primer worked great on this rock!
3. Base coat with any color
They key here isn’t the color of your base coat (the first layer of paint).
Rather, the important thing you need to remember is to keep that layer as solid and smooth as possible.
Everything you build up from here relies on how well you performed the previous step.
Make sure your primer is dry, for example, before moving to the next step.

I chose to Vallejo Model Color “Dark Sea Blue” as my first base coat. This is not the color I will wet blend, but merely a way for me to darken the surface.

For more complex miniatures or pieces that I want to perform advanced painting techniques on, I usually prefer starting from a dark tone color and moving to a brighter one.

Paint the base coat evenly.

Use a large flat brush (or the biggest you are comfortable with your working surface).

4. Paint your two colors normally (define your blending “transition zone”)
This is a simple.
You will be blending two paint colors using wet blending. But, before you do that, decide on location of the transition zone.
You can see in the image above that I painted two colors: a Dark and Light Elf color, e.g., purplish-gray (Master Series Reaper paint).
Paint in layers so you don’t get clumps in the finish.
The paint coats should be even and complete. The colors should be smooth with no bumps in the paint (of course, if the model is bumpy that’s fine!). No splotches.
Notice the sharp border?
This is the transition zone. This is where you’ll do the wet blending and mixing on the working surface.
The transition zone definition is important. Vital!
5. Wet blending (the easy way)
Now that you have your transition zone painted (the sharp border between your two colors), you’re ready to wet blend the two colors together.

To start wet blending, apply the first color.
Don’t thin the paint.
Paint the color across the transition border as you would a base coat. In this case, you could paint directly from the bottle or pot directly.
If you’re having trouble with low paint flow, dampen your brush with water, then dip into your paint.

Add the second color. Don’t take too long, but don’t lose control by going too fast.
This is why defining the transition zone before wet blending is important. You’re not wasting time trying to find out where to blend while paint is drying.

While the paint colors are both still wet, zig-zag, or sweep the tip of your brush into the transition zone.

Only push and pull paint while both color remain wet.
You can more color on either size of the transition zone if you need to.

Stop messing with the colors if you notice a “paint skin” developing. A paint skin is the drying top layer of pigment.
If you mess that up, you’ll get peeling, bumpy paint surface, and it’ll be frustrating to fix.

Once the paint has started drying, simply wait for the entire surface to dry.
With practice, you can stop here. You are done with your paint blending. It will look great!
Should I Use a Wet or Dry Palette for Acrylic Wet Blending?
I use a dry palette for almost all my miniature painting work. See why dry palettes are always valuable!
- The reason I prefer a dry palette for wet blending, in particular, is because you need to maintain control.
- A wet palette is great for keeping paints wet (right?) for a long time. But, you’ll find even after 10-30 minutes, your paint thins automatically. The paint on a wet palette absorbs too much water, and becomes a thinned version of its former self.
- Paint doesn’t behave predictably. This character of wet palettes doesn’t work well for my preferred style of painting.
Of course, if you’re keen on using a wet palette, try it. Just be aware that acrylic paint that is too thin will be hard to use with the wet-blending method.
And, with this note, read on below for my overview of how to wet blend (using a rock as an example).
What is the Best Paint for Wet Blending on Miniatures?
You should always try and use model paints formulated for painting miniatures and relatively small surfaces. Water-based acrylic model paints have high pigment density, thin well with water, and have great coverage on primed plastic, pewter, or resin.
If I had to rank model paints in terms of best model paint for wet blending, here’s my list in descending order:
- Vallejo Model Color
- Reaper Master Series
- Scale 75 Fantasy & Games
- Citadel Layer Paints
- Army Painter
- Citadel Base Paints
- Vallejo Model Air or Other Airbrush Ready Paints
I’m 100% sure I missed some of the favorite model paints, e.g., Kimera, the other Vallejo and Scalecolor paint lines, and quite possibly offended a few of you with my impression of these paints. But, I’m open-minded and as with anything I do with the hobby, I’ll try anything more than once. I love experimenting!
Side note: You can paint miniatures with oil paints. I love using oil paints when I’m looking to relax and enjoy the process of playing with color and blending paint. Oil paints take a very long time to dry or cure. I can “wet-blend” oil paints for hours on end, if I wanted to. In fact, using oils paints may teach you how to blend acrylic paints because the process is similar (with a few caveats).
Recommended Acrylic Model Paints for Best Results with Wet Blending
You can wet blend almost any model acrylic paint. The above are merely my observations from working with these paints on a lot of different models.

Not happy with your results?
It does take practice to wet blend.
Practice will get you pretty far. I’ve been painting a lot of rocks because I want to get better, too!
Just look at my painting desk.

Glazing, in this case, is simply taking your two paints (the two colors you already used), mixing them in a 1:1 ratio, and thinning them until they are translucent.
You can still use your dry palette for this, or move to your wet palette. Applying a thinned glaze will even out and smooth any unevenness in your wet blend.
Apply your glaze mixture in thin, very thin layers where you think the transition isn’t as smooth as you like it. Wait for each glaze layer to dry before applying the next.
If you’re like me, you could be glazing for hours….
Or, be a normal person, and take a step back.
Conclusion
Learning how to blend paint on miniatures, models, and other things….never ends.
Check out my painting gallery for examples of my work.
Best paints for wet blending on models and miniatures:
I’m always learning and discovering new ways to paint. You can check out what I’ve learned in my other articles about painting miniatures, modeling, and general hobbies.
And, more on the way!
I hope you enjoyed this article and found these tips helpful.
Thank you for reading!
Happy painting.
Enjoying your visit? Join Tangible Day
Free newsletter with monthly updates (no spam)
Leave a comment below! Follow on Twitter, Instagram, and Facebook.


Wet blending. that's a tough one. It's almost as much art as it is science for me. I've actually posted some of this before, but it wasn't anywhere as in depth as what I'm putting up today. The previous post on wet blending barely scratched the surface.
Wet blending can be done a bunch of different ways I'm sure. Just like everything else out there. Without any formal knowledge or training (as it relates to painting minis), this is how I decided to tackle the process and make it work in the few places I apply it to my models.
The difference between wet blending and layering and glazing
I think these few techniques get confused sometimes. for me, they are completely different things.
Layering is a process where I'll start with one color and then add additional "layers" of paint over that (usually lighter in value) leaving a little bit of the previous layer showing along a predetermined edge with each pass. This is a great way to "build up" highlights and have a smooth transition between the lightest color and the darkest color.
My layering is also usually done with opaque colors. You end up thinning them out so much that they start to loose their opacity, but most of time, you're looking to make a transition from one color to another or add a highlight/shadow to a spot on your model. Each layer goes on top of the previous one.
Sometimes folks even confuse glazing and layering. Glazing is where I use things like inks or washes to alter the original color. The difference for me being that I want to keep the original color, just add some subtle variety to it. For example, I have a red shoulderpad and I want to make it a rich red up top by adding a Gryphonne Sepia wash, but use a Leviathan Purple wash down near the bottom to cool the red down a bit to reflect the portion in shadow.
I'm still working with a red shoulderpad and I don't want to change it, just create some variety.

So how do you wet blend two colors?
Once I have the area on my model that I think warrants wet blending and not layering or glazing, I'll look at the colors I'll be using. Most of the time it's the base color and black or a very dark color for the shadow areas.
Depending on how opaque the base color is, I'll work one of two ways. In the example above, I wanted the cape to be more red than black, so I painted the entire thing red first. If I wanted it to be more black than red in the end, I would have started with black. It doesn't change the actual process, just where the final look of the piece falls. do you want it more dark or do you want it more like the base color?

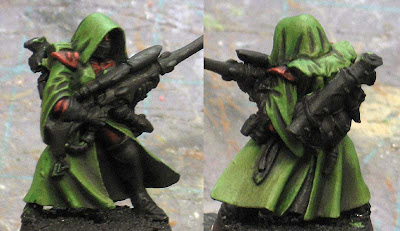
Since I wanted the banner to be more green than black, I started by painting the whole thing green. Once that was good and dry, I started with the blending. Since it's on the back of the banner, I went straight to black. I wasn't looking for anything fancy, just a deep shadow right along the banner pole.
(The far left picture)
I start by painting the area along the banner pole green again. As soon as I have a layer of wet green paint down, I go right over it along the deepest recess with black paint. Remember, you've got to work quick since the paint is drying as you're doing this.
Note: Some folks will say you have to use certain extenders or drying retarders to do this properly. I don't use any of that stuff. I just keep my areas smaller and have a plan before starting.
(The middle picture)
As soon as I have my two colors in place, I wipe any excess off my brush real quick and start blending my black into my green using long strokes running parallel to the banner pole. I only go out as far as I want my shadow to go.
The reason I start with the black in this case is because it's the color I just finished adding and I want to blend it outward from behind the pole.
(The far right picture)
As soon as I'm done with pushing my shadow color (the black) out into my base color (the green), I rinse my brush and dry my brush (leaving it slightly damp) and then I add a tiny bit of green to it and begin working from the pure green area back into the black.
This will push the shadow slightly back towards the banner pole or the point of origin. If it goes too far for your liking, all you need to do is switch colors back to black and make a few strokes to bring it (the shadow) out into the green again.
And the end result. The shadow is there along the banner pole and you can see that I've added a few more things to it overall.

Wet blending in different directions
Here's an example to show you that sometimes it's not just blending in one direction. The banner pole had the black go from pure black (behind the pole) outward in one direction into the green. The same was done on the other side, but I had the pole to hide behind. In the case of the folds on a cloak, you have nowhere to hide and you need to blend in each direction. left and right.
With this one, I started with a black base coat and built up to purple. I would start each fold with a thin line of purple along a the outer ridge of a fold and a thin line of black in the adjacent recessed areas.
Then I would blend the purple a little bit to the left and a little bit to the right down into the deep recessed areas along each side of each fold. In the case where I had to put my shadow back in, I added some black and blended out towards the ridges. In the case where my purple wasn't showing up enough, I repeated the purple portion again. Lots of quick back and forth.
And yes, that means each fold is done like this. You can see how the time adds up fairly quickly. In the original example, I started with the red base coat so that meant I had to add my black to the recessed areas and work it outward and up towards the high points. Any time I got too much black on a high point of a fold, I corrected it with red.
You can see how doing something like this can create huge problems when it comes to adding freehand over it. It's insanely hard to correct any mistakes over a super-fine blend like this. Most of time, you'll end up starting the whole thing over if you don't throw the model in the trash before that out of frustration.

But what about white?
Ah, the dreaded white. When it comes to this color, I don't use the wet blending route. I go with a layering approach. I'll start with a light grey color for my base and then add successive layers of white on the high points until I get (build up) the contrast I want. Same for the shadows if need be, I'll add thin layers of a slightly darker grey into the recessed areas. Usually I start with a dark enough grey that I don't have to do this.
For me, white is just not one of those colors I wet blend. Simple as that. Trying to blend white is far to problematic for me and I can get the results I like with layering and save myself all kinds of headaches.

And last but not least are multiple wet blends
Perhaps the hardest of all since the area you're working in is much smaller than what you'd probably like it to be. The only real trick to pulling this off is cutting back on the amount of paint you use and setting clear starting and ending point (imaginary) for where colors will start and stop. The blade of his weapon is a good example of a multiple wet blend. and in a very tiny area on top of that.
Wet blending has it's place. Most of the time I don't use it on models. Layering is the big one I use all the time. In the cases where you have something you want the super smooth blends on, you can't beat wet blending. My Deathwing armour is a good example of that. For the armour plates, I needed the smooth blends and so I had no other choice (outside of an airbrush maybe).
One final note about my brush, water and physically blending the paint
The trick for me with the blending is to have a "damp" brush. I take my brush, rinse it out and then lay the tip on my drying cloth. I just set the tip there for a few seconds until the majority of the water is wicked out of the brush tip. I don't press down on the towel with the brush to get all of the water out, only what will come out on it's own fairly quickly.
You just want it wet, but not so much that it contributes any water to the paint you're blending and accidentally thins it. The reason I get it wet is so that it doesn't absorb any paint when I put it down onto the surface of the model. If it were dry, it would wick up the wet paint and I don't want that. You want only enough water so the brush doesn't pick up paint. but not too much so it doesn't add any water to the paint either.
When you get it just right, you end up using the brush to blend and it does not draw up the excess paint and it does not add any water thinning out the paints. Then you just need to work fast because the paint is drying during this whole process.
UPDATE: The idea of using successive layers of washes in the recessed areas came up as an option to replace wet blending. While it does work, it has it's limitations and does not afford you the control that wet blending does. But. it is still a viable option.
For those interested in that approach, I have this post on that very technique. The post covers the whole model, but the portion on the cloak is where you'll want to focus.
If you've got any questions about something in this post, shoot me a comment and I'll be glad to answer. Make sure to share your hobby tips and thoughts in the comments below!
Читайте также: