
Arma 3 модули описание
Обновлено: 05.07.2024
This page can be considered a hub when it comes to Modules. Here you will find everything you need to know when it comes to creating modules, available modules in Arma 3 and existing module documentation.
TexView2

Меняем текстуру.
Теперь в GIMP или в другом граф.редакторе меняем текстурку под свой вкус.
The model configuration file (model cfg for short) is the interface between a (P3D) model and the program.
It is a look-up table which is processed during the binarization process, to tell the program what the various sections of the model are, which skeleton it uses and how it is animated.
This system is more flexible than the one previously used, because all the information is stored for the model and not for the object class in the main configuration file. This means that several object classes can use the same model and don't have to define the animations for this model seperately.
A goal of the system is to seperate the configuration of models into a designer and an artist part.
This is done by the introduction of a class AnimationSources in the main configuration file (the designer part) and the continuing use of the class Animations in the model cfg (the artist part).
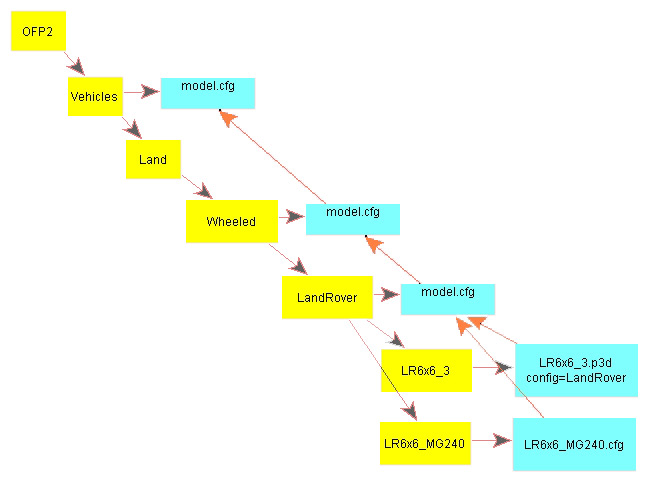
Most models will be able to inherit definitions from basic definitions on higher levels in the data hierarchy. An example hierarchy is described and illustrated below.
- p:\ofp2\vehicles\model.cfg - Defines a class Default.
- p:\ofp2\vehicles\land\wheeled\model.cfg - Defines a class Car.
- p:\ofp2\vehicles\land\wheeled\landrover\model.cfg - Defines a class LandRover.
- p:\ofp2\vehicles\land\wheeled\landrover\lr6x6_3 - In the model is a property config = LandRover (this feature is not implemented and may never be).
- p:\ofp2\vehicles\land\wheeled\landrover\lr6x6_mg240 - Has a LR6x6_MG240.cfg, which inherits from class LandRover and adds definitions for a turret.
Notes
At this stage the file is parsed during the binarization of a model and animations can be played in the program with user actions. Eventually they can be previewed using the Buldozer viewer.
The model cfg follows a set of naming conventions. There can be several model cfg files, named by default model.cfg, named after the folder name or named after a specific model. In the case that both a model.cfg and <foldername>.cfg are present, only the latter is parsed. The <modelname>.cfg is parsed alongside of the other model cfg files and therefore the model can be seen as an additional level in the hierarchy.
When we have an example folder called humr with a model called hmmwv.p3d, we can use the following names: model.cfg or humr.cfg and next to that a hmmwv.cfg.
In the future a model may support a named property called config, which tells the model which class in the model cfg to use. There is some doubt whether this feature will be implemented though.
There are model cfg files that do not relate directly to a specific model, but are used for the generic base class definitions, such as class Default.
The functionality of the animations has been extended, allowing to do in scripting what was done before using RTM animations. In addition, animation controllers were introduced, which allow for the control of different animations at the same time. This opens up possibilities like having several turrets on a tank.
The model cfg and main configuration file (where classes cfgModels, cfgSkeletons and Animations were previously defined) operate together to smooth the change from the old to the new system. When a model cfg and the main configuration file both define the same model, the model cfg takes precedence.
Segments
cfgModels
This segment defines all properties of each model. The class names correspond to the model name.
Here you define which sections the model has, which skeleton it uses and its animations.
cfgSkeletons
This segment defines the skeleton for the model and the bones that it uses.
Animations
This segment is part of class cfgModels and defines all animations used by the model.
Animation sources
source= is the controller that provides the data to the animation phase. It is declared in in cfgModels.ModelName.class Animations<. >. Inbuilt controllers are listed below. Custom controllers (source=user) can be constructed in config.cpp using cfgVehicles.ModelName.class AnimationSources <. >together with cfgVehicles.ModelName.class UserActions
Controller names marked by * are freely defined by vehicle turret configs. The values here show the names commonly used for ArmA vehicles.
Arma 3 Update 1.60 comes with a new way how to handle multiple muzzle animation sources for weapons:
- The following may be used with indexes ranging from -1 to (number of muzzles - 1) in format "name.x" (e.g. reload.0):
- revolving
- ammo
- ammoRandom
- reload
- trigger
- reloadMagazine
- hasMagazine
- isEmptyNoReload
- isEmpty
- zeroing
- weaponMode
Animation types
This table outlines the Animation Types you can use for an animation class.
Animation Properties
This table outlines the properties (or entries) that each defined animation class expects to be present based on the animation type that is specified.
Eg. If you specify a an animation type of 'rotationX' you must specify the animation properties 'angle0' and 'angle1'.
AnimationSources
This is not part of the model cfg, but part of the main configuration file. This class allows you to define new user controllers or modify selected properties of existing controllers.
Defining custom controllers makes it possible to use one custom controller for several different animations. If an animation does not define the source parameter, the program looks for a custom controller defined in this class with the same name.
It is also possible to override an existing controller using this class, but be extremely careful in this case. The custom controller will hide the original one, leaving the latter inaccessible. Overriding is done using the :: notation in the source parameter as can be seen in the third example.
Модель и Текстуры
Мы будем использовать ВАНИЛЬНУЮ модельку от BISов, просто добавим к ней новую текстуру. Давайте найдем подходящую одежду и перекрасим ее!
- Переходим в папку с игрой ARMA 3
- Далее в папке Addons ищем PBO файл characters_f.pbo
- Открываем ее с помощью PBO Manager
![Гайд по созданию собственной формы для ARMA 3]()
- c_poloshirtpants_1_co.paa
- c_poloshirtpants_nohq.paa
Это текстуры от модельки characters_f\civil\c_poloshirtpants.p3d (Если Вы работаете с 3DMAX можете переделать и саму модель)
Spawning a Module by script
A module can be created using createUnit. Same as normal units, a Group must be created first.
Since 1.86 the variable BIS_fnc_initModules_disableAutoActivation must be set to false in its init to allow its init code to run.General Information
- Modules are executed before initServer.sqf, initPlayerLocal.sqf and initPlayerServer.sqf (See Initialization Order)
- Modules are very easy to set up, even for unexperienced users
- They can easily be used to create mission templates
Необходимые инструменты
Для нашего примера хватит нескольких инструментов:
Creating a Module
Arma 3 introduces a module framework which aims to simplify the configuration of modules and the way their functions are executed (Globally,JIP)
Create a Module Addon
- Make a folder named myTag _addonName a create a config.cpp file in it.
- Inside, declare a CfgPatches class with your addon and its modules (in the units array). Without this, the game wouldn't recognize the addon.
- Make sure the addon and all objects start with your tag, e.g. myTag .
Module Category
- Modules are placed into basic categories which makes finding a desired module easier.
You can use on of the existing categories (See table to the right) or create your own category (See example below).
class displayName Effects Effects Events Events Modes Gameplay Modes GroupModifiers Group Modifiers Intel Intel NO_CATEGORY Misc Multiplayer Multiplayer ObjectModifiers Object Modifiers Sites Sites StrategicMap Strategic Supports Supports Creating the Module Config
- All in-game objects (soldiers, vehicles, buildings, logics, modules, . ) are defined in CfgVehicles class.
- All modules must inherit from Module_F parent class, either directly or through some additional sub-parent.
- Modules functions are by default not executed when in Eden Editor workspace. It can be enabled using is3DEN property, but that will also change format of function params.
2D Editor: The description is available after clicking on "Show Info" button when editing the module![]()
Eden Editor: The description is available after opening the modules' attributes window![]()
Configuring the Module Function
- Place class CfgFunctions to config.cpp. See Arma 3: Functions Library for more info about functions configuration.
Writing the Module Function
- Create the functions folder within the addon folder and place *.sqf or *.fsm files there.
- Example: \ myTag _addonName\functions\fn_ module Nuke .sqf
- Input parameters differ based on value of is3DEN property.
Default Example (is3DEN = 0)
Show text
Example Eden Editor (is3DEN = 1)
Show textWhen is3DEN = 1 is set in module config, different, more detailed params are passed to the function.
obj animate ["door_1_rot", 0];
интересный текст на экране
движение s1 к Zloi
s1 move getpos Zloi;
Скрипт на случайные разговоры. Вот пример, каждые 3 секунды бот будет говорить любую из этих восьми фраз, пока его не убьют.
while do
_sound = selectRandom ["akbar1","akbar2","akbar3","akbar4","akbar6","akbar7","akbar8"];
c1 say3d _sound;
sleep 3;
>;смена персонажа.
добавление оружия
geroy addWeaponItem ["rhs_weap_pkp", "rhs_acc_pso1m21"];
команда удаляет перечень объектов
разрешает повреждать юниты из перечня
ForEach [pulem, pulem2, pulem3, pulem4, strelok1, str2];
создаем вйпоинт для группы b
_wp1 = group b addWaypoint [[7997.26,9840.82,0],0];//добавляем вейпоинт
_wp1 setWaypointType "MOVE";//двигаться
_wp1 setWaypointFormation "ECH RIGHT";// правый клин
_wp1 setWaypointSpeed "FULL";//скорость полная
_wp1 setWaypointStatements ["true", ""];Как дойдешь и будешь готов,
waitUntil ;Повернись к игроку лицом
ivanov lookAt geroy;Дадим время на разворот
sleep 1;Замри
ivanov disableAI "move";Пистолет опусти
ivanov switchMove "Acts_AidlPercMstpSnonWnonDnon_warmup_2_loop";команда делает игрока не играбельным, а простым юнитом, что позволяет в кад-сцене им управлять командами на движение
а эта команда делает игроком юнита с именем geroy
Альтернатива выводу картинок в миссии.
["Путь к картинке",0,-0.10,13,0,0] spawn bis_fnc_dynamicText;
делаем игрока «пленным».
player setCaptive true;
выгрузка пехотинца
s1 leaveVehicle vert ;
как легко посадить бота на стул.
[имя, "SIT", "имя стула"] call BIS_fnc_ambientAnim;
условие на дистанцию в сгф
wpF setWaypointStatements ["true", "прописать команду на выход"];
команда на поднятия оружия.
прикрепляем флаг к БТР 80
fl4 setFlagTexture "ukr.paa";fl4 attachTo [btru, [0.85,-2,0.9]];
отключает ввод с клавиатуры. Используется в роликах.
закрывает технику для игрока.
jeepOne lock true;
удаляет маркер на карте
пропускает время.
заставляет юнит остановиться.
soldierOne stop true;
titleCut ["Guns of Steel","BLACK IN",2.5];
отключение двигателя
vert engineOn false;
выдаёт боту с именем s5 парашют
s5 addBackpack "B_Parachute";
рандомизация времени.
skipTime round random 24;
добавляют юниту в рюкзак прицел ПСО из РХС.
(unitBackpack this) addItemCargo ["rhs_acc_pso1m21",1];
юнит включает фанарик.
unit enableGunLights "forceOn";
vasya = group player createUnit ["B_Soldier_GL_F", position player, [], 0, "FORM"]; vasya allowDamage false;
Данный гайд не обучит Вас азам моддинга, а лишь даст толчок и покажет что сложного в этом деле ничего нет. Мы рассмотрим простейший пример ретекстуринга, который даст понять вам основы.
Читайте также:


