
Space engineers как включить свободную камеру
Обновлено: 04.07.2024
Для того чтобы управлять кораблем нужно подойти к кабине пилота и нажать "T". Так же можно подойти к любой взаимодейcтвовать с любой консолью. Находясь в корабле при посадке можно активировать или отключить магнитное шасси нажатием на "P"
Recipe
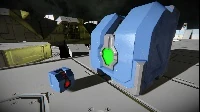
The Remote Control allows players to control a ship, typically, a drone or shuttle, from a distance, either manually or through autopilot.
Note that with this particular block, placement and rotation are essential for success. The screenshot shows the front. If you place the block the wrong way round, the drone/shuttle will fly sideways.
Autopilot and Wheeled vehicles
The autopilot does not attempt to propel or turn wheels of rovers.
- The autopilot insists on using gyroscopes to turn, like a space ship, which kinda works in a rover if you set the wheels to low friction. The autopilot will also attempt to use gyroscopes to recover after a rover catches air during a jump.
- The rover needs either thrusters or you must set up a Propulsion Override on all wheels. Remember to invert propulsion on the second side. You will have to turn on the propulsion override yourself, or set up timers or sensors to toggle the overrides on and off at waypoints, the autopilot won't do it for you.
Collision avoidance and precision mode are not applicable for rovers.
Warning: The low friction/propulsion override workaround for rovers is only viable on flat terrain, the autopilot cannot handle driving uphill like that.
For land vehicles, it's also essential that the waypoints are recorded at the exact same height as the remote control block on the vehicle, for the waypoint to be detected. Because, in contrast to spacecraft, a rover in gravity cannot freely move in 6 directions to align with the coordinates. If the suspension is a bit higher or lower, it might struggle to reach the waypoint
Beyond that, if you need reliable autopiloted land vehicles, it may be better to look into scripts shared on the Steam Workshop.
Manual Remote Steering
A remote-controlled ship without cockpit and oxygen supply is often called drone. Advantages are that drones can be built lighter and more compact, and if a drone should get destroyed, the player's health is not affected. Downsides are low range of the required antenna and a restricted (fixed first-person) view.
Requirements
- In order to remotely access a target ship, both sides (the controlling ship and the controlled ship) must have an Antenna owned by or shared with the player.
- The target ship must have a Remote Control block that is owned by or shared with the player.
- For steering, the player accesses the target ship's terminal and activates the Remote Control block using the "Control" button. Then steer normally using WASD by default.
Warning: Remote steering relies on the settings and range of the Antenna. If the Antenna is not set to broadcast, the player's grid will lose contact or be unable to communicate with the remote drone. This means the effective range of a remote controlled drone is limited to the lowest broadcast range of either side. (The autopilot function, in contrast, does not rely on antenna range.)
Tip: A remote control can replace a broken or missing cockpit in a pinch.
Steering
While linked, the player is able to pilot the target ship or rover as though sitting in its cockpit.
To break the control link, press the 'F' key. If either antenna stops working, or either ship moves out of broadcast range, the link is broken as well.
Seeing where you’re going
Note that using the Remote Control block does not change the viewpoint of the operator! Engineers usually combine the remote control block usage with at least one forward-facing Camera on the drone ship.
Add the camera's view action to the toolbar and you'll be able to see from its point of view. The only way to look around, however, is to pitch/yaw the whole ship. You cannot press V to switch into third-person perspective, as you can in a cockpit. To close the camera view, press ‘F‘.
Autopilot
The remote control block also has an autopilot function that can be used to control shuttles. A shuttle is a ship with gyroscopes and thrusters plus other functionality of your choice, such as an airtight passenger cabin or large cargo containers. A cockpit or antenna are allowed but not required to use the autopilot function, you just need to be able to access the control panel somehow (for example directly through a terminal).
To configure the shuttle’s autopilot behaviour, you must first prepare a list of waypoints on the Autopilot Modes
The autopilot operates in one of three modes.
- Patrol - Patrolling means the shuttle will travel back and forth on a linear path. The autopilot moves the ship to each waypoint on the list, starting from the top. When the bottom waypoint is reached, the autopilot processes the queue backwards. When the autopilot reaches the top of the queue, it repeats the patrolling path forwards again, until you tell it to stop.
- Circle - If the waypoints form a closed circle or rectangle, choose circling. The autopilot moves the ship in accordance with the queue, and then repeats the queue starting again with the first waypoint.
- One Way - The autopilot moves the ship in accordance with the waypoint queue and stops at the last waypoint, then toggles off autopilot automatically. This is useful to send a shuttle once manually, and have it wait for further instructions.
Autopilot: Precision Mode
Toggle on Precision Mode for more accurate drone navigation. In precision mode, the autopiloted drone aims to stop exactly on each GPS waypoint set, using the Remote Control Block as the center point of the vessel. The advantage is that the drone can follow a path through a base or narrow mining tunnels. The downside is that it will brake often and accelerate again, the drone will waste power/fuel and travel only slowly.
When Precision Mode is off, the autopilot aims for a general area of about 50 meters around the waypoint. The advantage is that the Autopilot will use the fastest means to approach each waypoint. The downside is that it will often overshoot waypoints because of high speed. Once the way point is deemed close enough, the autopilot will continue on to the next GPS waypoint without braking. This faster mode works well for patrolling open space, but is not recommended for drones navigation inside bases or near obstacles!
It's important to remember that the GPS coordinates of the waypoints are aligned with the position of the Remote Control block, especially when you want to position a ship at a connector. Optimally, you Autopilot: Collision Avoidance
Collision Avoidance adds basic sensor functionality to the Remote Control block. The autopilot will attempt to brake to avoid crashing into obvious obstacles like, say, an asteroid.
The best that Collision Avoidance can accomplish is that the drone doesn't total itself. After braking, do not expect the drone to search for a new path by itself! It will wait for you to provide additional waypoints.
If you switch this on and the drone does no longer dare to fly, some obstacle (or even the drone's own blocks) might be too close to the remote control sensor, which confuses it. In this case, try placing the remote control in the very front.
Terminal Use
- On/Off
- Name
- Show on HUD
- View
Камера
Для смены положения камеры зажмите Alt. Вы можете переключить камеру на вид от третьего или первого лица нажав "V". Вид из кабины пилота доступен только для малых кораблей. При пилотировании больших кораблей доступен только вид от третьего лица, т.к. большие корабли управляются с пульта управления и все данные выводятся непосредственно на экран.
Для того чтобы управлять кораблем нужно подойти к кабине пилота и нажать "F". Так же можно взаимодейcтвовать с любой консолью. Находясь в корабле при посадке можно активировать или отключить магнитное шасси нажатием на "P"
Камера
Для смены положения камеры зажмите Alt. Вы можете переключить камеру на вид от третьего или первого лица нажав "V". Вид из кабины пилота доступен только для малых кораблей. При пилотировании больших кораблей доступен только вид от третьего лица, т.к. большие корабли управляются с пульта управления и все данные выводятся непосредственно на экран.
Материалы сообщества доступны в соответствии с условиями лицензии CC-BY-SA, если не указано иное.
The Camerais a block used as, for example, a surveillance camera in your factory, an aiming aid of a fighter, or it can be a drone's "eyes". When you activate the camera, your engineer's view switches to the camera's view. You activate the camera either by accessing it through terminal and pressing the "View" button, or by assigning the camera View action to the toolbar and activating it there.
Press 'F' to exit the camera view.
If you have activated the camera from a cockpit, you can still pilot the ship normally using WASD and the mouse. The steering directions are judged based upon the cockpit's orientation, so this can be disorienting if the camera is pointed in another direction.
The view's rotation corresponds to the camera blocks's orientation when it is built: When placing the camera block, make sure that the "CAMERA" text is along the upper edge, and the little light is in the bottom left.
While viewing through the camera, use the mouse scroll wheel to zoom in and out. This can be helpful to evaluate asteroids and enemy grids from afar.
Contents
Читайте также: